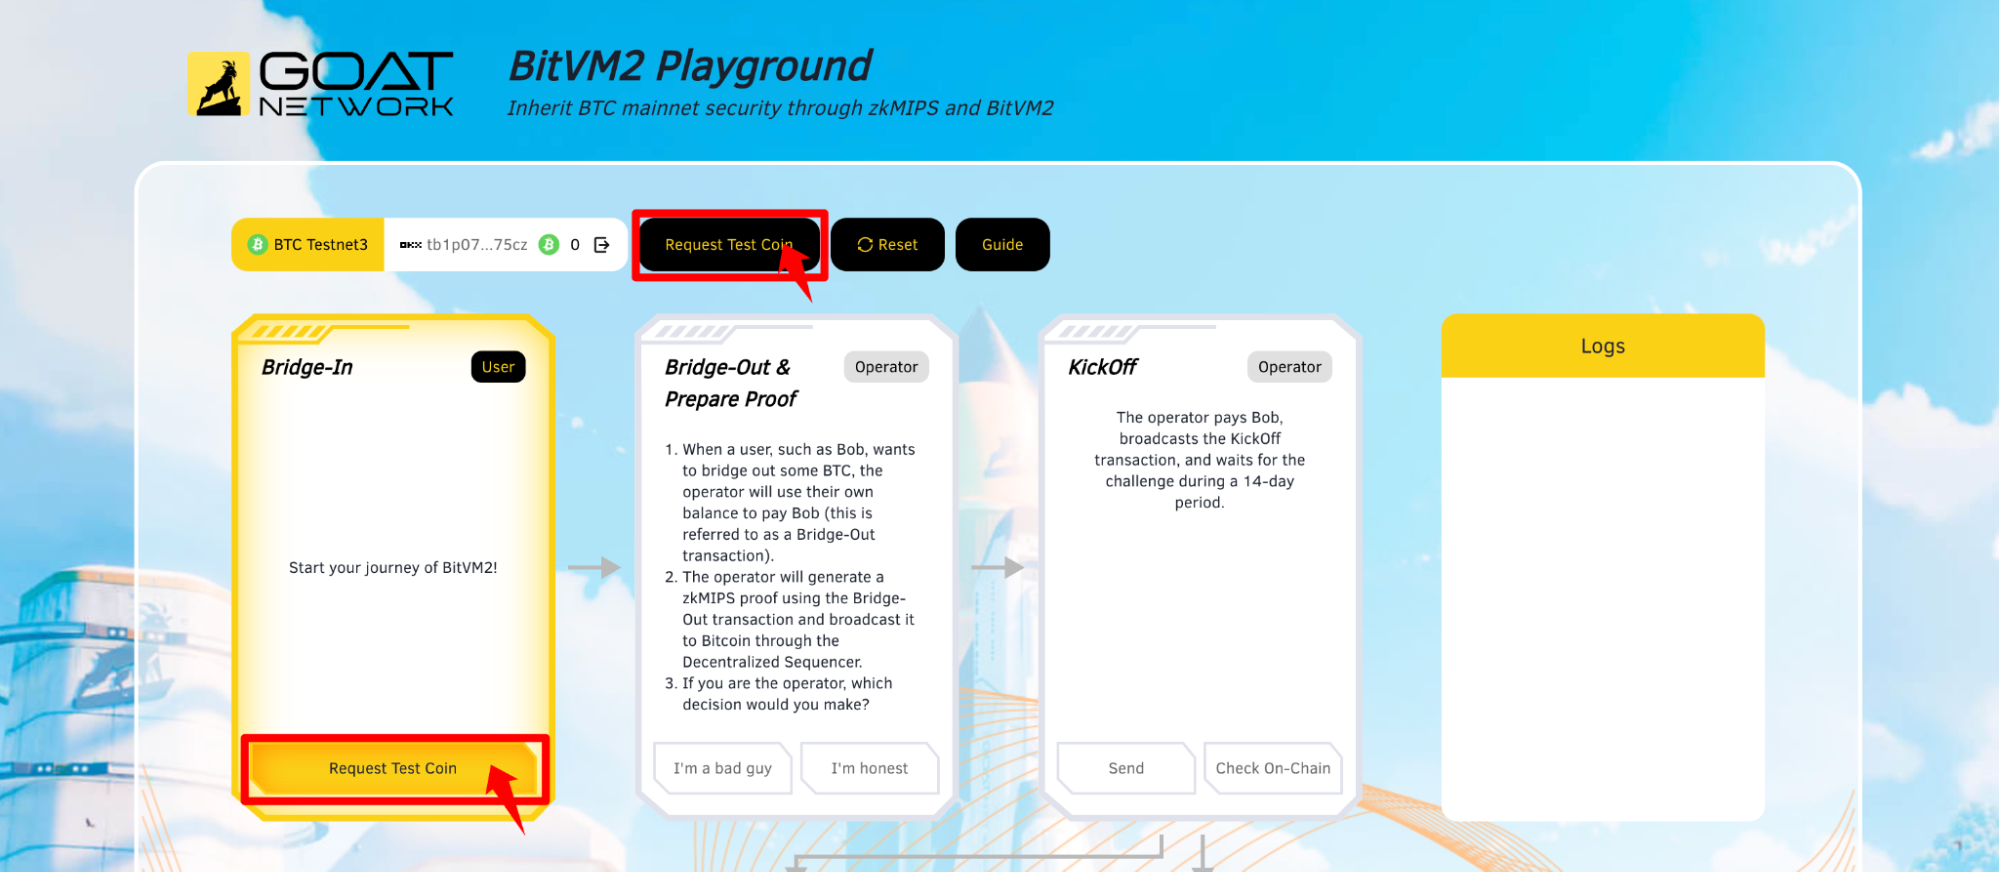
BitVM2 Playground Guide
Introduction
Welcome to the BitVM2 Playground! Here, you can see what it feels like to run the BitVM2 protocol with zkMIPS to verify the GOAT Network's valid zero-knowledge proof; whether you’re a high-level dev or a regular Joe!
Our goal is to leverage zkMIPS and BitVM2 tech to implement a Bitcoin Layer 2 network, without compromising security or creating Bitcoin forks, while enhancing programmability and scalability. No matter your level of blockchain knowledge, try out our BitVM2 Playground to experience the future of Bitcoin now!
User Instructions
Preparation
- Connect Wallet
Please connect your BTC wallet. We support Unisat wallet and OKX wallet.

- Request Test Coins
Claim your BTC Test Tokens. Then, start your BitVM2 Playground journey.

Step 1: Bridge-In
First, a regular user initiates a Bridge-in transaction, which will be broadcast to the network.
- Click the
Sendbutton to open your wallet for signing.

- When the transaction is successful, the
Check On-chainbutton will become clickable. Click it to view theOn-chaindata.

Step 2: Bridge-Out & Prepare Proof
When a user (let’s call him Bob) wants to bridge out some BTC, the operator will use their own balance to pay Bob (referred to as a Bridge-Out transaction).
The operator will generate a zkMIPS proof using the Bridge-Out transaction and broadcast it to the Bitcoin Layer 1 network via our Decentralized Sequencer.
If you are the operator, what decision would you make?
- If you choose to fake the zkMIPS proof, you need to enter an integer between 0 and 614, then click the
I'm a bad guybutton.

- If you don't fake any transactions, please click the
I'm honestbutton directly.

Step 3: KickOff
The operator pays Bob and broadcasts the KickOff transaction, and waits for the challenge with a period of 14 days.
- Click the
Sendbutton to open your wallet for signing.

- When the transaction is successful, the
Check On-chainbutton will become clickable. Click it to view the on-chain data.

Step 4-1: Take-1
If no challenge occurs during the entire 2-week potential challenge period, that tells us the operator behaved honestly. The operator can broadcast the timelocked Take-1 transaction and get the reimbursement successfully.
- Click the
Sendbutton to continue.

- Because you chose to trust the operator, the operator will broadcast the timelocked Take-1 transaction and get reimbursed successfully. Your user journey has now come to an end.

Step 4-2: Challenge
A challenge transaction is pushed and this will spend the output of the KickOff transaction by script path (which indicates the operator can not go to Take-1).
- Click the
Sendbutton to continue.

- When the transaction is successful, the
Check On-chainbutton will become clickable. Click it to view the on-chain data.

Step 5: Assert
The operator must disclose the zkMIPS verifier Tapscripts via an Assert transaction, or they cannot proceed to the Take-2 path. In simple terms, that means:
- Click the
Sendbutton to continue.

- When the transaction is successful, the
Check On-chainbutton will become clickable. Click it to view the on-chain data.

Step 6-1: Disprove
If you, the challenger, revealed an error in one of the operator's committed Tapscripts, you issue the Disprove transaction, and it will execute the corresponding verification subscripts to check if this is a valid challenge. If the proof is disproved, the operator will lose the locked BTC and you can win the rewards. In simpler terms:
- Click the
Sendbutton to disprove.

- In the second step, the operator did not falsify the zkMIPS proof, and the challenge failed. You can now proceed with Take-2.

- In the second step, the operator generated a fake zkMIPS proof, and the challenge succeeded. Your user journey has now come to an end.

Step 6-2: Take-2
If no valid disprove action occurs before the end of the 2-week disprove period, the operator gets reimbursement from the GOAT Federation in the Take-2 path and wins some extra rewards.
- Click the
Sendbutton to continue.

- When the transaction is successful, the
Check On-chainbutton will become clickable. Click it to view the on-chain data. Congratulations on completing this journey!

Additional Features
- Check On-chain
At any step, users can click the "Check On-chain" button to view the current transaction status in the blockchain explorer.
- Reset the Game
At any step, users can click the "Reset" button to return the page to its initial state and start a new transaction process.
- Logs
After each step, users can view the corresponding transaction information in the log window. By clicking on the TXID, you can check the on-chain transaction details.
Notes
-
If transactions remain "Processing" for a long time, it may be due to network congestion. Please wait patiently or reset the game.
-
The BitVM2 Playground is just a demo that enables users to see BitVM2 technology in action; it does not create real transactions. Please feel free to use it, as no transactions with real assets are required.