GOAT BitVM2 Testnet3 Beta
Introduction
GOAT BitVM2 Testnet3 Beta was born to enable efficient interoperability between the Bitcoin and the GOAT Network.
BitVM2 is a permissionless bridge protocol that enables Bitcoin to verify arbitrary off-chain computations without a hard fork, using presigned transactions, one-time signatures, and SNARK proofs. It improves capital efficiency over BitVM by allowing anyone to challenge and penalize a faulty operator within three on-chain transactions and a delay of no more than 2–3 weeks, though it remains impractical for real-world deployment.
GOAT BitVM2 extends BitVM2 into a standard Bitcoin zkRollup by solving key limitations such as operator double-spending, inefficient reimbursement, and lack of incentives mechanism. GOAT BitVM2 can allow any operator to finish the reimbursement in 1 day with the powder of zkMIPS and multi-round randomized challenge mechanism, and prevent the operator’s double spend issues by verifying the Rollup chain’s consensus lightclient.
Combined with GOAT Network’s decentralized sequencer and zkMIPS, GOAT BitVM2 enables GOAT Network to be the first native Bitcoin zkRollup with real yield. See more at GOAT BitVM2 White Paper (opens in a new tab).
GOAT BitVM2 Bridge Guide
Bridge In
-
The bridge-in function is available to everyone.
-
Connect your BTC wallet and EVM wallet.

-
Choose the amount you want to bridge in. Click [Max] to select 0.1 BTC.

-
Select the fee rate for the Bitcoin network — this affects the processing speed of your transaction.

-
Click [Next] to proceed to Step 2.

-
In Step 2, wait for the Operator to generate the BitVM2 Graph. Click [Refresh] to update the progress.

-
In Step 3, carefully review the transaction details and click [Submit] to submit the transaction.

-
In Step 4, your transaction has been successfully submitted. You can click [Peg-in Txid] to open the block explorer and track the transaction status.

-
Once the transaction is successful, the funds will appear in your receiving wallet.
Bridge Out
Path 1
-
Only Operators participating in Peg-in can use this path to bridge out a specific amount of BTC.
-
Simply connect your EVM wallet.

-
Select the amount you wish to bridge out.

-
Click [Approve] — your wallet will prompt an approval window. Please approve the maximum amount you intend to transact.

-
After the approval is successful, return to the interface and click [Submit]. Your wallet will prompt a transaction confirmation window. Confirm the transaction and pay the gas fee.

-
In Step 2, this indicates you have successfully kicked off the process. You can click [BitVM2 Graph] to track the bridge-out progress.

-
Once the bridge-out is successful, the funds will appear in your receiving wallet.
Path 2
-
Other users and Operators not participating in Peg-in transactions can use this path to bridge out PegBTC to the Bitcoin mainnet.
-
Exchange PegBTC for BTC on the GOAT network through GoatSwap;
a. Switch to testnet in GoatSwap.

b. Select PegBTC as the payment token in the Swap.

c. Use the token address "0x626eDC7aF114Fa6EA80e260400A926C301Cc92d9" to locate PegBTC.
d. Select BTC as the receiving token in the Swap;
e. Confirm the transaction amount and click [Swap Anywhere] to proceed with the exchange.

- Bridge out BTC from GOAT network to Bitcoin mainnet through GOAT Bridge;
a. In GOAT Bridge, select the Bitcoin chain and use the bridge out function.

b. Detailed steps for bridging out can be found in the GOAT Bridge User Guide.
History
Bridge In
After your bridge-in transaction is successfully submitted, you can check this data in the transaction records.


Bridge Out
After your kick-off transaction is successfully submitted, you can check this data in the transaction records.

BitVM2 Graph
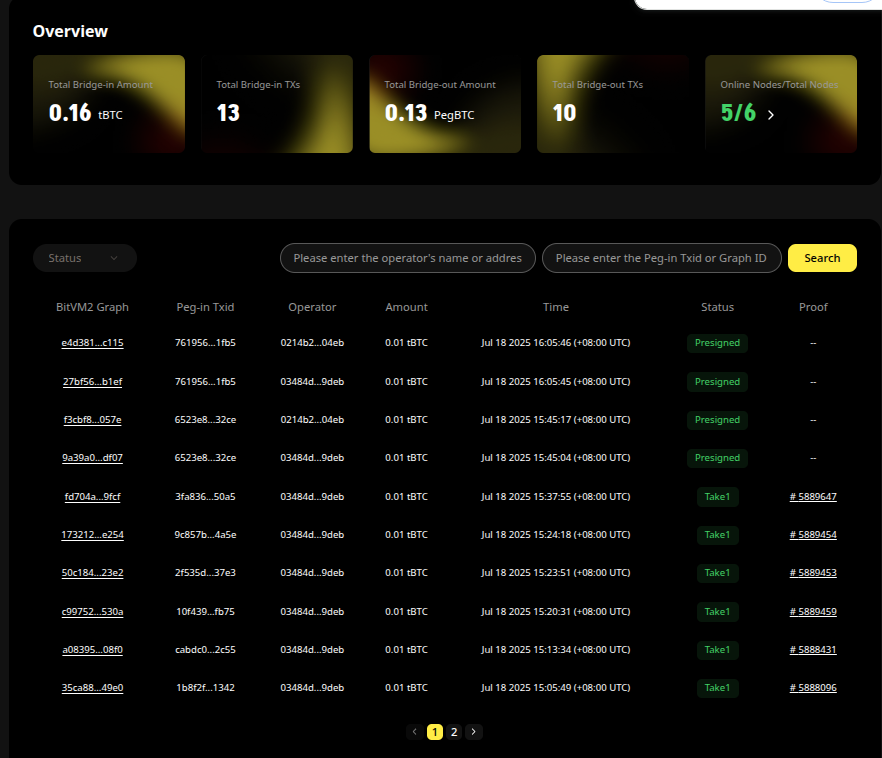
There are 4 cases for each BitVM2 graph.
Case 1. Only peg-in transactions have occurred so far; no operator has initiated a peg-out yet.
Case 2. The Operator initiated a peg-out. With no challenges initiated, the Operator received reimbursement. The Graph has progressed to the Take 1 stage.
Case 3. The Operator initiated a peg-out, and a challenger raised a dispute. The challenge was successful, proving Operator misconduct. The Operator did not receive reimbursement. The Graph has progressed to the Disprove stage.
Case 4. The Operator initiated a peg-out, and a challenger raised a dispute. The challenge failed, indicating a malicious or invalid challenge. The Operator was successfully reimbursed. The Graph has progressed to the Take 2 stage.
Proofs
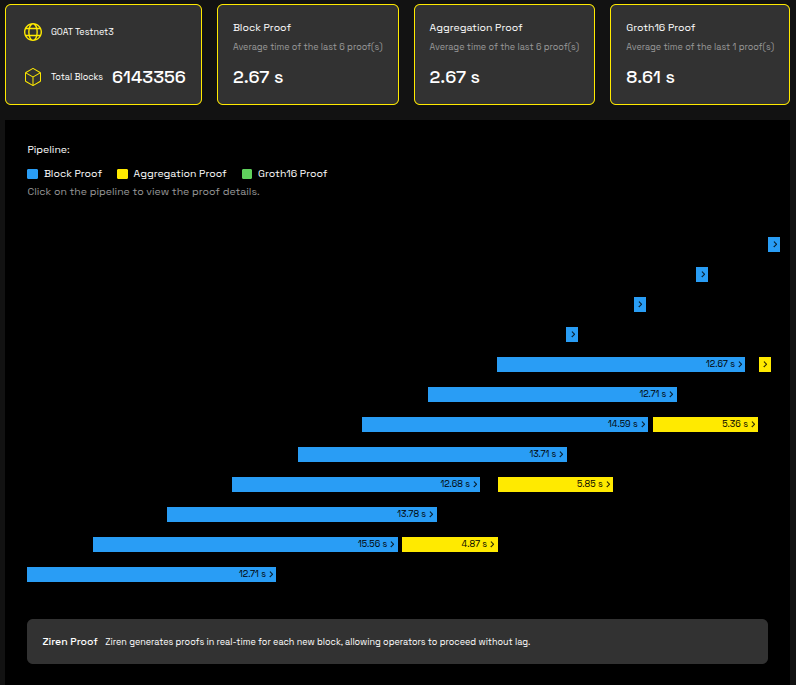
The real-time proving is now live on BitVM2 Testnet3 Beta. This major milestone is the first implementation of a BitVM2 Bridge capable of generating and verifying withdrawal proofs in sync with block production - without delay or backlog.
The system is powered end-to-end by Ziren, ZKM’s production-grade zkVM and proving stack, delivering the throughput, latency, and compression required to make peg-outs on Bitcoin usable in practice.
Key features
-
Instant kickoff availability powered by Ziren: Achieved a block proof average of 2.6s, aggregation proof in 2.7s, and Groth16 proof in ~10.38s.
-
Comprehensive proof visualization: Introduced a dedicated proof UI that displays the full proof generation pipeline and detailed validity proofs for each peg-out.
-
Capital efficiency for operators: Without real-time proof generation, delays accumulate block by block. This can force operators to wait days or weeks to withdraw.
Proof UI
Entrypoint: https://bitvm2.testnet3.goat.network/proof (opens in a new tab)
-
Track live proof generation:

-
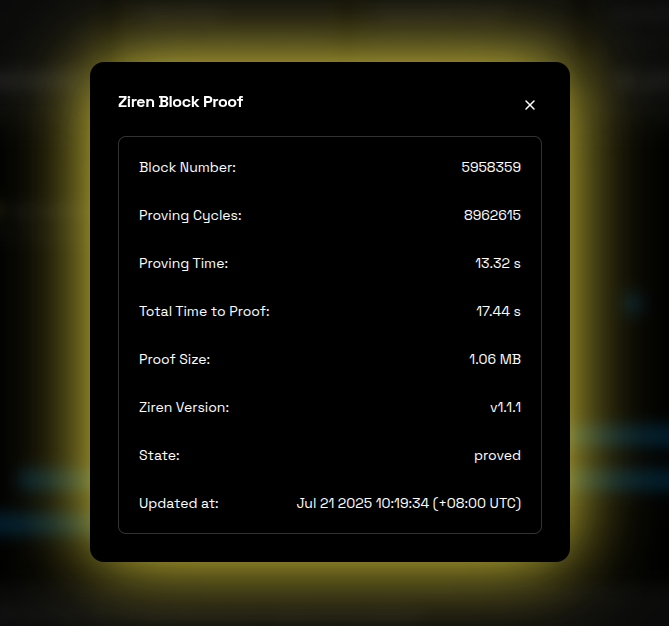
Click on the pipeline to inspect detailed proof stages:

Note: A single proof takes ~13s, but with five provers running in parallel, average time per proof drops below 3s.
-
Dashboard: Displays BitVM2 transaction graphs and proof records:

-
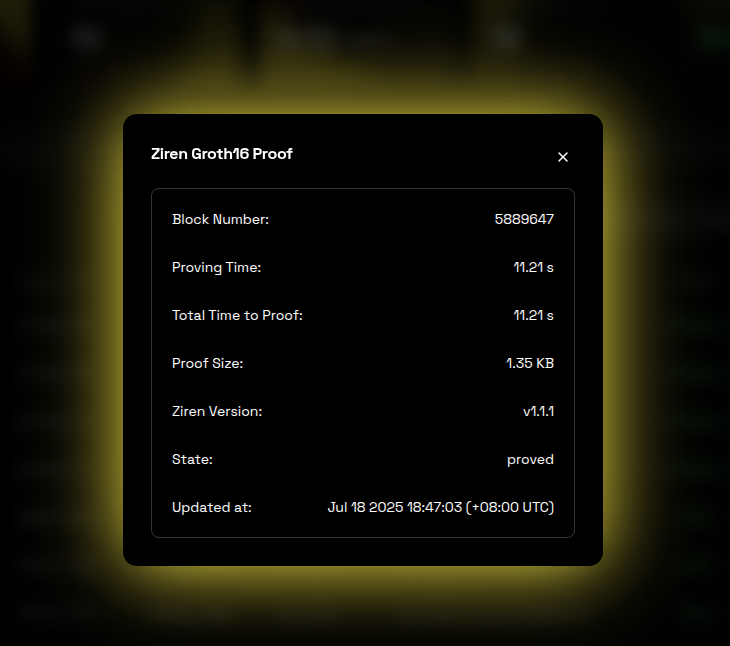
Click a proof: View the Groth16 proof used for corresponding reimbursement:

Join GOAT BitVM2 Testnet3 Beta
Roles Overview
GOAT BitVM2 allows any user to become an operator or challenger. From the perspective of Optimistic Challenge, an operator acts as a prover while a challenger acts as a verifier. The functionality of those two roles is outlined below in Table 1.
| Role | Functions | Honesty Assumption |
|---|---|---|
| Operator | Anyone can be an operator: 1) Generate ZKP Exchange PeggleBTC to native BTC with users Kickoff the reimbursement from Committee; 2) Generate the preimage of the hash time lock to each watchtower | 1/∞ |
| Challenger | Anyone can be a challenger: 1) Verify the validity of the reimbursement from operators offchain; 2) Submit the challenge transaction on Bitcoin to force the kick off to unhappy path; 3) Once the kickoff is on the unhappy path, and the operator unveils all the execution trace(Circuit F below), verify finds the flaws in the execution trace, and can spend the UTXO from Assert transaction, and stop the operator to continue the reimbursement. | 1/∞ |
Table 1: The Roles in Optimistic Challenge
More details see our GOAT BitVM2 White Paper (opens in a new tab).
To become an operator or challenger, you need to run a BitVM2 Node.
BitVM2 Node
Installation
- Build from sourcecode
git clone https://github.com/GOATNetwork/bitvm2-node
cd bitvm2-node
cargo install --path ./node bitvm2-noded- Install with binary
Download the binary from bitvm2-noded releases (opens in a new tab).
- Use docker
Use the docker image bitvm2-node (opens in a new tab).
After the installation, run the bitvm2-noded --version to check that the version should be 0.1.0.
$ bitvm2-noded --version
bitvm2-noded 0.1.0
Or run bitvm2-noded --help to check out all the usage information.
Run a Node
You generate a file .env in your workspace, you can also download a .env template from here (opens in a new tab).
# required
ACTOR=

# required
GOAT_GATEWAY_CONTRACT_ADDRESS=0xc3c2D73FB80cbc10DD85B6896e639D47ebd21B01

# required
GOAT_CHAIN_URL=https://rpc.testnet3.goat.network

# required
PEER_KEY=

# required, operator and challenger should setup its BTC private key, committee can setup a seed string.
BITVM_SECRET=

# optional, relayer only
GOAT_PRIVATE_KEY=

# optional, operator only
GOAT_ADDRESS=

# network id
PROTO_NAME=bitvm2t3

# Bootnodes, optional
BOOTNODES=- ACTOR : It can be
ChallengerorOperator. Anyone can be a challenger (opens in a new tab) or an operator, but the operator needs to be whitelisted in this stage. - PEER_KEY: Node peer key, you can generate the peer key by below command.
$ bitvm2-noded key peer
PEER_KEY=
PEER_ID=- BITVM_SECRET: your Hex-format private key, which is used to submit a challenge to the operator's reimbursement in BitVM2 graph.
After you set up the .env, you need to deposit some tBTC(Bitcoin Testnet) to your P2WSH address, which can be generated by:
$ bitvm2-noded key funding-address
Funding P2WSH address (for operator and challenger):  tb1q…
It prints a P2WSH funding address, and the funding amount for each role is listed below.
| role | balance amount(tBTC) |
|---|---|
| Challenger | 0.12 |
| Operator | 0.23 + Peg-in-amount * 0.02 |
The funding is held by your private key and serves as the stake required to initiate a reimbursement or challenge.
Run the node using the below command.
bitvm2-noded --bootnodes ${bootnodes} -d --rpc-addr localhost:8081 --p2p-port 8443 --db-path ${path-to-workspace}/bitvm2-node.db Or by docker
docker run -d -v ${data to path}/:/var/data -v $PWD/.env:/app/.env --env-file .env -p 9100:9100 -p 8443:8443 ghcr.io/goatnetwork/bitvm2-node:${version}Where the bootnodes can be one of the following.
Bootnode0: /ip4/34.210.83.80/tcp/8443/p2p/12D3KooWL2CpYGRmohyCK72B9Ee2A3mX83GhUJ8Duf7bqq9uNnQw