

Merchant Portal
Overview
The GOAT Flow Merchant Portal is your management dashboard for registering your merchant identity, setting up payment methods, managing the team, keys, and webhooks, viewing payment operations and fee credits, and publishing QuickPay links/products or configuring API Payments routes.
Portal Navigation
The portal sidebar is grouped as:
| Group | Pages |
|---|---|
| Overview | Dashboard |
| Payments | All Orders · Refund Requests · Disputes · Reconciliation |
| Payment Setup | Payment Guide · Crypto Payments · Card Payments (Stripe) · PayKit Settings |
| QuickPay | Accept Any Amount · Sell Products |
| Developer | API Keys & Webhooks · MPP Routes |
| GOAT Flow Fees | Fee Balance · Top Up Fee Balance |
| Account & Security | Profile · Team · Security · Audit Logs |
Dashboard
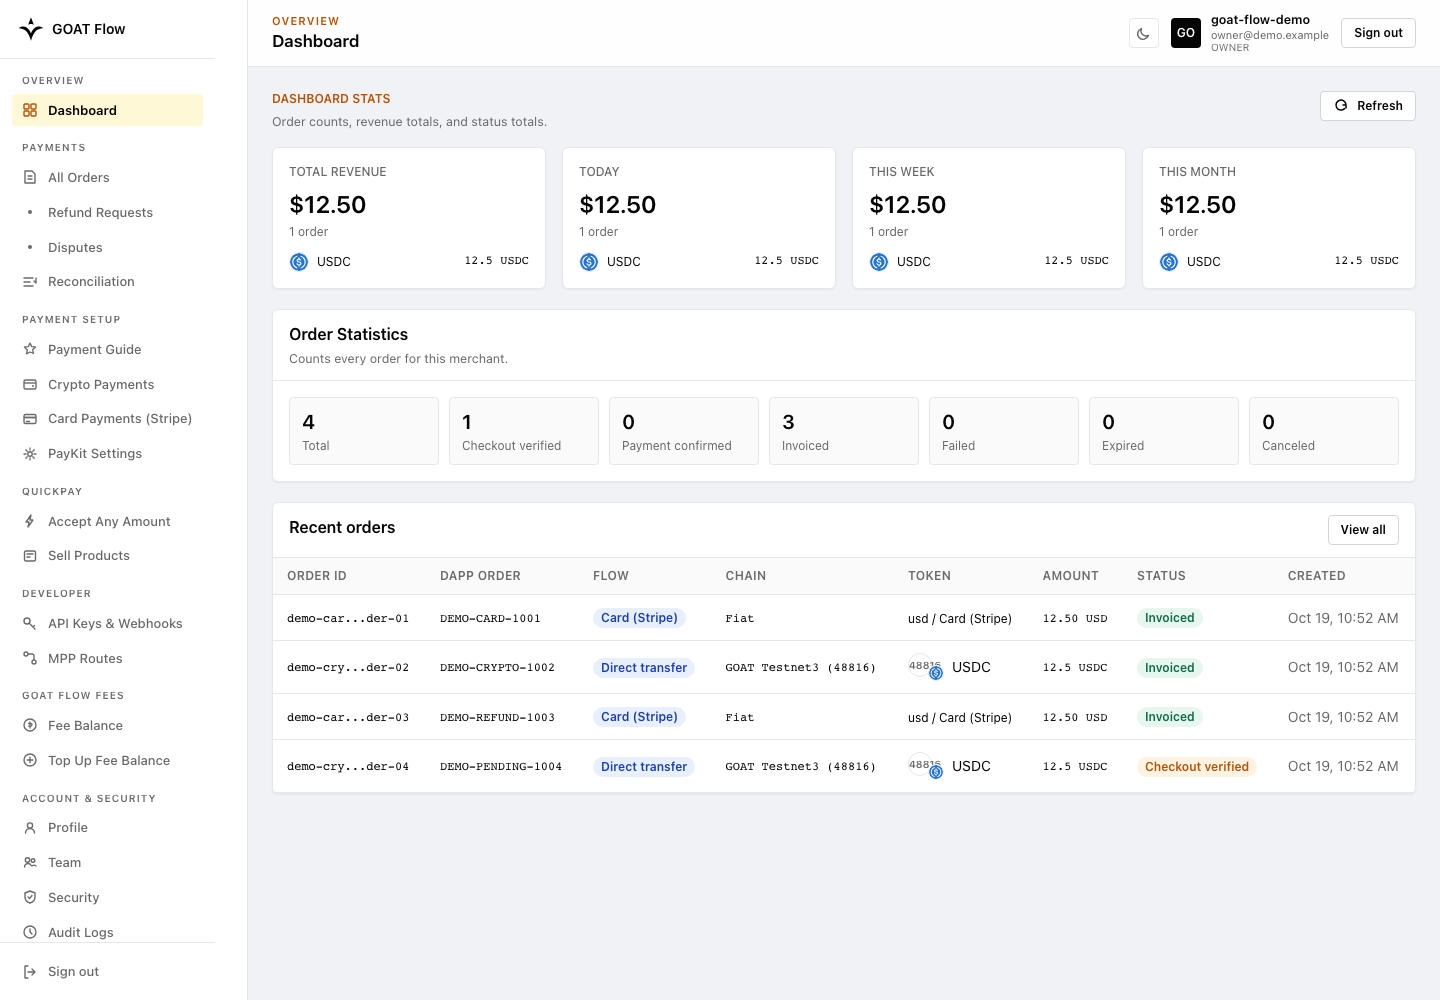
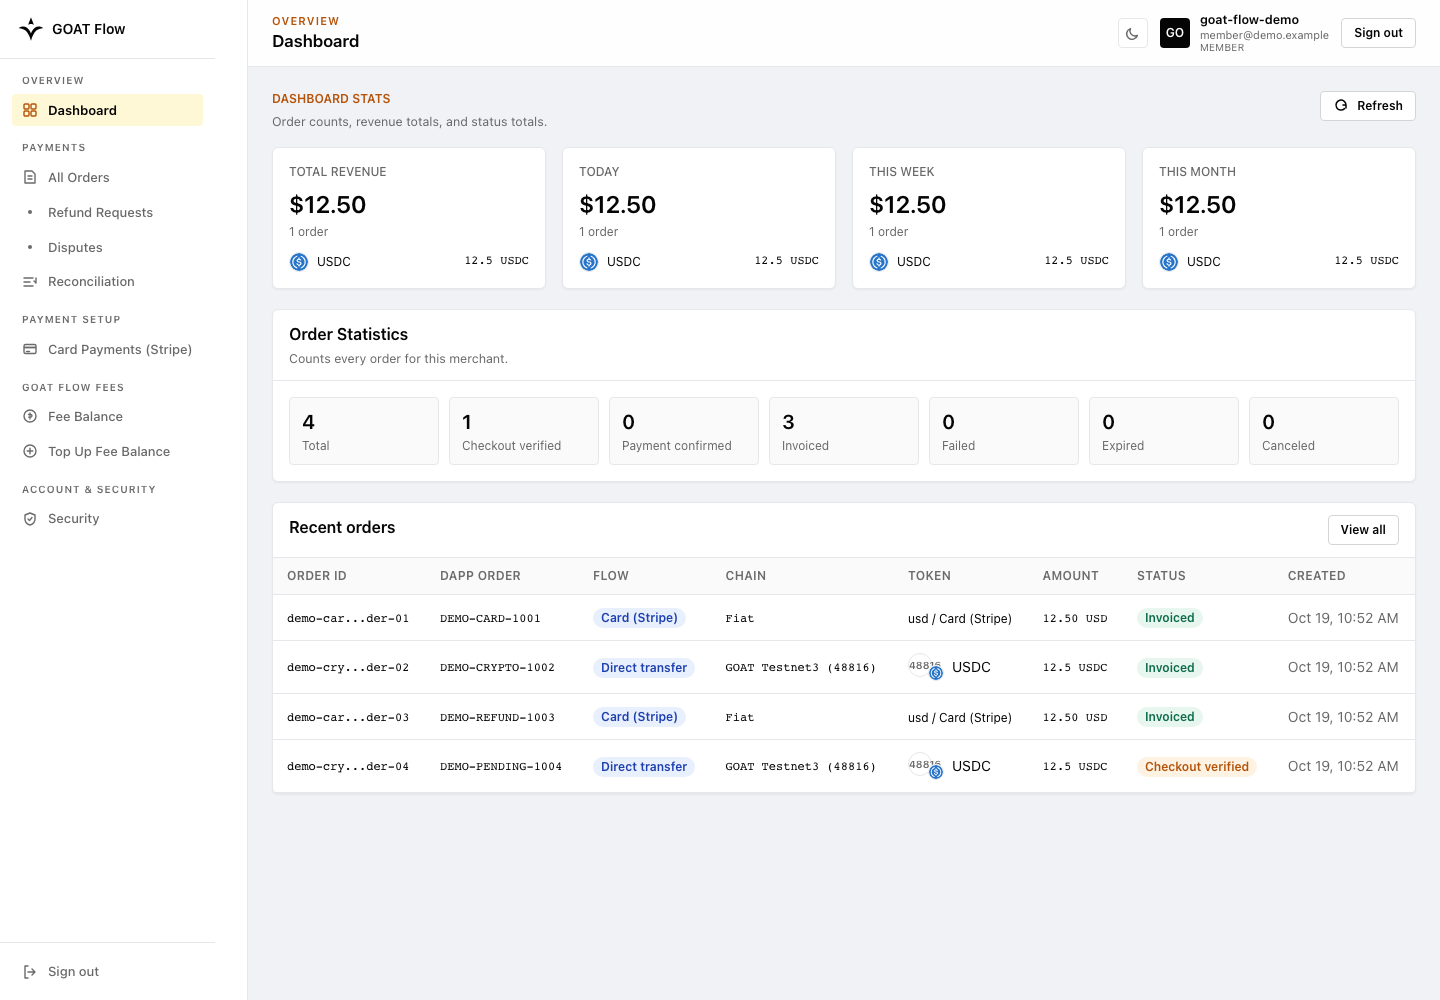
After login, the owner lands on the Dashboard page.
Setup reminder
The Dashboard setup reminder checks Receiving set up and Payment method. Receiving is ready when you have a Crypto receiving configuration or an eligible Stripe account. A customer payment entry point must also be configured; having a wallet or connected account alone does not publish a payment link.
Select Resume setup or open Payment Setup → Payment Guide to complete onboarding.
Dashboard statistics
Dashboard Stats show revenue and order totals as cards:
| Card | Description |
|---|---|
| Total Revenue | Cumulative order revenue and order count |
| Today | Today's order count and volume |
| This Week | This week's order count and volume |
| This Month | This month's order count and volume |
Order Statistics counts every order by state: Total, Checkout verified, Payment confirmed, Invoiced, Failed, Expired, Canceled. A Recent orders table lists the latest orders and identifies Card (Stripe) payments with their fiat currency and amount rather than a Crypto token amount.
Stripe TEST payments do not count toward revenue and do not enter reconciliation reports. They can still appear in order statistics and order details, so a successful test with unchanged revenue is not a missing order. LIVE Card revenue accounts for successful refunds and disputed amounts not yet recovered. Revenue is shown by token or fiat currency; it is not a currency conversion or a guarantee of a Stripe bank payout. See Order Reconciliation for reporting details.
Getting Started
Choose the environment, register your merchant account, and sign in after approval. Then follow the Payment Guide to prepare your payment methods and customer entry points.
Access and Environments
Treat Production and Testnet3 as separate deployments.
| Resource | Production | Testnet3 |
|---|---|---|
| Merchant portal | https://flow-merchant.goat.network | https://flow-merchant.testnet3.goat.network |
| Flow API / standalone MPP Core | https://flow-api.goat.network | https://flow-api.testnet3.goat.network |
QuickPay and Checkout URLs come from the active portal or Checkout Session response, not from hostname substitution. The PayKit library derives its public API paths from the trusted QuickPay link origin.
Keep separate merchant records, users, credentials, secret-manager entries, receiving wallets, webhook endpoints/secrets, fee balances, products, MPP routes, logs, alerts, and runbooks.
Do not derive production configuration from Testnet3 examples or screenshots. Read chain IDs, token contracts, decimals, limits, fees, RPCs, explorers, and enabled capabilities from the active environment. Order IDs, nonces, idempotency keys, and wallet addresses are also environment-specific.
Before launch, create a reviewed production configuration record from the live portal and API.
Before You Begin
- Keep Mainnet and Testnet3 merchant IDs, credentials, wallets, webhook secrets, receiving addresses, and configuration separate.
- Use the active portal, manifest, challenge, or API response as the source of current configuration.
- Never share API secrets, webhook secrets, private keys, TOTP setup data, recovery codes, active invite codes, or unredacted personal and wallet data.
Setup path
| Step | Action | Detailed home |
|---|---|---|
| 1. Register | Create the merchant account and owner user; wait for approval | Registration and approval |
| 2. Complete Payment Guide | Confirm business details, set up Crypto and/or Card, then choose how customers pay | Payment Guide |
| 3. Prepare access | Configure the chosen solution; create backend API credentials for server-side integrations | API Keys & Webhooks and QuickPay |
| 4. Integrate | Present the selected payment entry point and confirm results through a trusted backend flow | Checkout, QuickPay, or API Payments |
| 5. Test and launch | Validate payment, fulfillment, reporting, and operations before production launch | Go-Live Checklist |
The Payment Guide has three screens; complete the remaining integration and launch checks separately.
Register a Merchant Account
Open the Registration Page
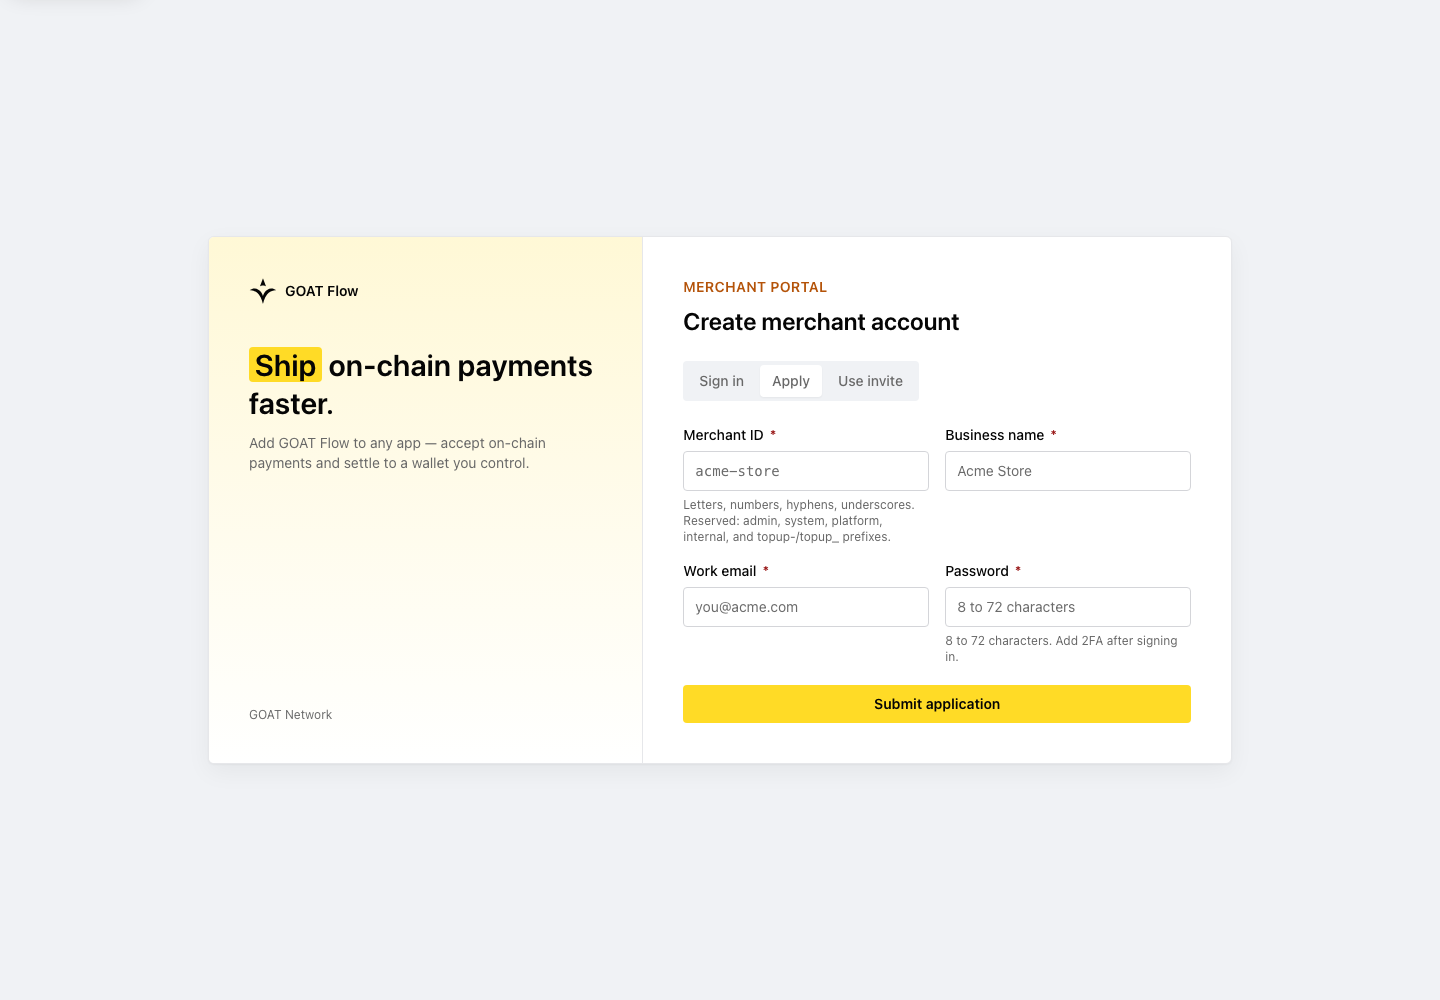
Visit the Merchant Portal and select Apply to open the registration form.
Fill in Registration Details
The registration form includes:
| Field | Description | Format Requirements |
|---|---|---|
| Merchant ID | Unique merchant identifier; cannot be changed after registration | Letters, numbers, hyphens, and underscores only. Reserved IDs and topup- / topup_ prefixes are not available. |
| Business name | Display name; can be changed later | Any merchant display text |
| Work email | Owner login email | Valid email address |
| Password | Owner login password | 8 to 72 characters. Set up 2FA after signing in. |
Submit Application
Click Submit application when done.
After submission, the portal confirms that the application is pending review:
Registration submitted. Your account will be available after application review and approval. No access token or session is issued until then.
The applicant is not signed in and no access or refresh session is issued until the application is approved and the owner account is activated.
Approval and Sign In
Application Review and Activation
After registration, the application enters review. Approval enables the merchant account. QuickPay and MPP are separate capabilities; inspect Profile or the relevant setup page to see whether they are enabled for the account.
Sign in
The portal provides Sign in, Apply, and Use invite tabs.
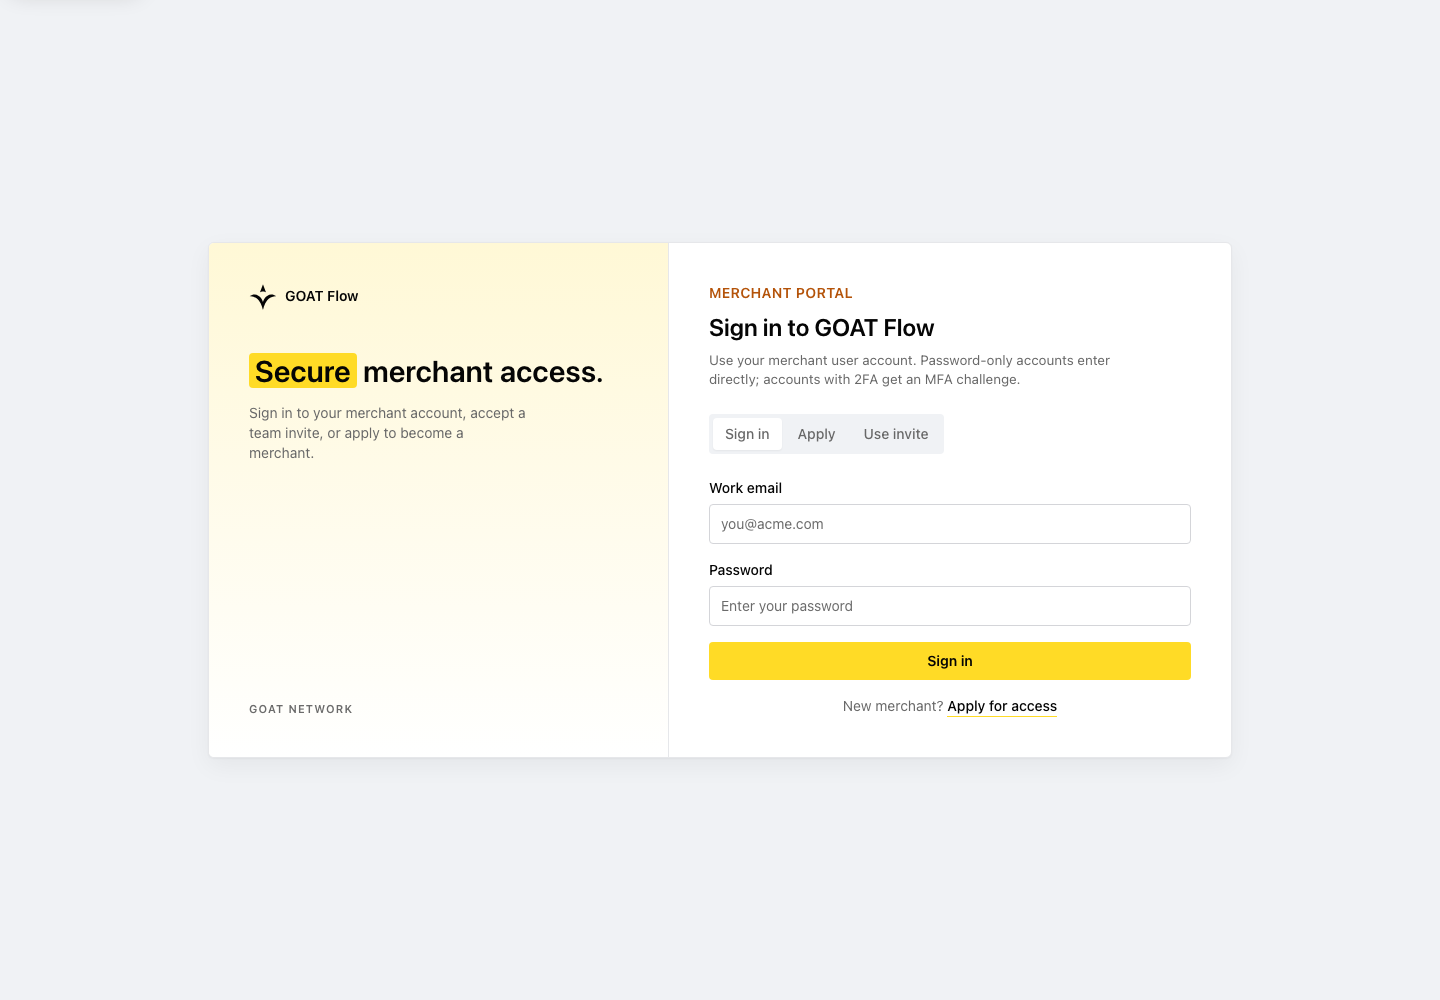
Once approved, enter the work email and password used during registration. If 2FA is enabled, complete the TOTP or recovery-code challenge before entering the dashboard.
If login fails, the generic invalid email or password response does not
distinguish an invalid credential from an activation or account-state problem.
If the credentials are correct but access still fails, contact
Support@goat.network to confirm the account state
or request a reset.
Payments
Use Payments to review orders, track Card refund requests and disputes, and reconcile collected payments.
All Orders
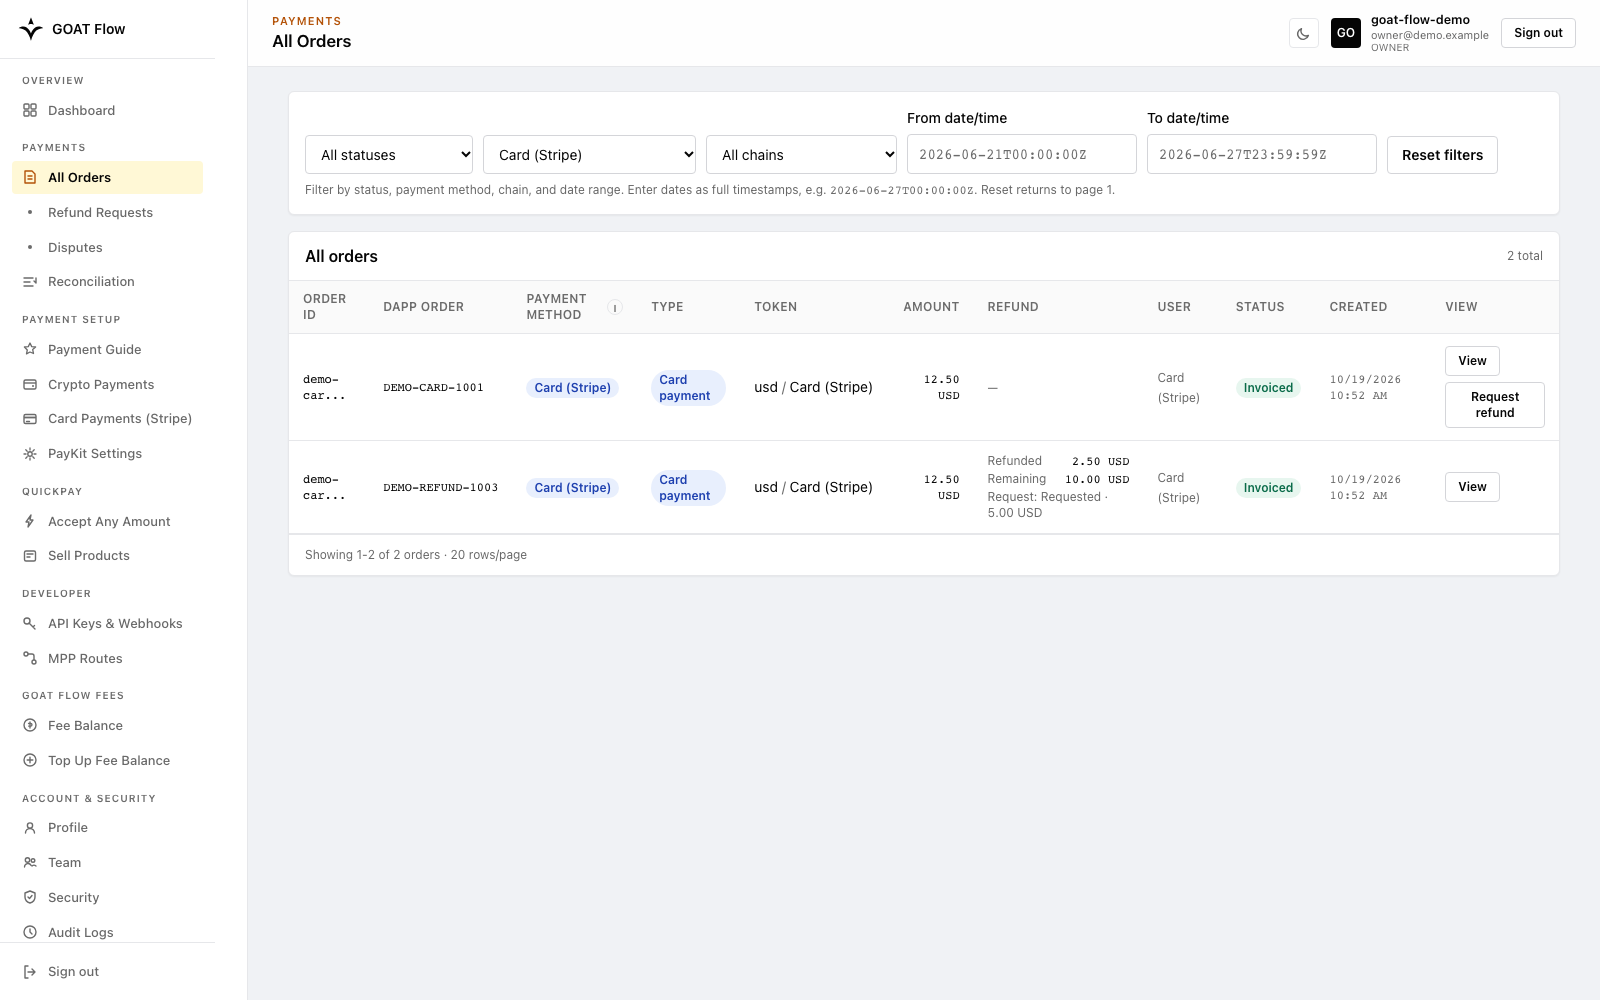
Open Payments → All Orders to view Crypto and Card orders.
Filters
| Filter | Options |
|---|---|
| Status | All / order statuses |
| Payment method | Includes Direct transfer and Card (Stripe); historical flow labels may also appear |
| Chain | Crypto chain filter; use All chains when reviewing Card orders |
| From / To | Full timestamp range |
Order List Fields
| Column | Description |
|---|---|
| Order ID | System order ID |
| Dapp Order | DApp-side order number |
| Payment method | Direct transfer or Card (Stripe); historical flow labels may also appear |
| Type | Order type, such as GOAT Flow payment |
| Token / currency | Crypto token, such as USDC, or fiat currency / Card (Stripe) |
| Amount | Crypto token units or the Card amount in the order's fiat currency |
| Refund summary | For Card: refunded, in-flight, and remaining refundable amounts, plus an active request when present |
| User | Crypto payer address; Card orders are identified as Card (Stripe), not a wallet payer |
| Status | Order status |
| Created | Creation time |
| View | Opens the order detail dialog |
Click View to inspect the order and method-specific payment record:
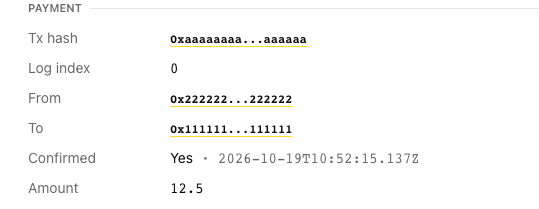
- Crypto: chains, token contract/decimals, receiving address, payer,
transaction hash, expiry, memo, and confirmation details. A
Payout Txcolumn does not mean GOAT Flow holds or later pays out DIRECT Crypto funds; the buyer's tokens move directly to the merchant receiving address. - Card (Stripe): fiat currency/amount, LIVE or TEST mode, Stripe payment status and provider references, and refund information. Card chain/token/address compatibility fields are not an on-chain payment and must not be interpreted as a wallet transfer. Owners see Request refund only on eligible orders.
Crypto payment record
Card payment record
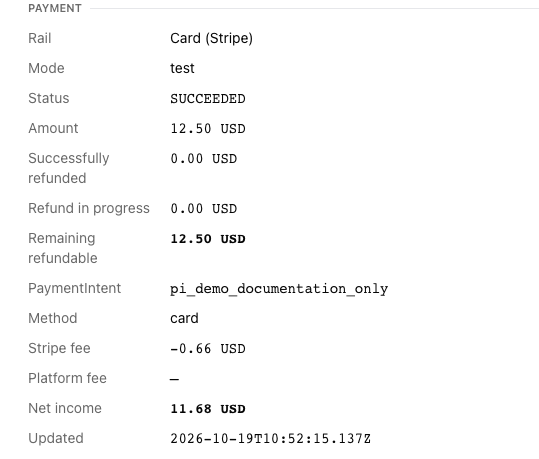
These images focus on the public payment-record fields. The example records are illustrative, not blockchain transactions or Stripe charges.
Order status and fulfillment
Current SDK order status values include:
CHECKOUT_VERIFIEDPAYMENT_CONFIRMEDINVOICEDFAILEDEXPIREDCANCELLED
The TypeScript waitForConfirmation() and Go WaitForConfirmation helpers
return on PAYMENT_CONFIRMED or INVOICED, and also on FAILED,
EXPIRED, or CANCELLED; returning does not mean payment succeeded or delivery
is allowed. Core can advance a DIRECT Crypto order from
PAYMENT_CONFIRMED to INVOICED in one watcher transaction, so a poller may
observe only INVOICED.
A Card order can remain PAYMENT_CONFIRMED while fulfillment is held, including
duplicate-payment or payment-conflict cases. Do not ship based on that status
alone. Order completion (INVOICED) and Checkout Session completion
(COMPLETED) belong to different status models; inspect the appropriate trusted
backend result and any restrictions before delivery.
Completion is only one fulfillment input. Verify the merchant and business order/session identifiers and the expected amount. For Crypto, also check the chain, token, recipient, and transaction; for Card, check currency, mode, and Stripe payment association. Make fulfillment idempotent so a webhook retry or status poll cannot ship twice. See the central Status Values.
For Crypto, getOrderProof() / GetOrderProof() returns a server-issued payment record.
Its historical signature field is an unsigned Keccak256 digest of
order_id, tx_hash, log_index, from_addr, to_addr, amount_wei, and
from_chain_id, concatenated without separators in that order. It does not
cover status; verify the transaction hash on-chain when independent proof is
required.
Refund Requests
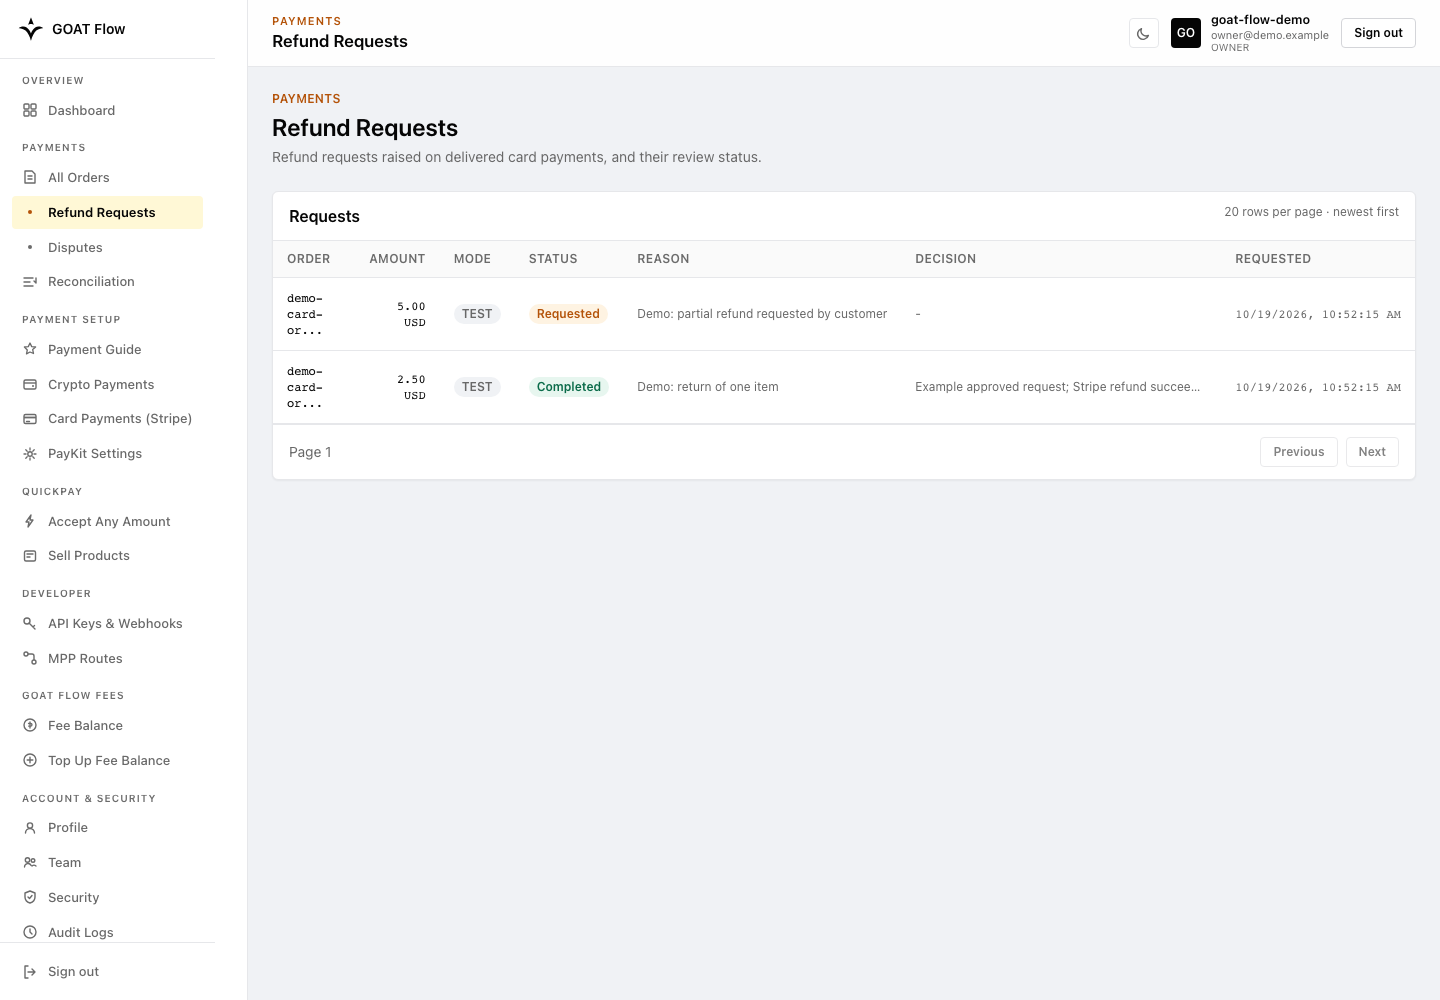
Use Payments → Refund Requests to track a Card refund from review through processing. Start a new request from the eligible original order in All Orders.
- As an Owner, open Payments → All Orders and locate the original Card
order. Request refund is offered for eligible delivered (
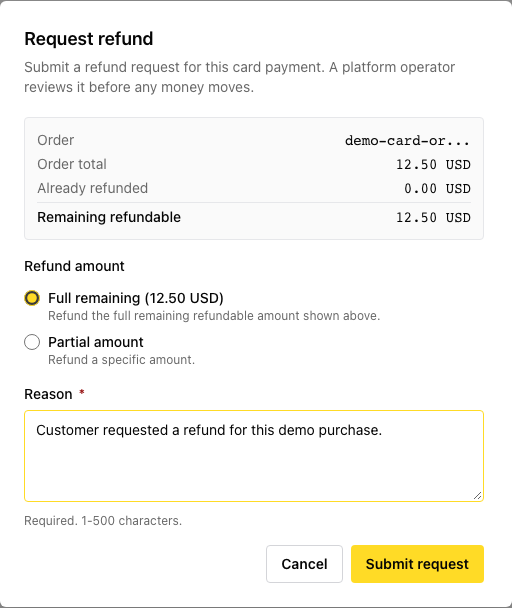
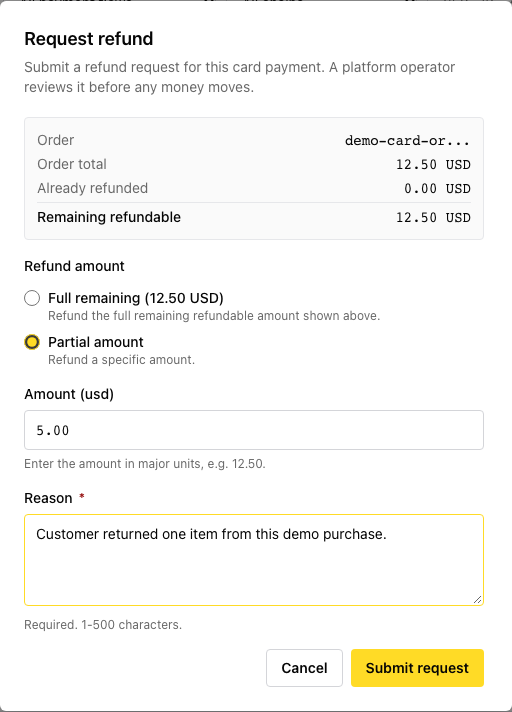
INVOICED) Card Checkout orders, not MPP orders. Remaining refundable amount, existing requests, and other eligibility checks can prevent a new request. - Select Request refund. Review the original amount, already refunded amount, amounts in flight, and remaining refundable amount. Choose Full remaining or Partial. A partial amount is entered in the order currency and must not exceed the remaining refundable amount. Supply the required reason and submit.
- Open Payments → Refund Requests to track review and processing. A platform administrator reviews the request before it is sent to Stripe. An approval is not a completed refund and does not mean the customer has received funds.
- Track the request and associated Stripe refund result through completion or failure. Keep the request ID, order ID, provider references, and internal support case together. Do not submit a second request just because processing or the customer's bank credit is delayed.
| Request status | Meaning |
|---|---|
REQUESTED | Submitted for platform review |
APPROVED | Review approved; processing has not necessarily completed |
PROCESSING | Refund processing is in progress |
COMPLETED | Request processing completed; check the Stripe refund result and customer bank timing |
REJECTED / FAILED | Review declined or processing failed; inspect the recorded reason |
Full remaining refund request:
Partial refund request:
Track review and processing separately from the original payment:
Disputes
Open Payments → Disputes to view the order, Stripe dispute reference, amount/currency, LIVE/TEST mode, reason, status, evidence due time, and outcome. Treat action-required notices and evidence deadlines promptly.
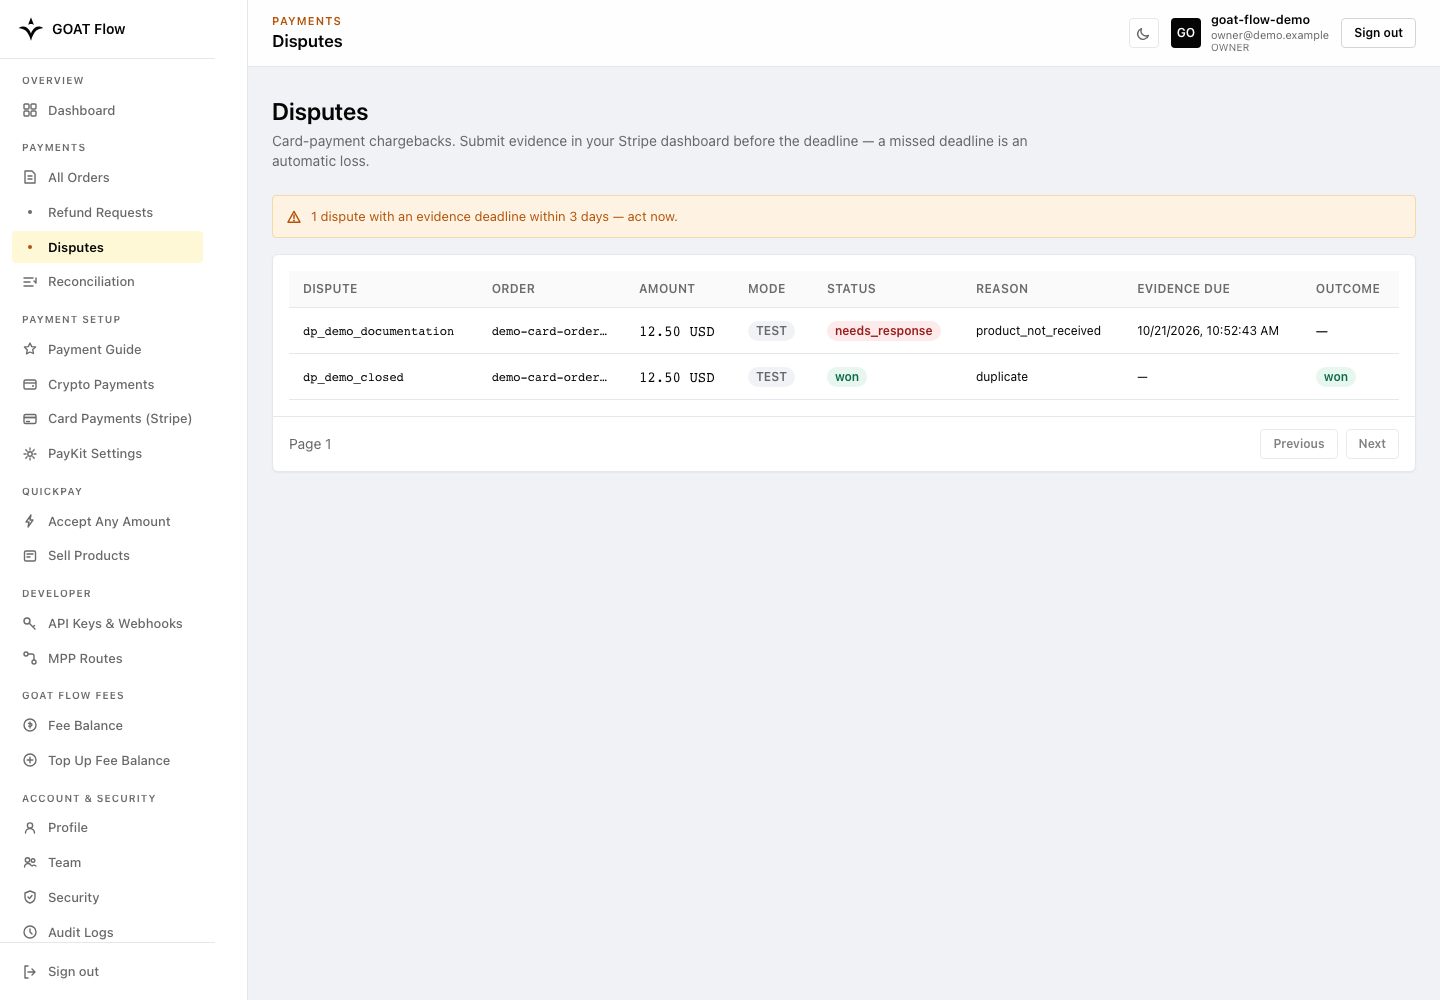
The portal is a read-only dispute view. Submit evidence in the connected
account's Stripe Dashboard, not in the Merchant Portal, and use the correct
LIVE/TEST mode. Coordinate access with the Stripe account owner, then track the
outcome in both systems. Use fiat.dispute.* webhooks for notifications without
relying on notification delivery as the only way to discover a deadline.
These Card workflows do not reverse Crypto transfers. A cancelled or expired order is not a refund, and a Crypto return requires a separately verified return transaction. Escalate unsupported cases with secrets and personal data removed.
Reconciliation
Payments → Reconciliation provides accounting-oriented reports. Filter by Chain and a From/To date range, then Apply. Summary cards show Total Orders, Matched Payments (confirmed), Unpaid Orders (waiting or expired before payment), and Late Payments (received after expiry).
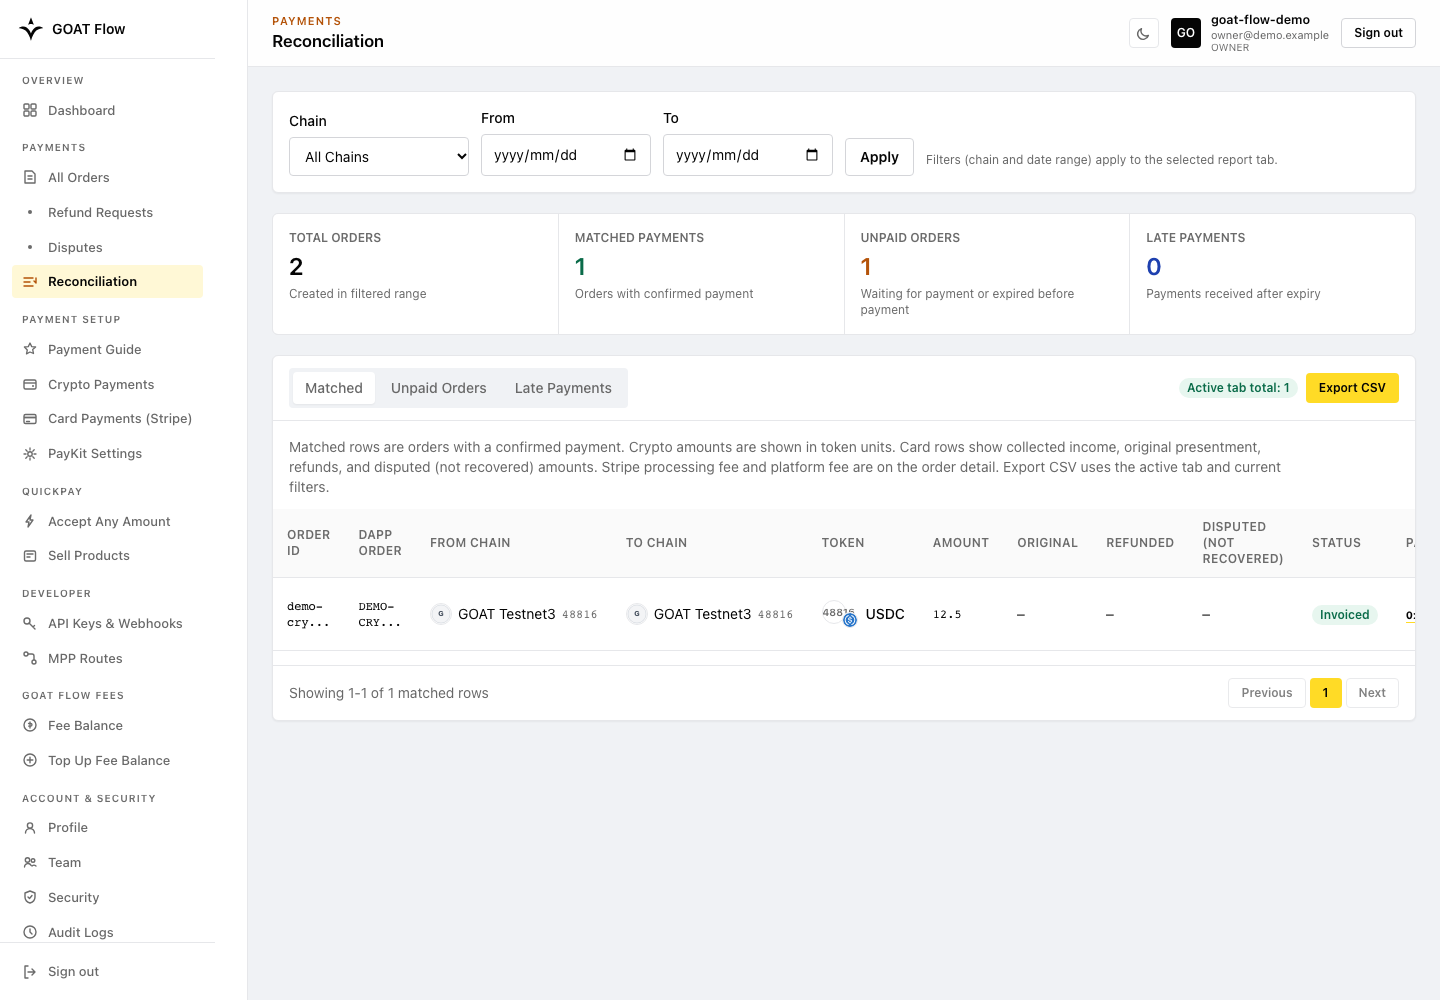
Three report tabs — Matched, Unpaid Orders, and Late Payments — show the corresponding order/payment rows. Export CSV exports the active tab under the current filters.
- Crypto: token amounts use normal display units, with chain and transaction references. Do not combine different tokens as if they were one currency.
- LIVE Card: rows use fiat currency and Stripe payment references, not token decimals or blockchain hashes. Matched rows show collected income, original presentment, successful refunds, and disputed amounts not recovered. Collected income accounts for those refunds and unrecovered dispute amounts; it is not the same as a Stripe bank payout or net profit after all fees. Stripe processing and platform fee details are available in the order detail.
- Stripe TEST: payments do not enter reconciliation reports or revenue. Inspect their order/payment details instead. An unchanged report after a test payment does not mean the order was lost.
Keep the Chain filter at All chains when reviewing Card records. Compare reports in the same environment, currency, date range, and payment mode.
Payment Tx and Payout Tx are portal column labels. For DIRECT transfers,
their presence does not imply that GOAT Flow holds or later disburses buyer funds.
Payment Setup
Prepare the payment methods and account settings used by your chosen solution.
Payment Guide
Open Payment Setup → Payment Guide, or select Resume setup on the Dashboard. Configure Crypto, Card, or both; a Card-only merchant does not need a Crypto receiving wallet.
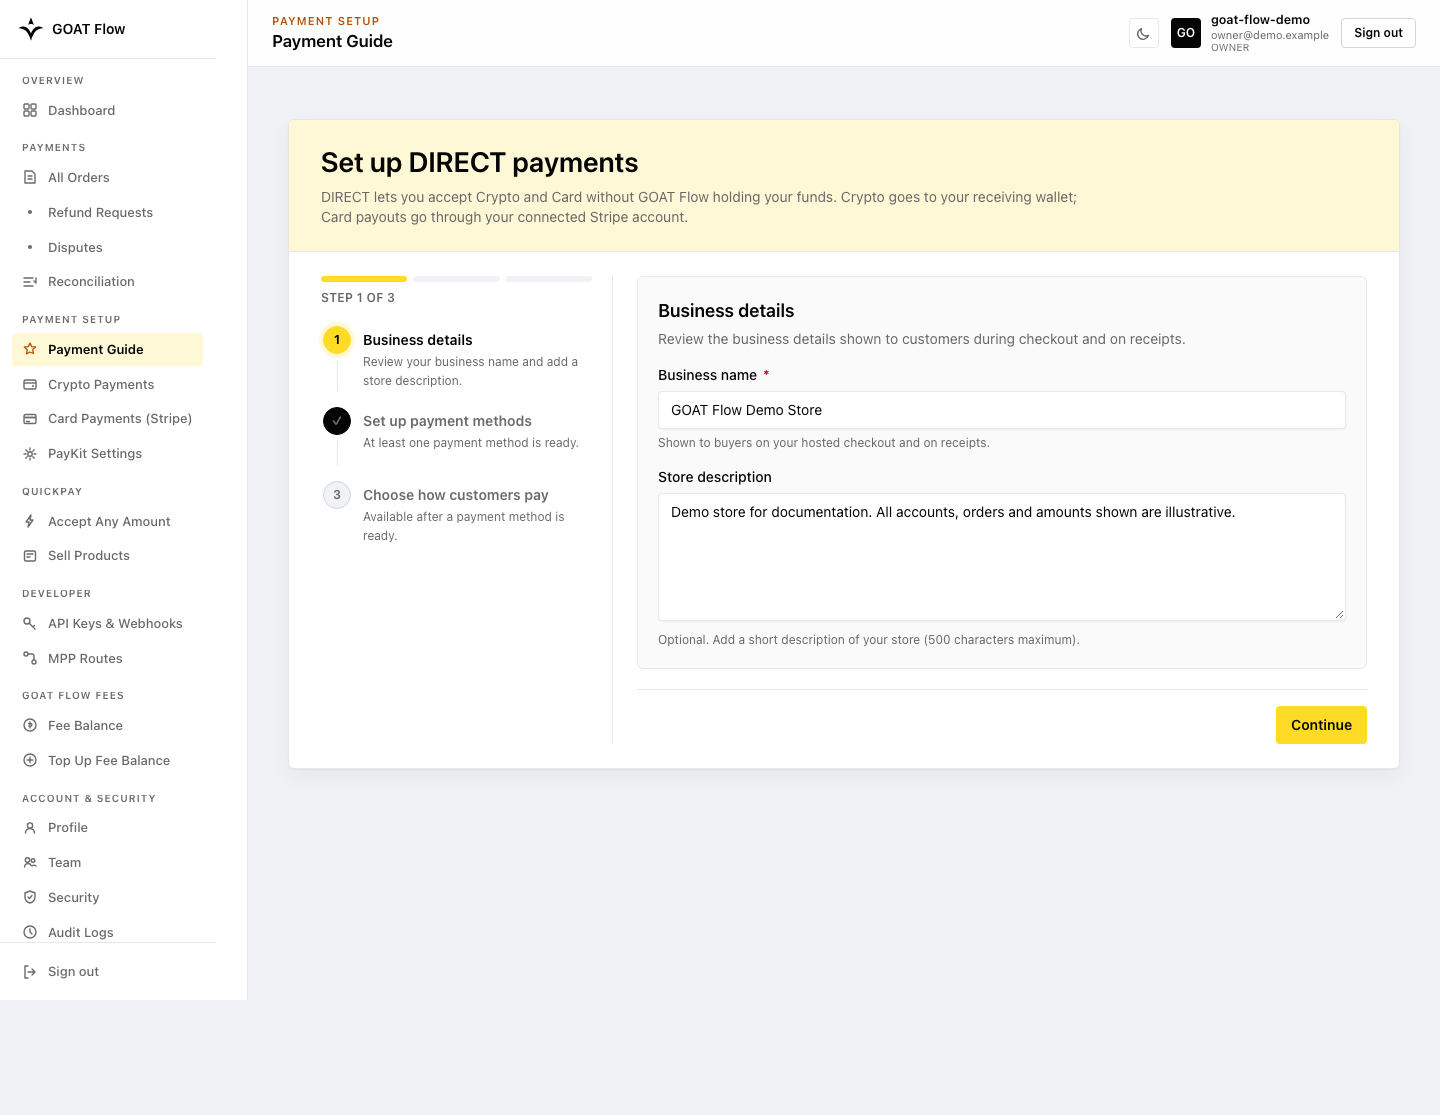
The Payment Guide has three steps:
- Business details: review the merchant name and add an optional Store description.
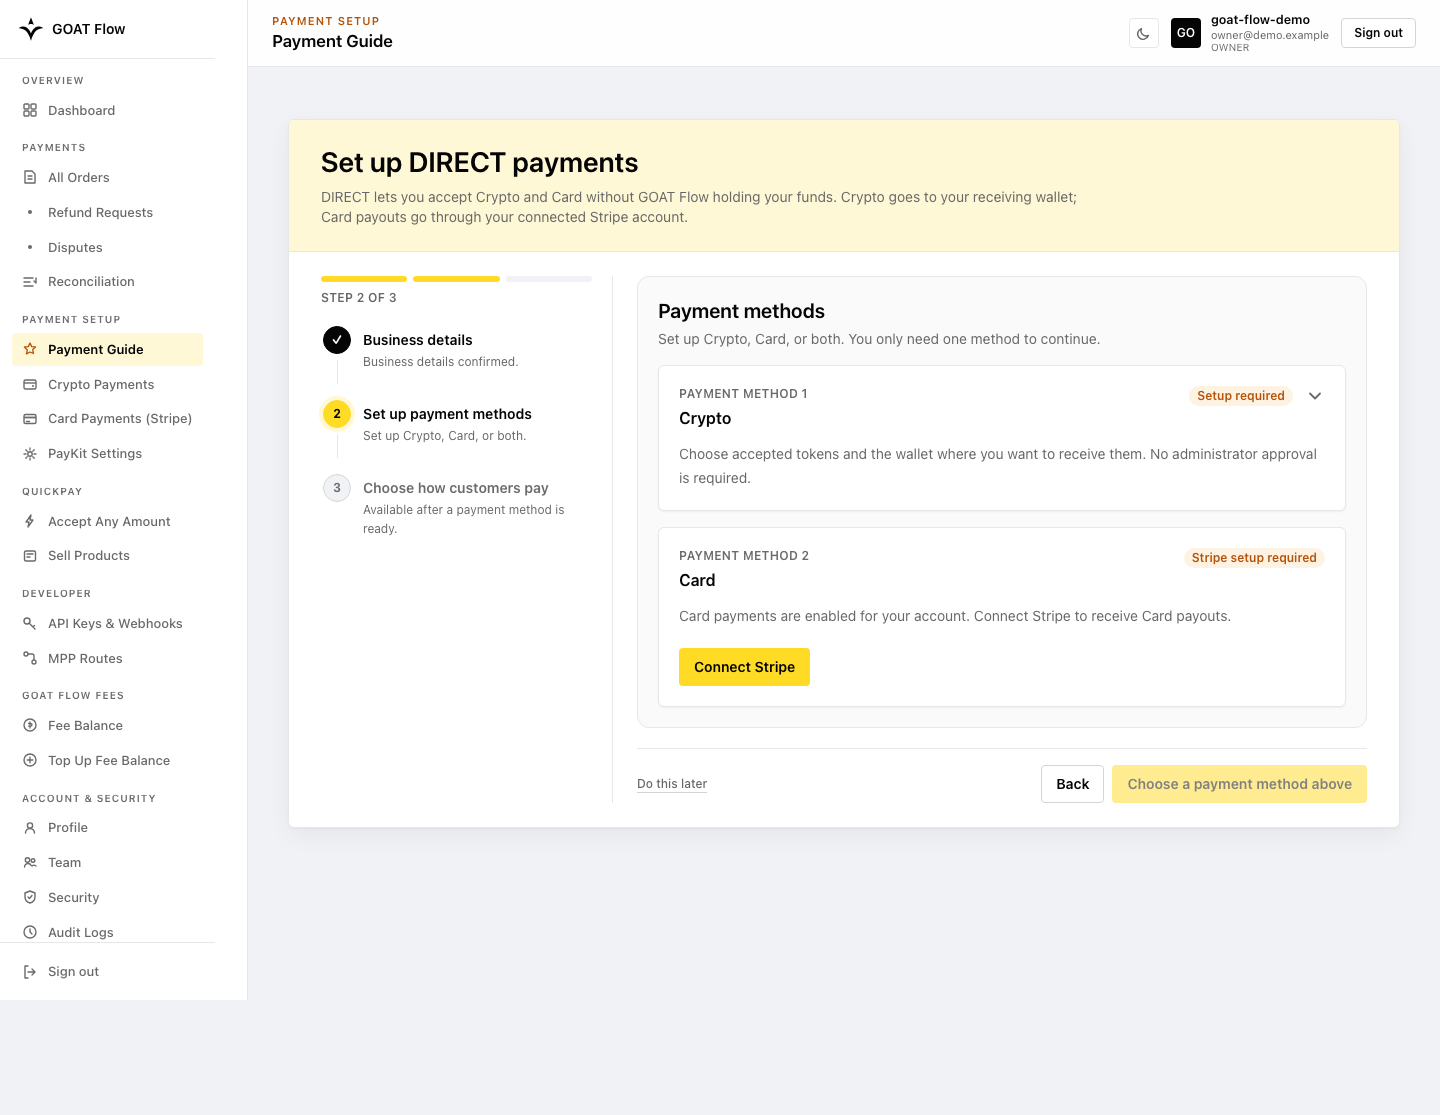
- Set up payment methods: configure Crypto receiving wallets, complete Card setup with Stripe, or do both. At least one selected method must be ready.
- Choose how customers pay: choose the payment entry points or integration options that fit the business; these can be changed later.
Step 1 — Business details
Step 2 — Set up payment methods
Step 3 — Choose how customers pay
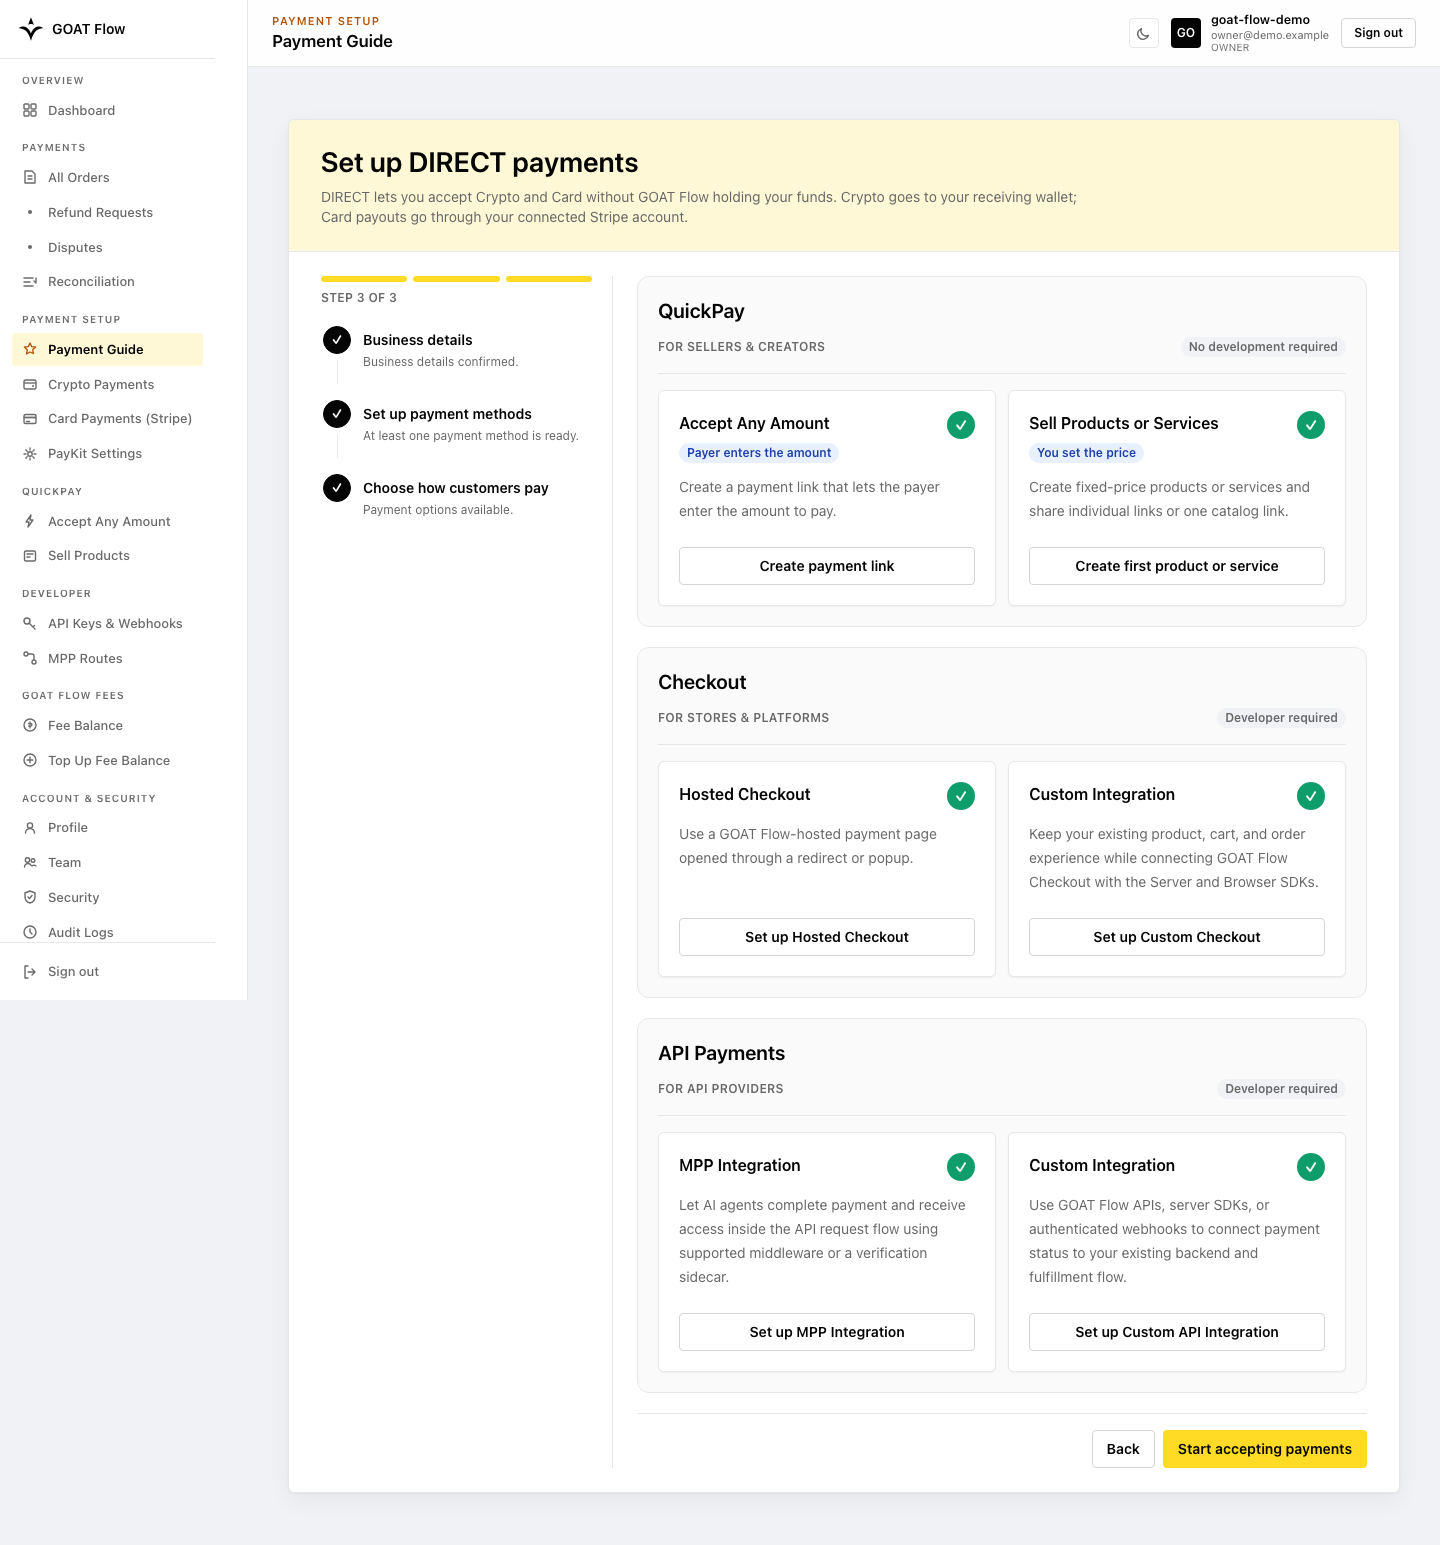
API key creation and self-testing are not separate steps in this wizard. Create API credentials when your backend integration needs them, and test the selected payment flow before launch. A Card-only merchant can complete setup without adding a Crypto wallet.
Crypto Payments
Open Payment Setup → Crypto Payments in the sidebar. This page configures Crypto receiving addresses, not Card payouts. Card-only merchants can use Card Payments (Stripe) without adding a wallet here.
In DIRECT, the buyer wallet sends tokens to the merchant wallet address returned for the order on the selected EVM chain.
Find Available Chains and Tokens
Do not treat a static chain matrix as current availability. Supported chains, tokens, decimals, contracts, minimums, maximums, and available transfer and receipt capabilities are deployment- and merchant-specific.
Use these runtime sources:
- Portal: Crypto Payments, PayKit Settings, and MPP Routes.
- Public integration: the GOAT Flow payment requirement, QuickPay
manifest.json, or public merchant lookup. - Authenticated integration: order and checkout responses returned by the active API deployment.
Testnet3 configuration does not imply that the same chains, token contracts, limits, fees, or merchant capabilities are enabled on Mainnet.
Add a Receiving Address
Click Add address in the top right to open the form. Token options come from the supported token list, filtered to EVM and already-configured pairs.
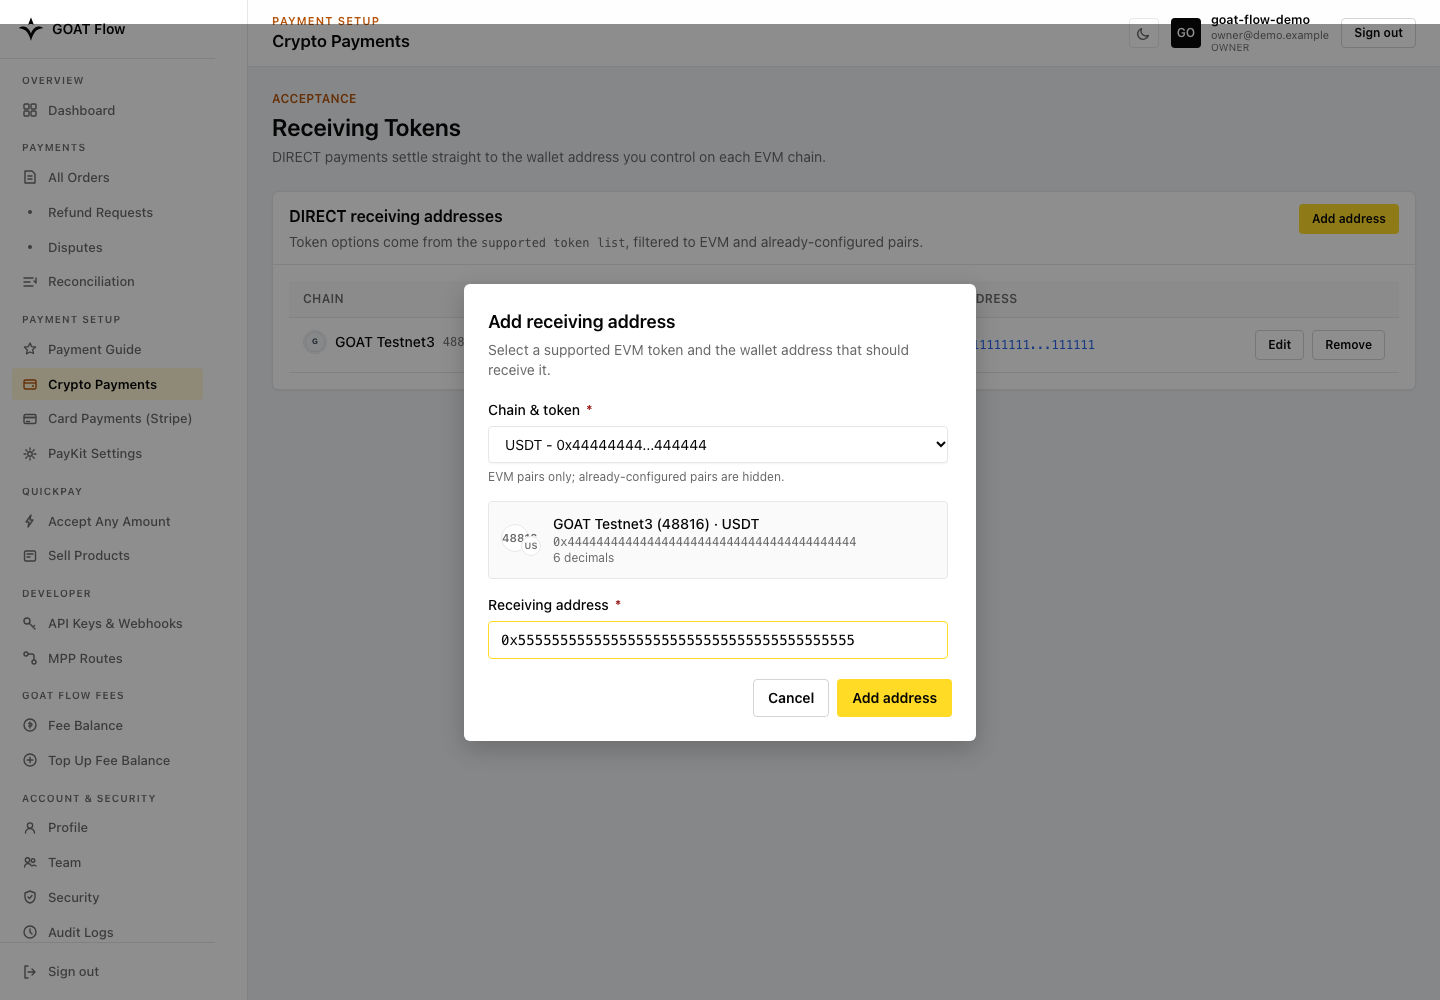
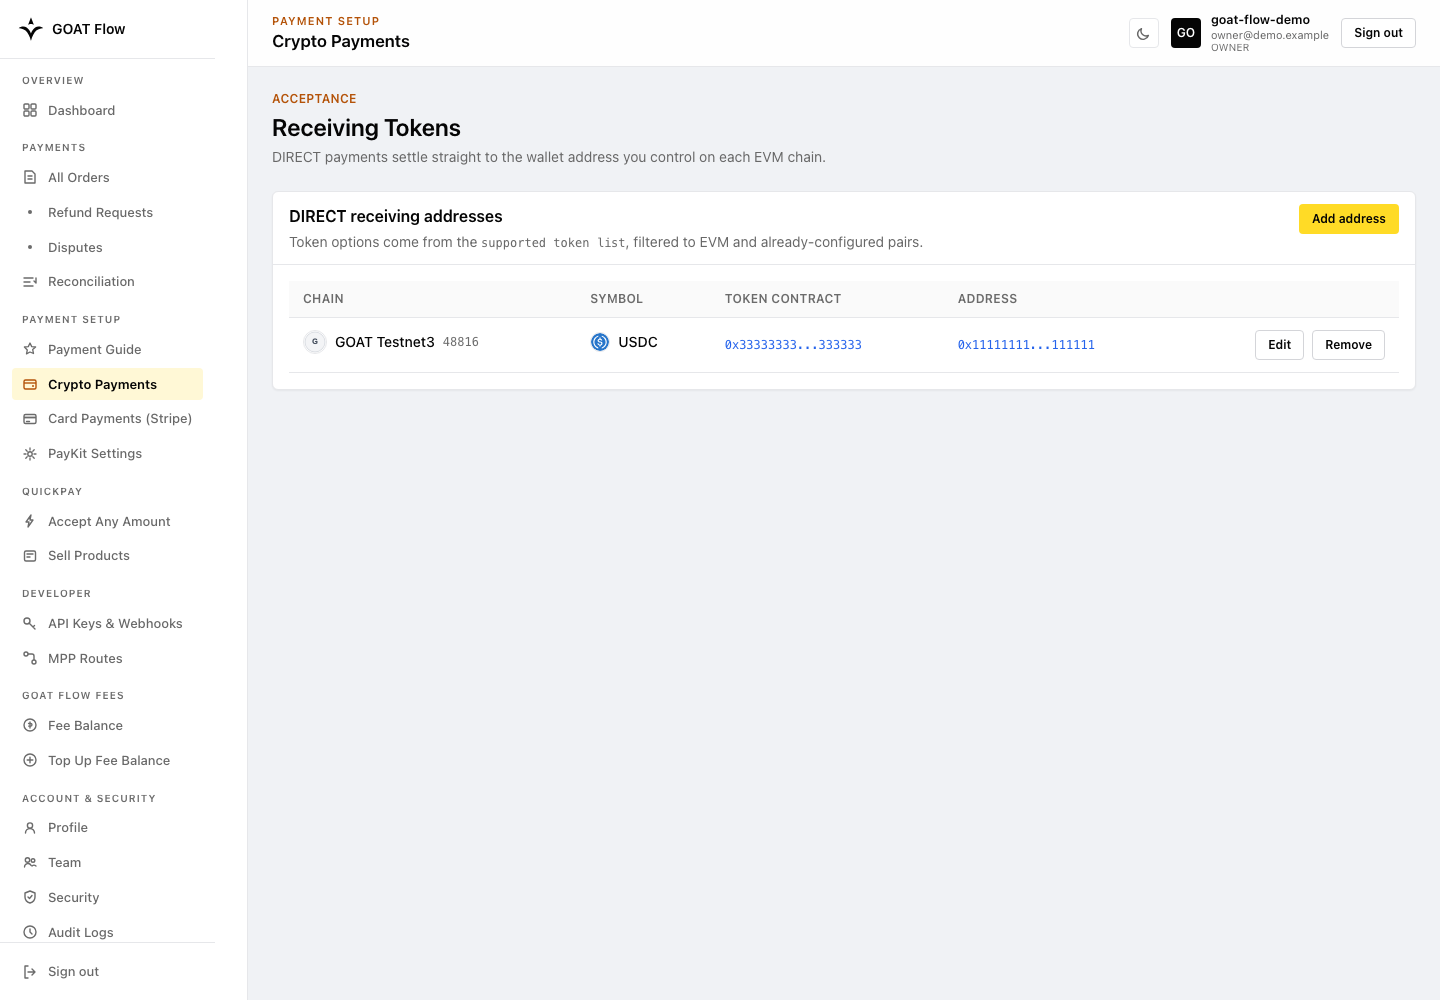
The DIRECT receiving addresses table lists one row per accepted pair:
| Column | Description |
|---|---|
| Chain | One of the EVM chains offered by the active deployment |
| Symbol | Token symbol, such as USDC or USDT |
| Token contract | The token's ERC-20 contract address |
| Address | Your EVM receiving address (0x + 40 hex characters) |
The form enforces these rules:
- Each Chain + Token combination can only have one address.
- Address and token contract must be valid EVM addresses.
- Available chains/tokens come from deployment configuration.
- Review every selected chain/token before confirming so that one address is not unintentionally assigned to unwanted pairs.
Save and verify each receiving row. Use Edit on an existing DIRECT row to change its wallet address, or Remove to remove a pair you no longer accept. Recheck the affected payment links and routes after any receiving change.
Card Payments (Stripe)
Open Payment Setup → Card Payments (Stripe). Owners can connect or complete setup; Members can view status but cannot start the connection flow.
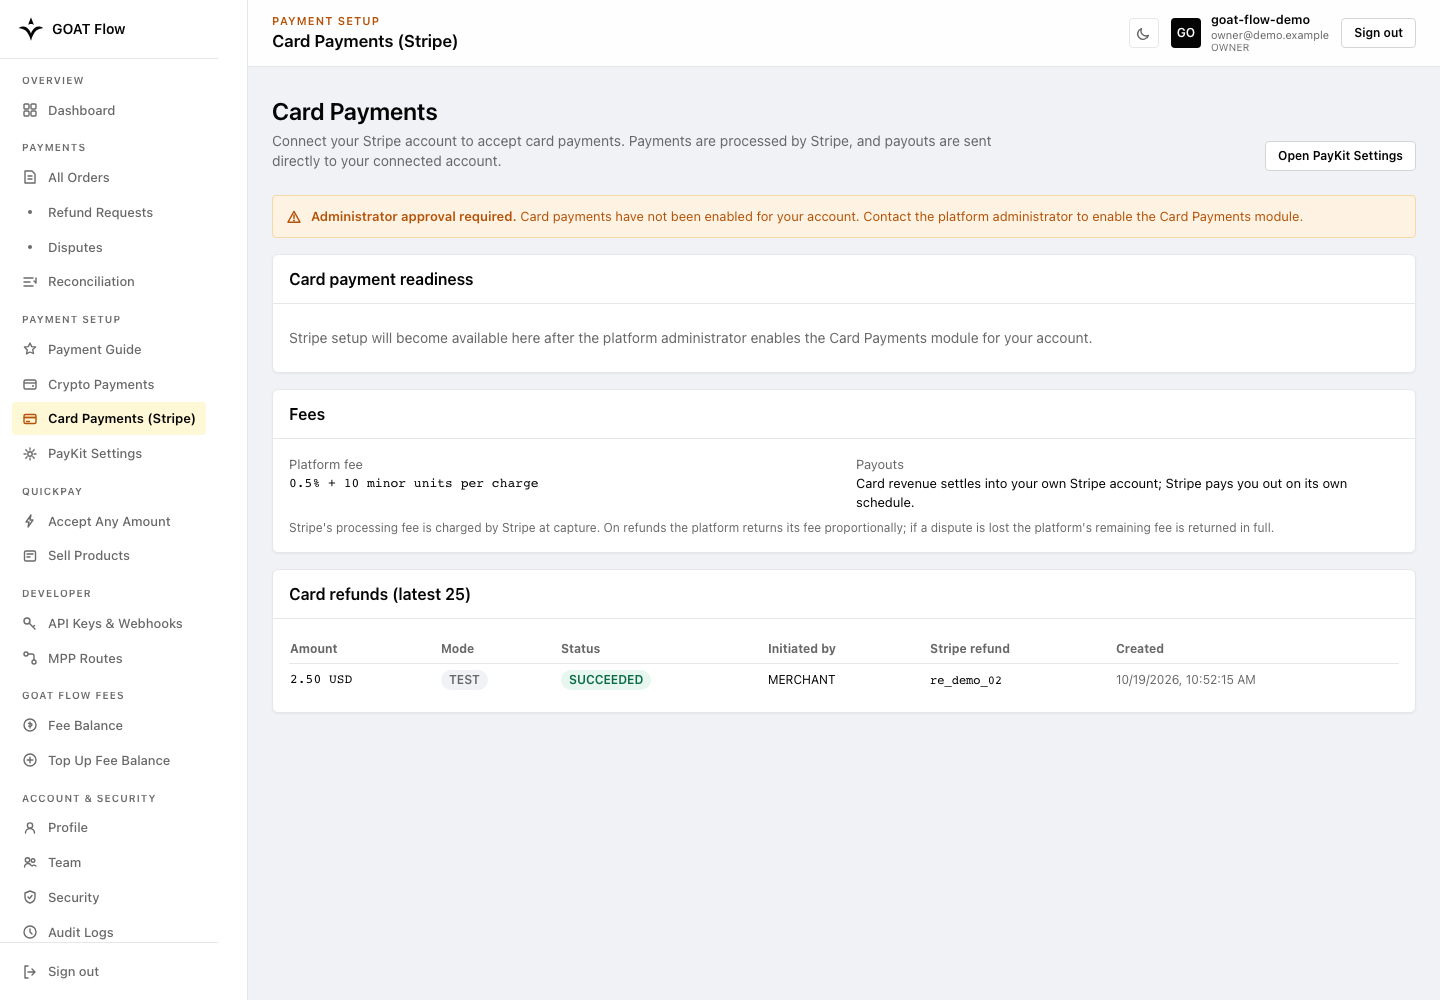
- Check platform access. Card Payments must be available in the deployment and enabled for your merchant by the platform administrator. If the page says it is waiting for platform access, contact support; connecting a Stripe account does not grant this permission.
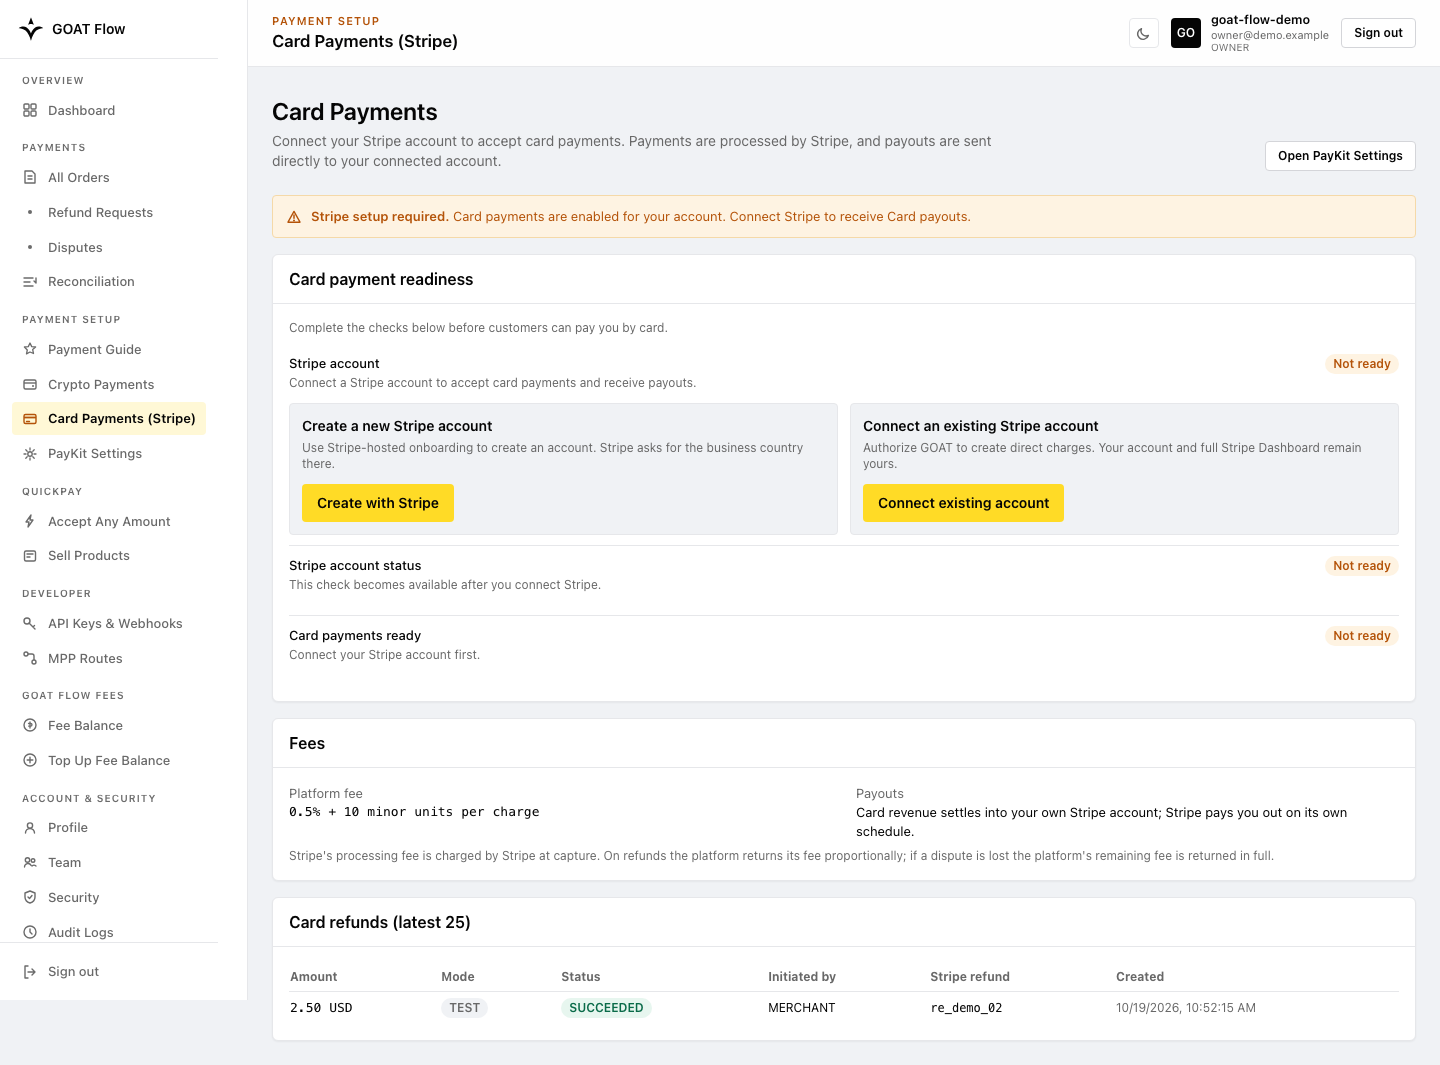
- Choose a Stripe connection path. If you do not have a connected account:
- Create with Stripe creates an account through Stripe-hosted onboarding. Complete the requested business, identity, and account information on Stripe. Returning to the portal before completing the requirements does not make the account ready to accept charges.
- Connect existing account authorizes an eligible existing Standard account with full Stripe Dashboard access. This option is available only when Standard-account OAuth is enabled in the environment; an unavailable button is not a requirement to create a second account.
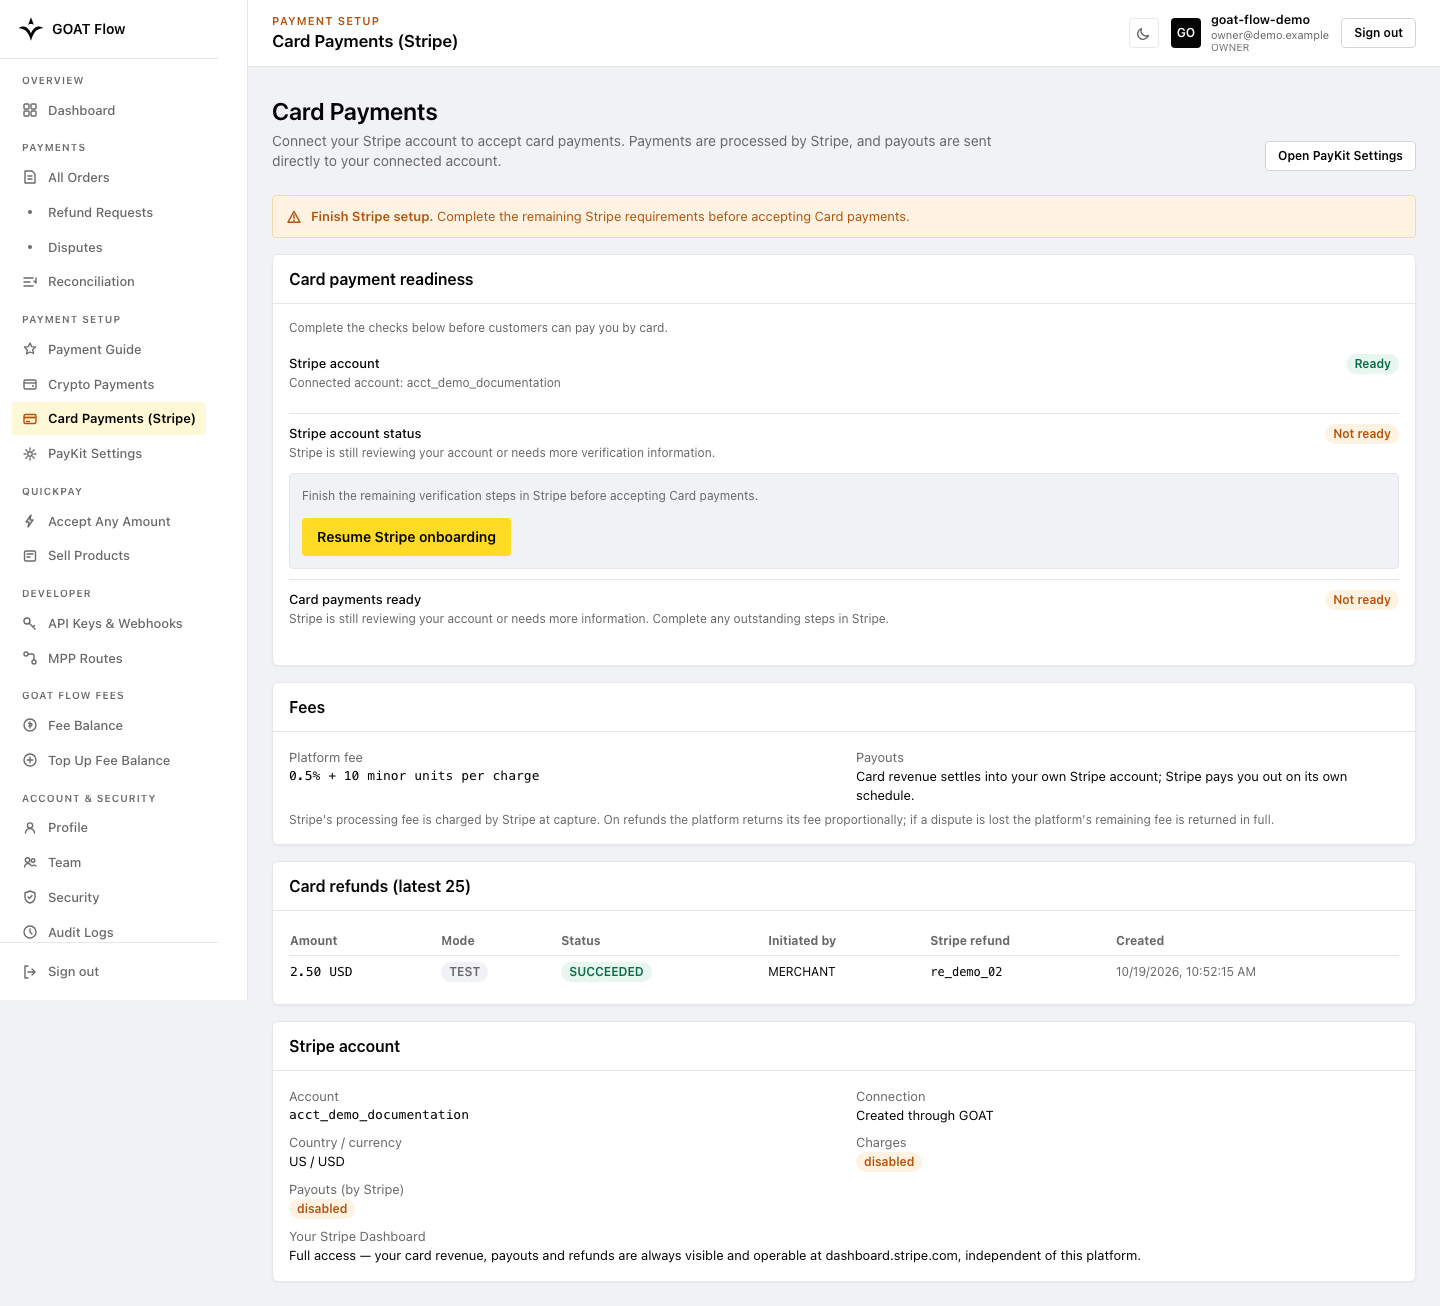
- Complete outstanding requirements. For an account created through hosted onboarding, select Resume Stripe onboarding. For an OAuth-connected Standard account, complete outstanding requirements in Stripe Dashboard, then return and refresh the portal status.
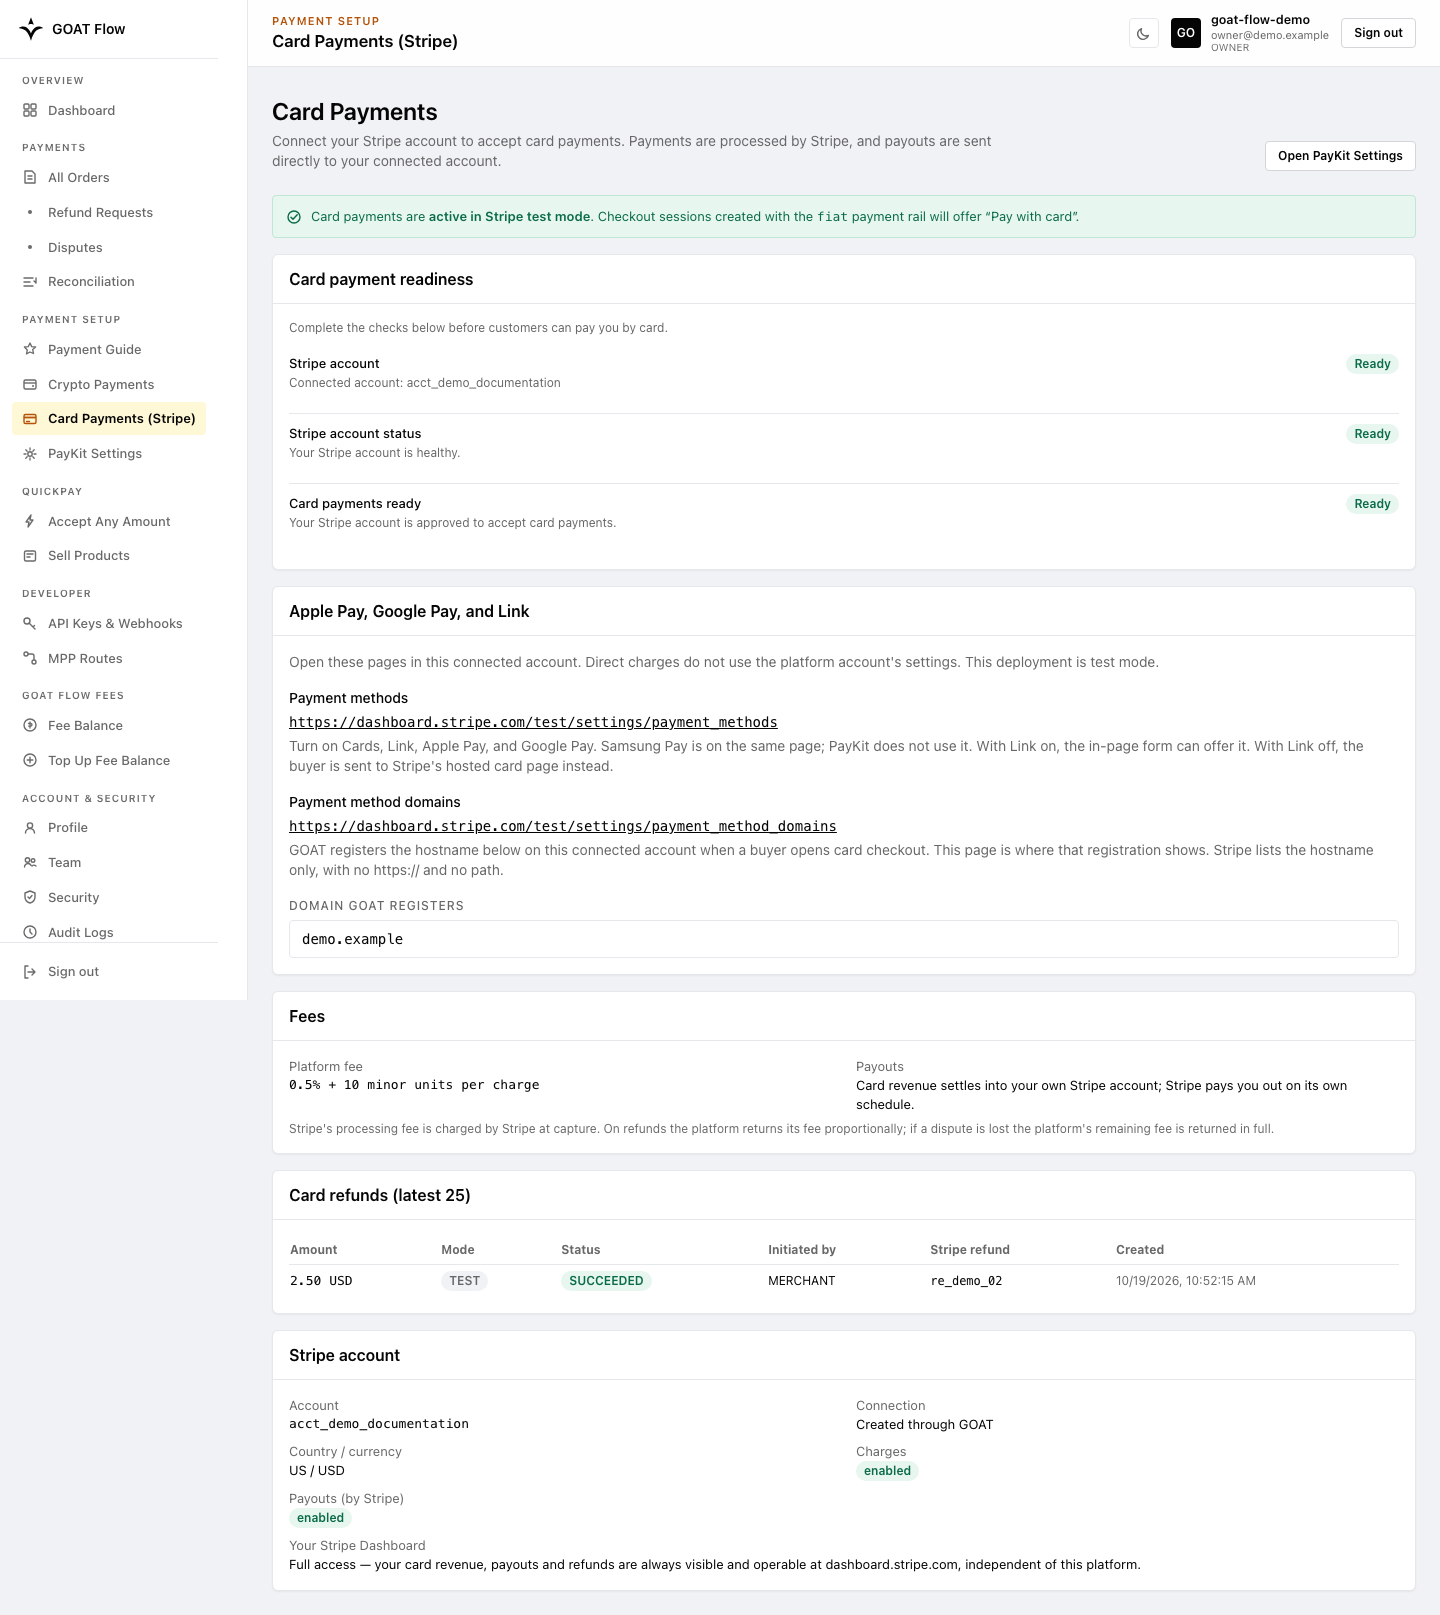
- Check readiness and mode. An account being connected is not enough:
charges_enabledmust be true, the connection must not be deauthorized or restricted, and the platform must report Card as eligible/ready. Check the displayed LIVE or TEST mode. A ready TEST account does not collect real Card revenue. - Enable Card for the intended entry point. Select Card on the Payment Link
or product and activate PayKit for QuickPay. For a backend-created Checkout
Session, select the
fiatrail and provide its fiat pricing using the authenticated Checkout integration.
A Card-only merchant does not need a Crypto receiving wallet. If Stripe later restricts or disconnects the account, revisit this readiness page before sharing links or accepting new payments. Available countries, currencies, and checkout surfaces still depend on the active environment and merchant permissions.
Platform permission is required before Stripe setup becomes available:
Once enabled, choose a new account or an existing Standard account:
Connected but not ready: continue the outstanding Stripe requirements:
Ready to accept charges in the displayed mode:
GOAT Flow provides the technical integration surface. Merchants remain responsible for product delivery, customer support, applicable policies, and any information requested by the enabled Card provider. Never place raw card details in order metadata, webhook logs, support tickets, or exported reports.
PayKit Settings
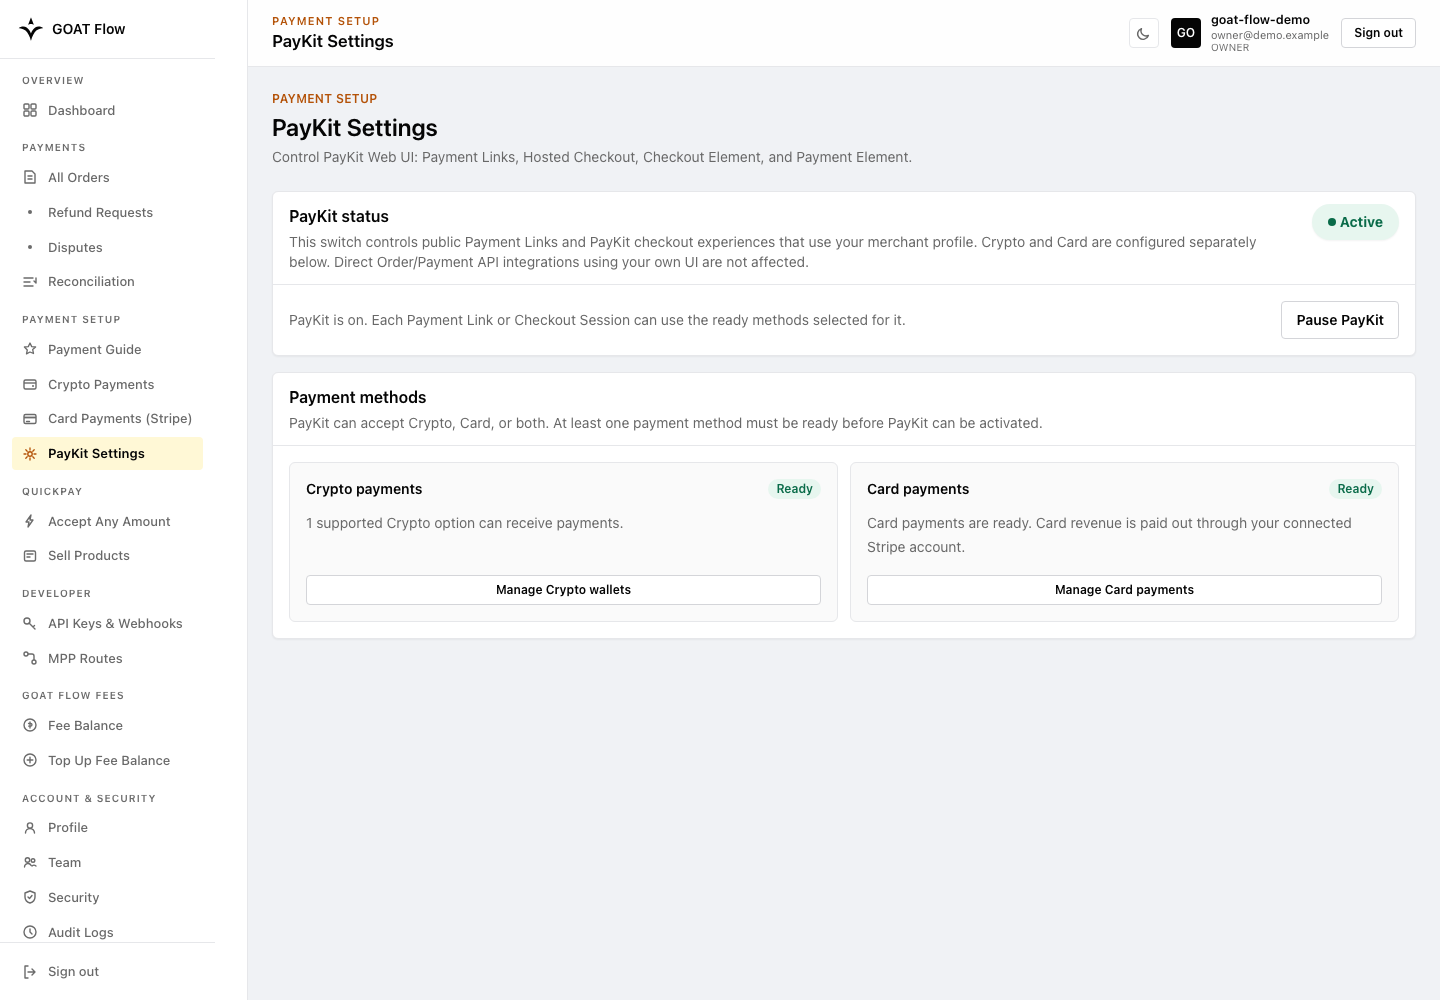
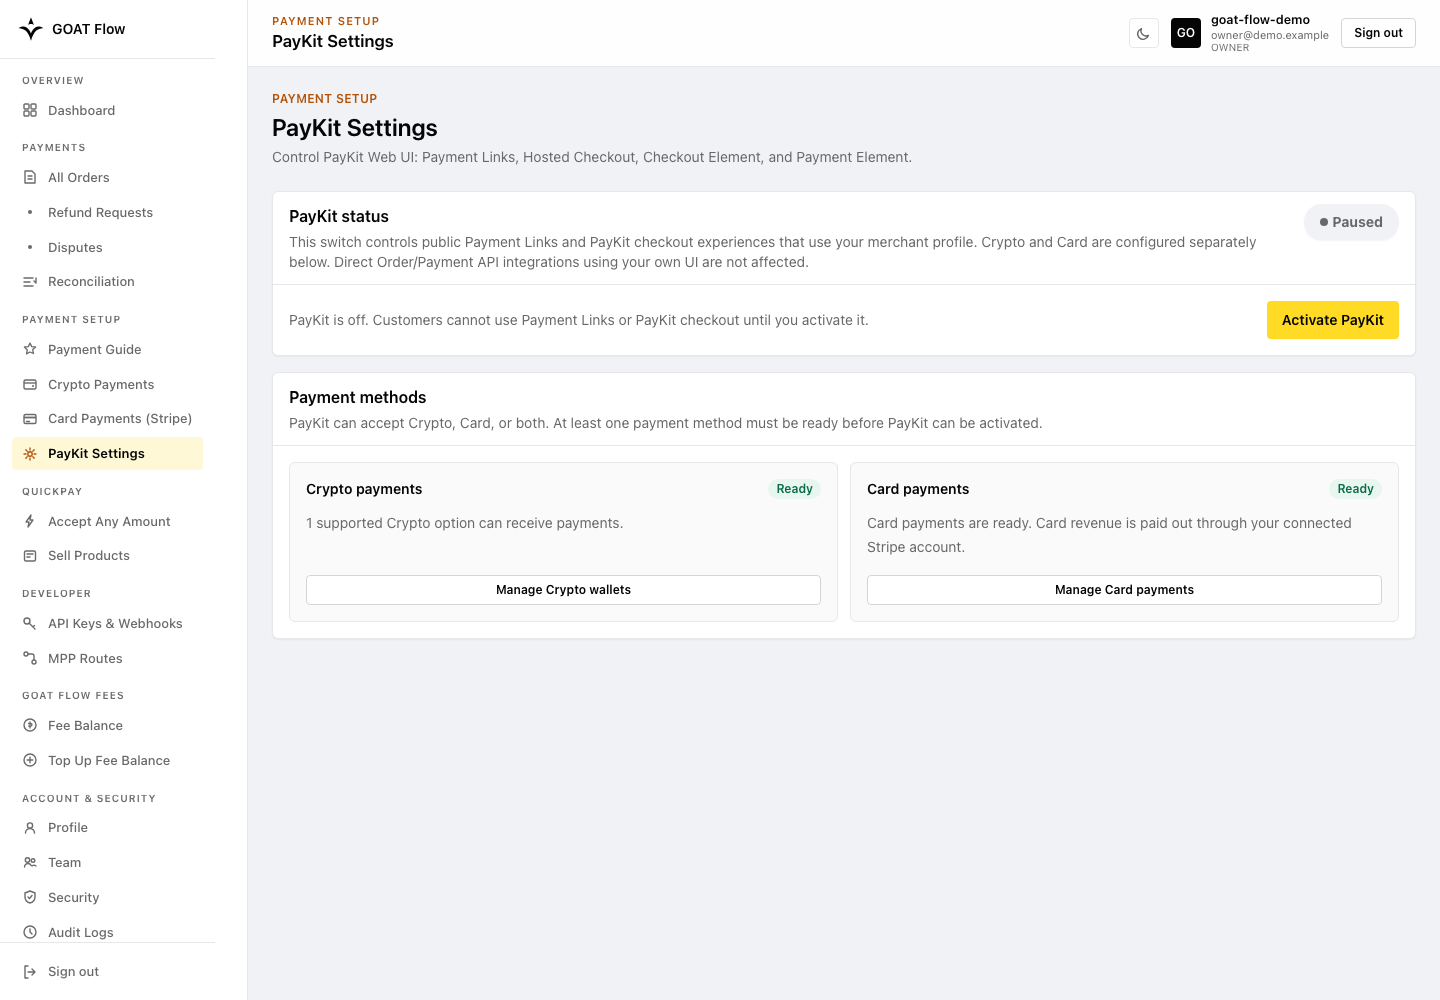
Open Payment Setup → PayKit Settings to check Crypto/Card readiness and the master switch. The Owner can select Activate PayKit or Pause PayKit without asking support to operate the switch. Resolve the displayed setup blockers if activation is unavailable; Card platform access still requires administrator enablement as described in Card Payments.
PayKit Settings — payment-method readiness and the master switch:
Paused configuration remains saved and can be activated by the Owner:
QuickPay
QuickPay is the payment-link solution for human buyers and AI agents. Configure its custom-amount links and fixed-price products in the portal's QuickPay section.
The portal requires:
- An enabled public DIRECT merchant account.
- At least one ready payment method: eligible Crypto receiving configuration or an eligible Stripe account for Card. Card-only merchants do not need a Crypto wallet.
- PayKit activated by the Owner, and a ready method selected on the specific link or product. The master switch alone does not make every entry point payable.
- Any applicable fee/limit requirements reported by the active environment.
Customer and agent access
Share the Payment page with customers and the agent.md or manifest.json link with AI agents. Create and share these links from the portal; merchants do not need to install an SDK to use QuickPay.
For custom payer or agent tooling, see PayKit SDK and CLI, including Crypto payment prerequisites and Card checkout links. Payment recovery details are maintained in SDK Reference.
Accept Any Amount
Accept Any Amount lets you create a reusable payment link where the payer enters the amount. Use it for tips, donations, or payments whose amount is agreed separately, without creating a fixed-price product or building a website or application.
Choose Crypto, Card, or both for this link. Share the hosted payment page with customers or the agent link with AI agents. The link's payment methods are configured independently of your fixed-price products.
Open QuickPay → Accept Any Amount to create or manage the link.
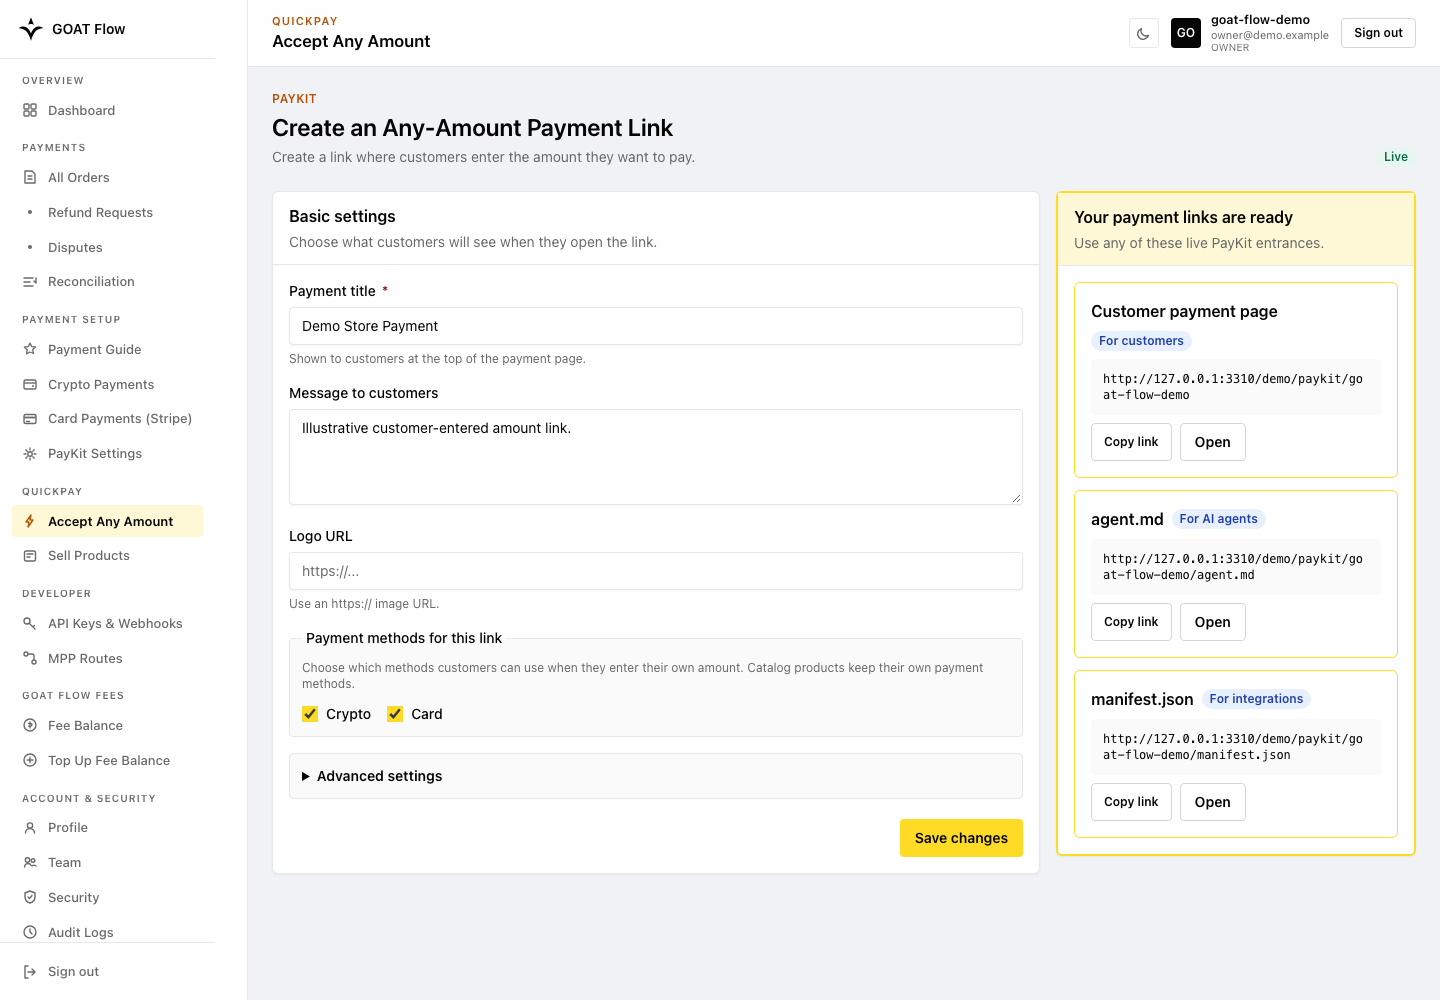
Configure and share an Any Amount link in this order:
- Sign in as Owner and check that the merchant is enabled. In Payment Setup → PayKit Settings, verify that Crypto and/or Card is ready.
- For Crypto, check the accepted token's chain, contract, decimals, receiving wallet, and limits. For Card, check Stripe eligibility and LIVE/TEST mode.
- Open QuickPay → Accept Any Amount and set the buyer-facing Payment title, Message to customers, and optional HTTPS Logo URL.
- Select Crypto, Card, or both for this Payment Link. These settings are independent of each product's payment methods. Card amounts currently use USD; Crypto amounts use the selected token's units, not an exchange rate.
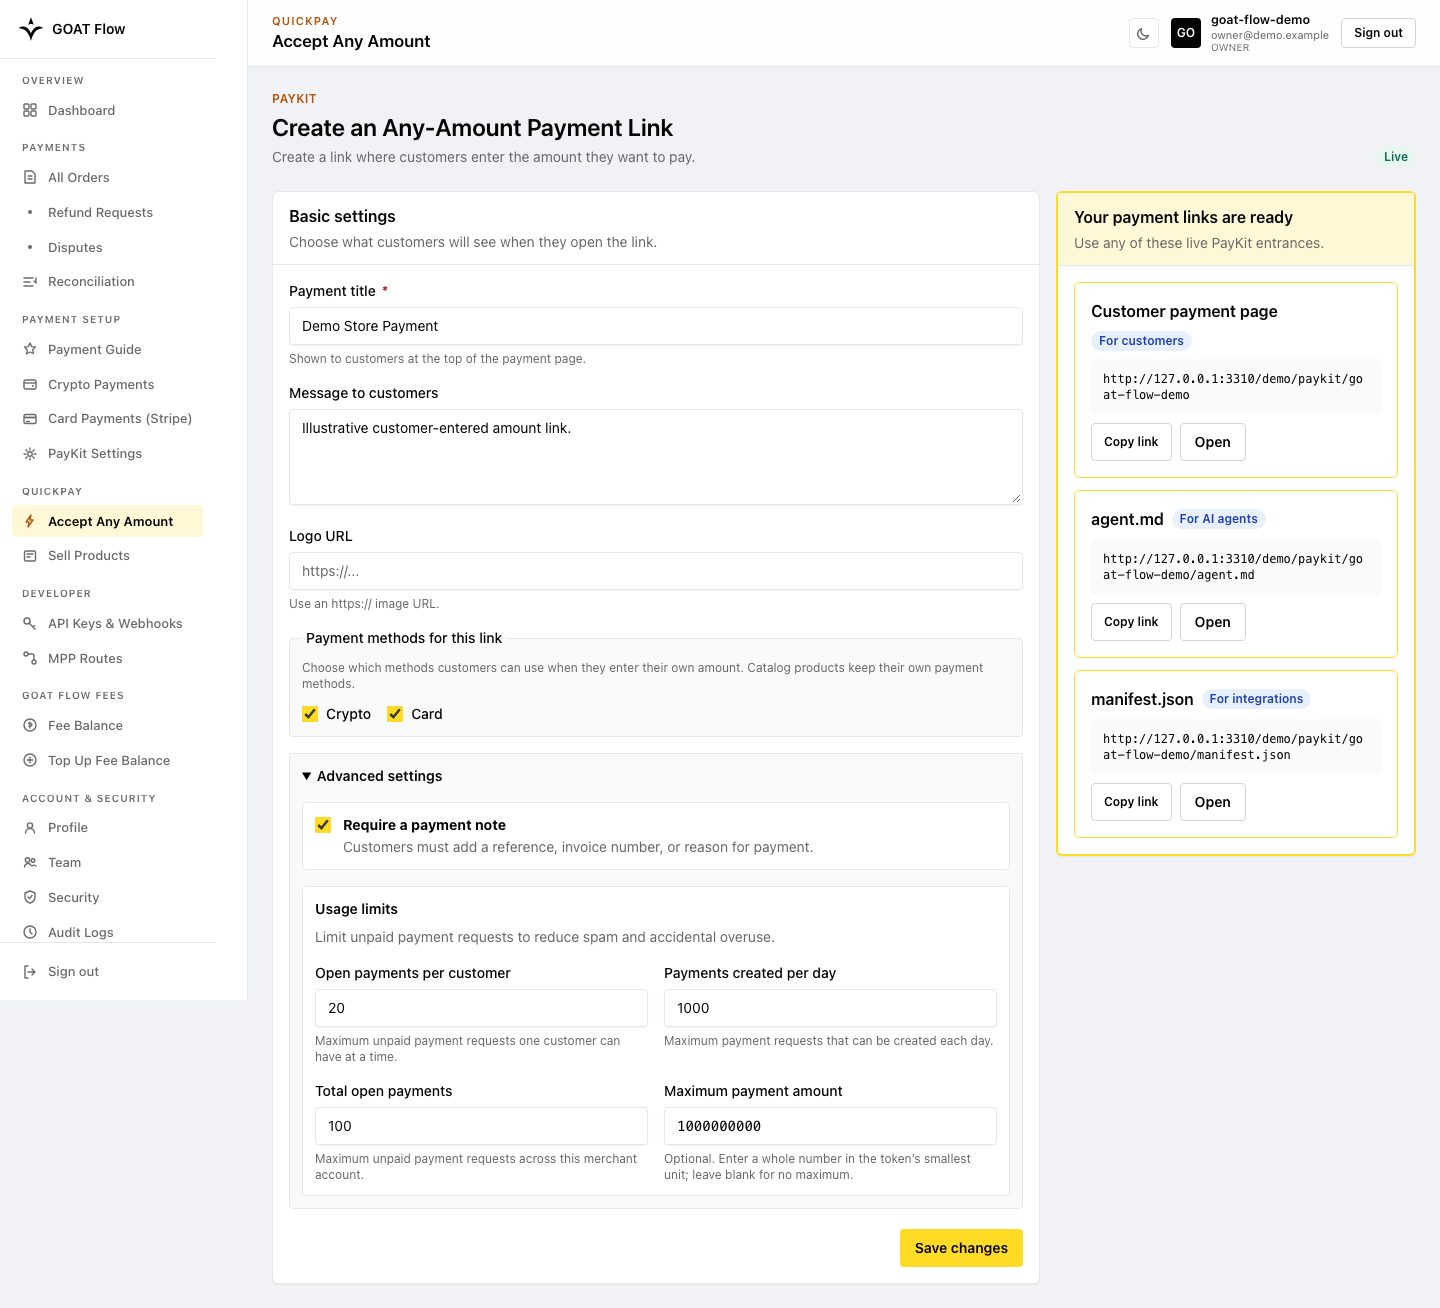
- Expand Advanced settings to set Require a payment note and review Open payments per customer, Payments created per day, Total open payments, and Maximum payment amount.
- Save. Some setup actions also attempt activation; check the actual result. Saved does not mean activated or payable. If PayKit remains paused, fix the readiness blocker and activate it in Payment Setup → PayKit Settings.
- Confirm this entry point is Live, not PayKit paused or Not payable. A globally active PayKit can still have a non-payable link when none of that link's selected methods is ready. Pausing PayKit prevents public PayKit payments even though the saved link/product configuration remains.
- Copy the actual Payment page,
agent.md, andmanifest.jsonlinks from the portal. Verify their environment and buyer experience without exposing API credentials. Do not construct links by replacing hostnames.
Advanced settings — payment notes and session limits:
The merchant API also exposes these owner-only configuration operations. They are service endpoints rather than SDK convenience methods:
| Action | API path | Notes |
|---|---|---|
| Read config | GET /merchant/v1/quickpay | Shows eligibility, display config, caps, token list, and public links |
| Update config | PUT /merchant/v1/quickpay | Owner-only |
Config fields include quickpay_enabled, payment_rails, display_name,
description, logo_url, memo_required, max_amount_wei, max_open_sessions,
daily_session_limit, and max_open_sessions_merchant_wide. The fiat API rail
corresponds to Card in the interface.
Sell Products
Open QuickPay → Sell Products to create fixed-price items. Each product selects Crypto, Card, or both independently of the custom-amount Payment Link. The same numeric decimal price applies to the chosen method:
- Crypto:
12.50means 12.50 units of the accepted token the buyer chooses, such as 12.50 USDC or 12.50 USDT. The client converts it into that token's base units using its decimals, not a market exchange rate. - Card:
12.50means USD 12.50 in the current QuickPay Card flow.
There is no automatic foreign-exchange conversion between these amounts. Confirm that the numeric price makes sense for every enabled method/token.
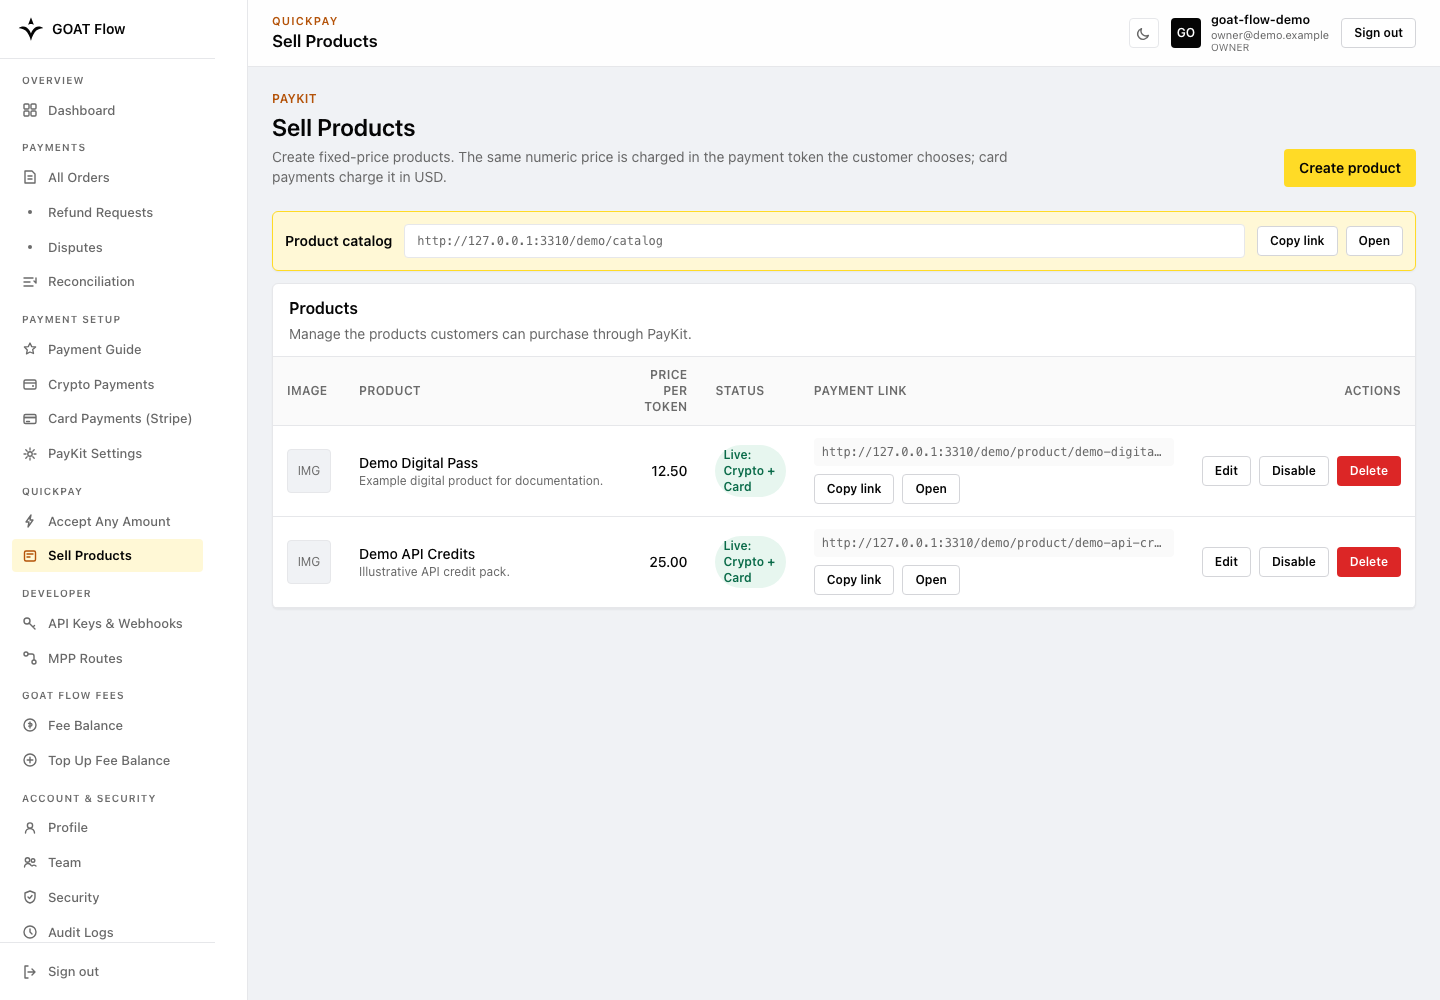
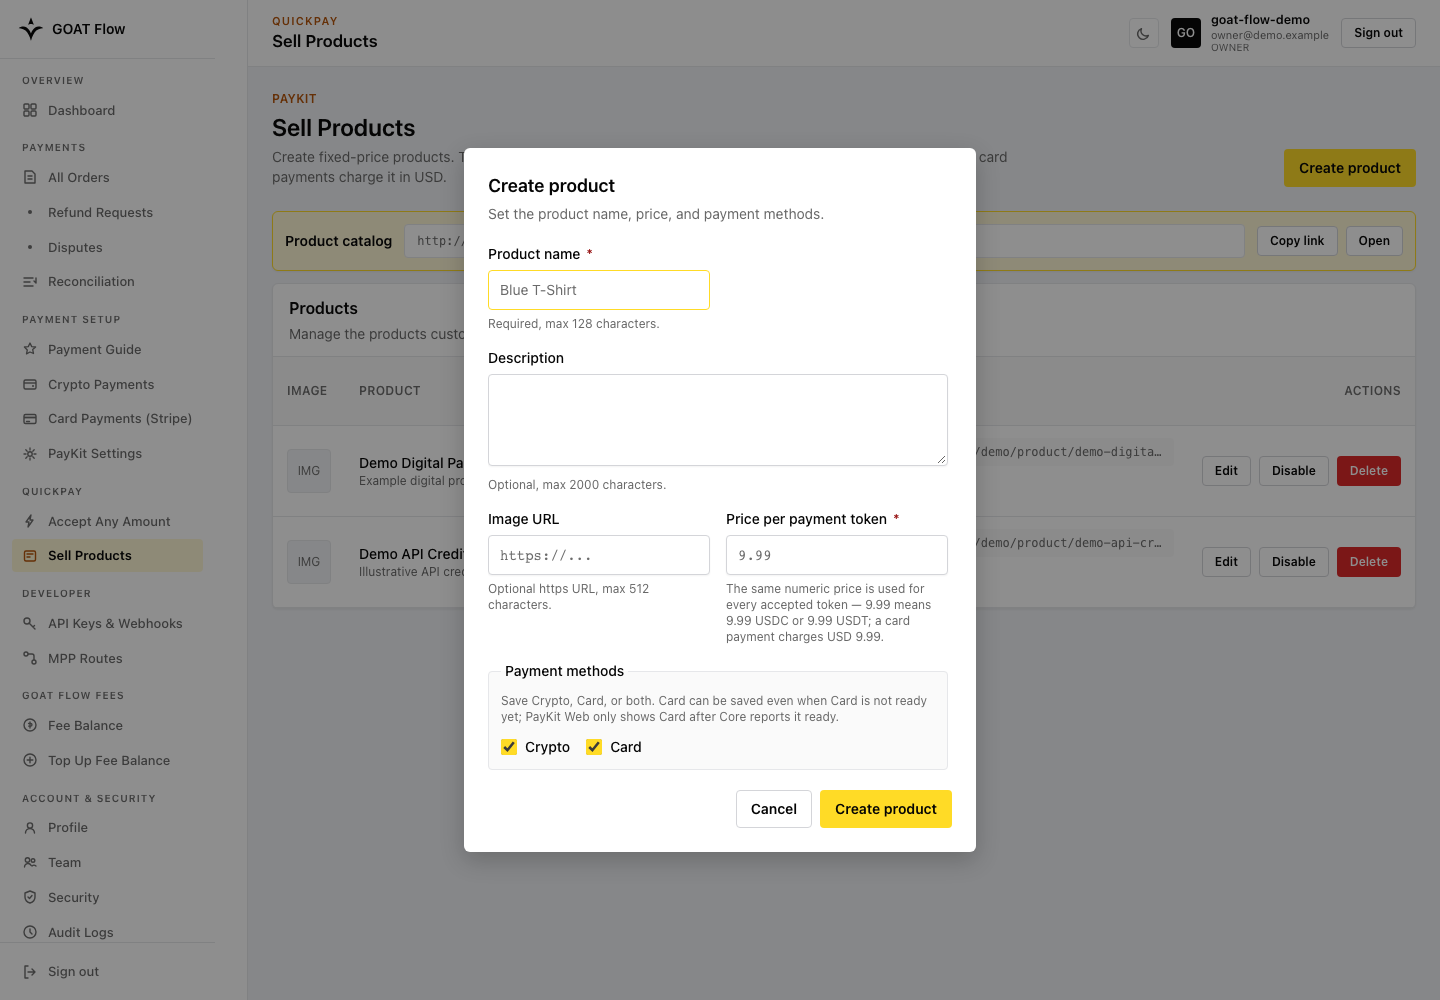
The merchant API exposes these product operations:
| Action | Merchant API path |
|---|---|
| List products | GET /merchant/v1/quickpay/products |
| Create product | POST /merchant/v1/quickpay/products |
| Update product | PUT /merchant/v1/quickpay/products/:product_key |
| Delete product | DELETE /merchant/v1/quickpay/products/:product_key |
The product settings and management API use these fields:
| Field | Notes |
|---|---|
product_key | Integration identifier; generated by the portal when creating a product. API-created keys must match ^[A-Za-z0-9._:~-]{1,64}$ and cannot be . or .. |
name | Required display name |
description | Optional |
image_url | Optional HTTPS URL |
price | Required positive decimal; same numeric price in the selected Crypto token or USD for Card |
payment_rails | Crypto (crypto), Card (fiat), or both; readiness is checked separately |
enabled | Available for sale; does not mean a payment method is ready |
sort_order | API catalog ordering field, not a current portal form control |
The product key identifies update/delete operations. Public discovery and SDK types are a separate contract; use the active manifest rather than assuming all portal-only management fields are published.
Crypto product-bound sessions use product_key plus the
buyer-selected chain_id and token_contract. The server response pins the
authoritative amount and memo (product:<product_key>), and the client verifies
the amount before broadcast. Card creates a Checkout Session with fiat pricing
instead of a Crypto transfer session. Selecting Card in the form can be saved
before Stripe is ready, but Card is only offered to buyers once the backend
reports it eligible.
The customer-facing page presents payable products and allows custom-amount checkout when enabled. See QuickPay for customer and Agent entry points.
For each product:
- Select Create product in QuickPay → Sell Products. The portal generates
its
product_key; retain that identifier if used by your integration. - Enter the buyer-facing name, optional description/image, decimal price, and payment methods. Manage Available for sale when editing or use the row's availability action; do not confuse it with payment-method readiness.
- Save it, then confirm the product is available, PayKit is active, and at least one of that product's selected payment methods is ready.
- Open the public payment page and verify the name, description, price, and available Crypto tokens and/or Card pricing. A product's Card selection does not override Stripe readiness, and custom-amount settings do not override the product's payment methods.
- Create one small environment-appropriate checkout. Confirm it appears under Payments → All Orders before connecting fulfillment. Check LIVE Card and Crypto reporting in Payments → Reconciliation; Stripe TEST payments are excluded from that report.
Custom-amount checkout is suitable for donations, tips, and other buyer-controlled amounts. Use a Product or an authenticated Checkout Session when the merchant must control the price. Never fulfill solely from a browser success callback; use a trusted webhook or backend order/session status.
Developer
Configure server-side API access, payment notifications, and paid API routes for your integration.
API Keys & Webhooks
API keys
API keys and webhooks share Developer → API Keys & Webhooks. Use API Key/Secret credentials for supported server-side GOAT Flow requests, including creating Hosted Checkout Sessions with Crypto, Card, or both, Custom Checkout orders, and Custom API Integration orders.
Creating and sharing QuickPay links in the Merchant Portal does not require you to configure API keys manually. This is different from a merchant backend creating a Checkout Session: that authenticated server request needs credentials even when the customer will use a hosted payment page or Card.
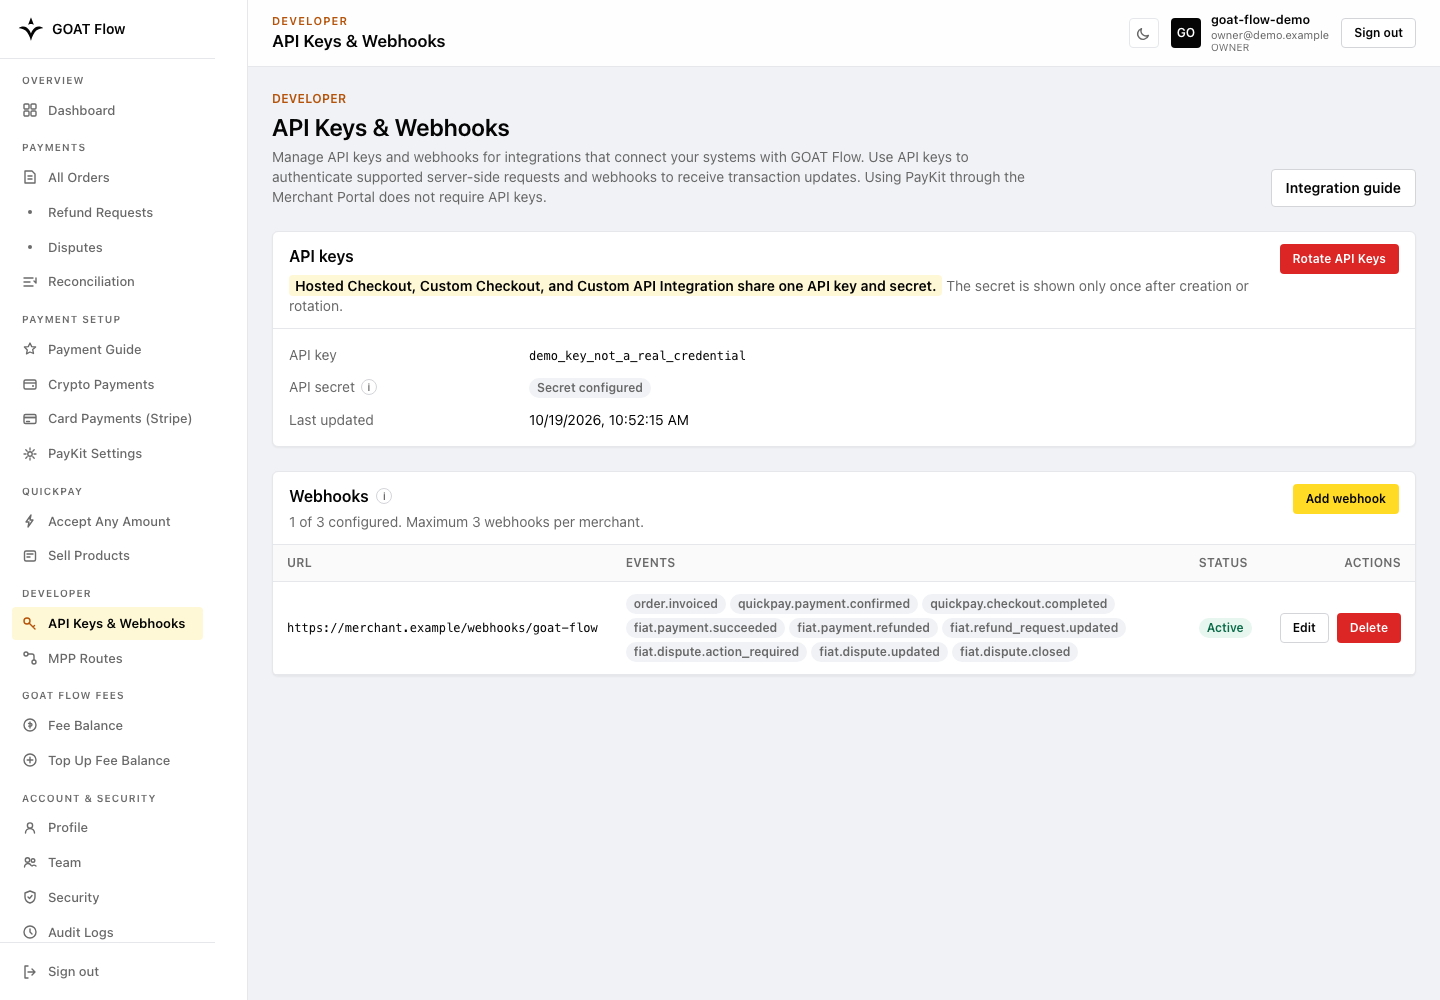
New merchants show API key (not set) / API secret (not set) until an owner
creates keys. The existing API secret is never returned after creation.
Create or Rotate API Keys
Select Create API Keys when none exist, or Rotate API Keys to replace an existing pair. Rotation immediately invalidates the old API Key and API Secret; there is no overlapping validity period. Coordinate the change across your secret manager, services, and workers, then verify requests with the new pair. The new secret is shown only once; save it immediately.
| Field | Description |
|---|---|
| API Key | Credential identifier for your merchant's authenticated requests |
| API Secret | Private HMAC key; shown only once when generated |
| Last Updated | Last rotation timestamp |
After the one-time display closes, the Developer page still shows the API Key but only reports that the Secret is configured. Do not include either credential in screenshots, tickets, or public documentation.
Use API keys only from your backend:
The TypeScript and Go server SDKs sign authenticated /api/v1/* requests with:
| Header | Required |
|---|---|
X-API-Key | Yes |
X-Timestamp | Yes |
X-Nonce | Yes |
X-Sign | Yes |
Do not expose the API Secret in frontend code or public repositories. If you suspect a key leak, rotate it immediately and confirm the previous credentials no longer work.
Webhooks
Webhooks are configured on the same Developer → API Keys & Webhooks page, below API keys. The current portal allows up to 3 webhooks.
Add a Webhook
On the Developer page, click Add webhook.
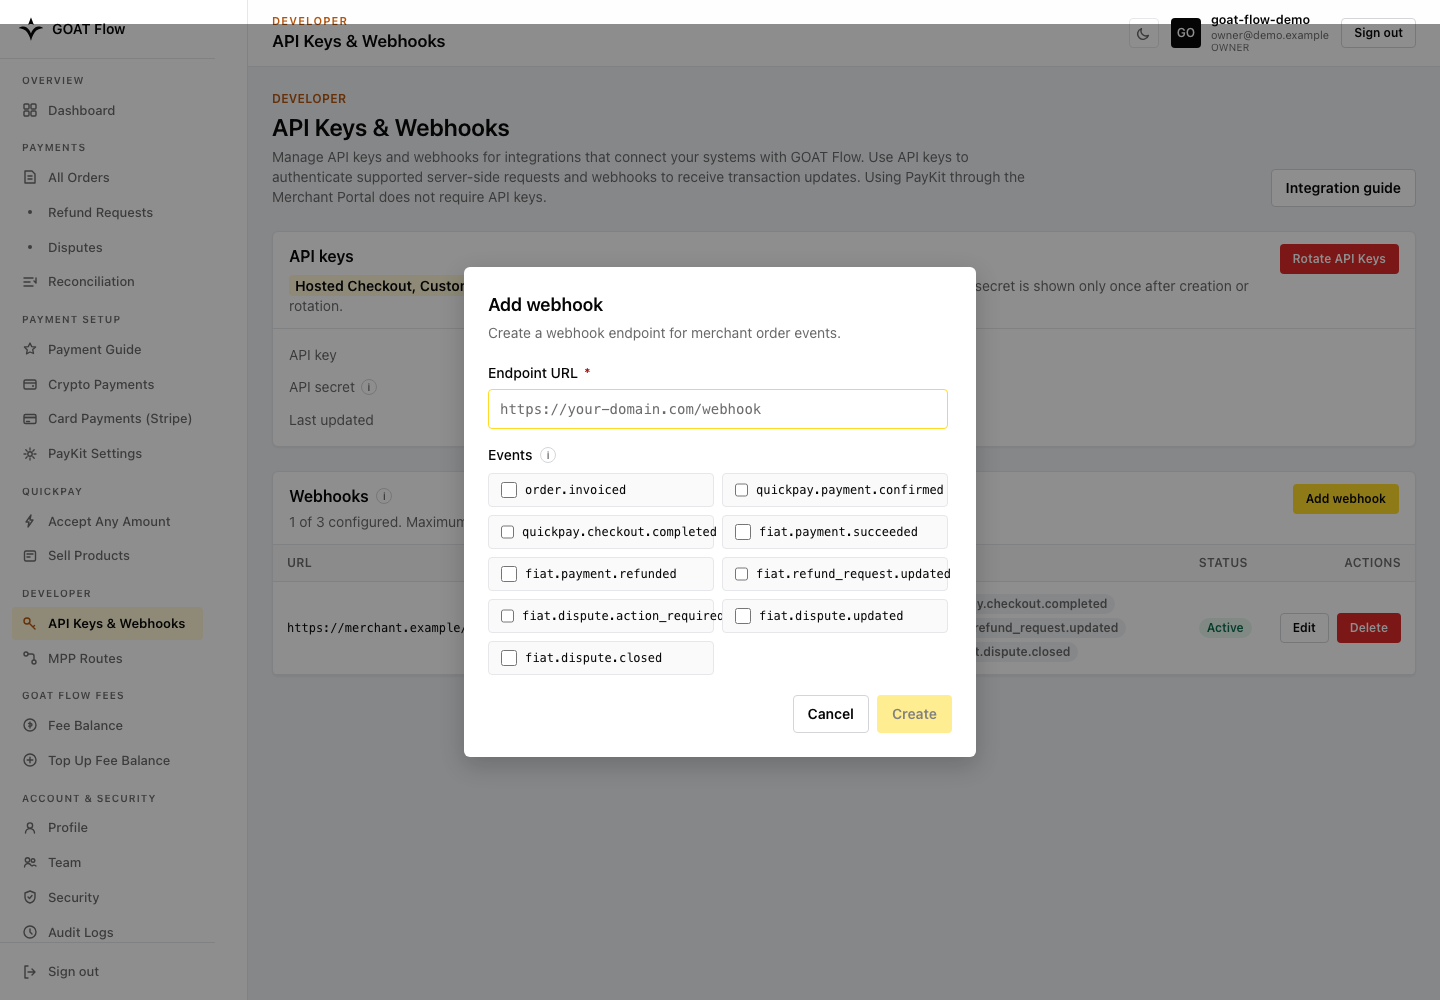
| Field | Description |
|---|---|
| URL | Your callback URL. Must be HTTPS. Example: https://your-app.com/api/goat-flow/callback |
| Events | Events exposed by the active deployment |
The form enforces:
- URL must be HTTPS.
localhostURLs are not allowed.- Maximum 3 webhooks per merchant.
The current portal offers these event subscriptions:
| Event | Use |
|---|---|
order.invoiced | Order invoicing/completion notification |
quickpay.payment.confirmed | QuickPay Crypto payment confirmation |
quickpay.checkout.completed | Checkout Session completion |
fiat.payment.succeeded | Stripe payment success; not by itself permission to fulfill |
fiat.payment.refunded | Card refund notification; inspect the refund and payment records |
fiat.refund_request.updated | Refund request review or processing update |
fiat.dispute.action_required | Dispute requires attention, such as evidence before a deadline |
fiat.dispute.updated | Dispute status update |
fiat.dispute.closed | Dispute closed; inspect the recorded outcome |
Subscribe to the events relevant to your enabled payment methods. Payloads are event-specific: a Card event is not guaranteed to contain a Token, wallet, or transaction hash. Query the associated order, session, refund, or dispute when additional facts are needed.
Delivery uses X-Webhook-Signature: sha256=<lowercase-hex-digest>, calculated as
HMAC-SHA256 over the exact raw request body bytes with that endpoint's
Webhook Secret, not the API Secret. Verify before parsing or reserializing
the body. The JSON envelope contains event, payload, and created_at.
created_at is a delivery timestamp, not a stable event identifier. Follow the
central Webhook signature contract
and validation/recovery rules.
Card success can be held from fulfillment, for example after a duplicate payment
or payment conflict. fiat.payment.succeeded and PAYMENT_CONFIRMED alone do not
authorize delivery; use the appropriate order/session completion result and
business checks. See
Payment Events and Fulfillment Events.
Before enabling fulfillment:
- Deploy a publicly reachable HTTPS endpoint with a valid certificate.
localhost, private-only addresses, browser cookies, and interactive login are not valid delivery dependencies. - Preserve the raw request bytes and verify the HMAC before parsing the body.
- Authenticate the request according to the webhook specification, durably enqueue it, return a success response promptly, and process it idempotently.
- Test a real Testnet3 event through the deployed receiver, including duplicate delivery and retry handling.
- Repeat the delivery test on Mainnet before enabling production fulfillment.
Save the Webhook Secret
After creation, the portal displays the Webhook Secret once.
The Webhook Secret is shown only once. Save it immediately and use it to verify incoming webhook requests according to the active signing contract. Never share or expose the one-time secret.
MPP Routes
Developer → MPP Routes configures fixed-price protected API endpoints that agents pay for through the Machine Payments Protocol (MPP).
About MPP. MPP is an independent open protocol, not a GOAT Flow protocol. This portal configures GOAT Flow's current MPP integration profile. Its JSON endpoints, direct ERC-20 transfer, and signed three-segment receipt are GOAT-specific implementation contracts, not the generic MPP wire format.
MPP availability and supported chains are runtime configuration. Do not hardcode the page's descriptive copy or a single chain ID. Read the active chain selector, supported tokens, receiving rows, and public manifest.
Route management requires:
- the Owner role
- an enabled merchant in DIRECT mode
- Paid API Routes enabled for the merchant
- a supported chain/token pair
- a matching receiving address
Configure and operate an MPP route in this order:
- Define the protected HTTP method and path in application code first.
- Convert it to the portal's canonical colon-delimited identifier, for example
GET /api/docs/protected→GET:api:docs:protected. - Add and verify the route's intended receiving chain/token under Payment Setup → Crypto Payments.
- Open Developer → MPP Routes and check that the merchant can manage routes.
- Select Add paid API, enter the canonical route, active network/token, receiving address, and fixed decimal amount, then save. Check the resulting pricing version in the saved row.
- Confirm the new row is active and shows the expected token contract, receiving address, and amount.
- Open the public QuickPay
manifest.jsonand confirm the MPP rail contains the exact route and current pricing version. - Run a Testnet3 buyer flow: request the challenge, broadcast exactly the
instructed ERC-20 amount, verify the transaction, and call the protected
endpoint with the returned
Payment-Receipt. - Verify the resource server rejects missing, malformed, expired, cross-merchant, wrong-route, and replayed receipts according to the intended receipt policy.
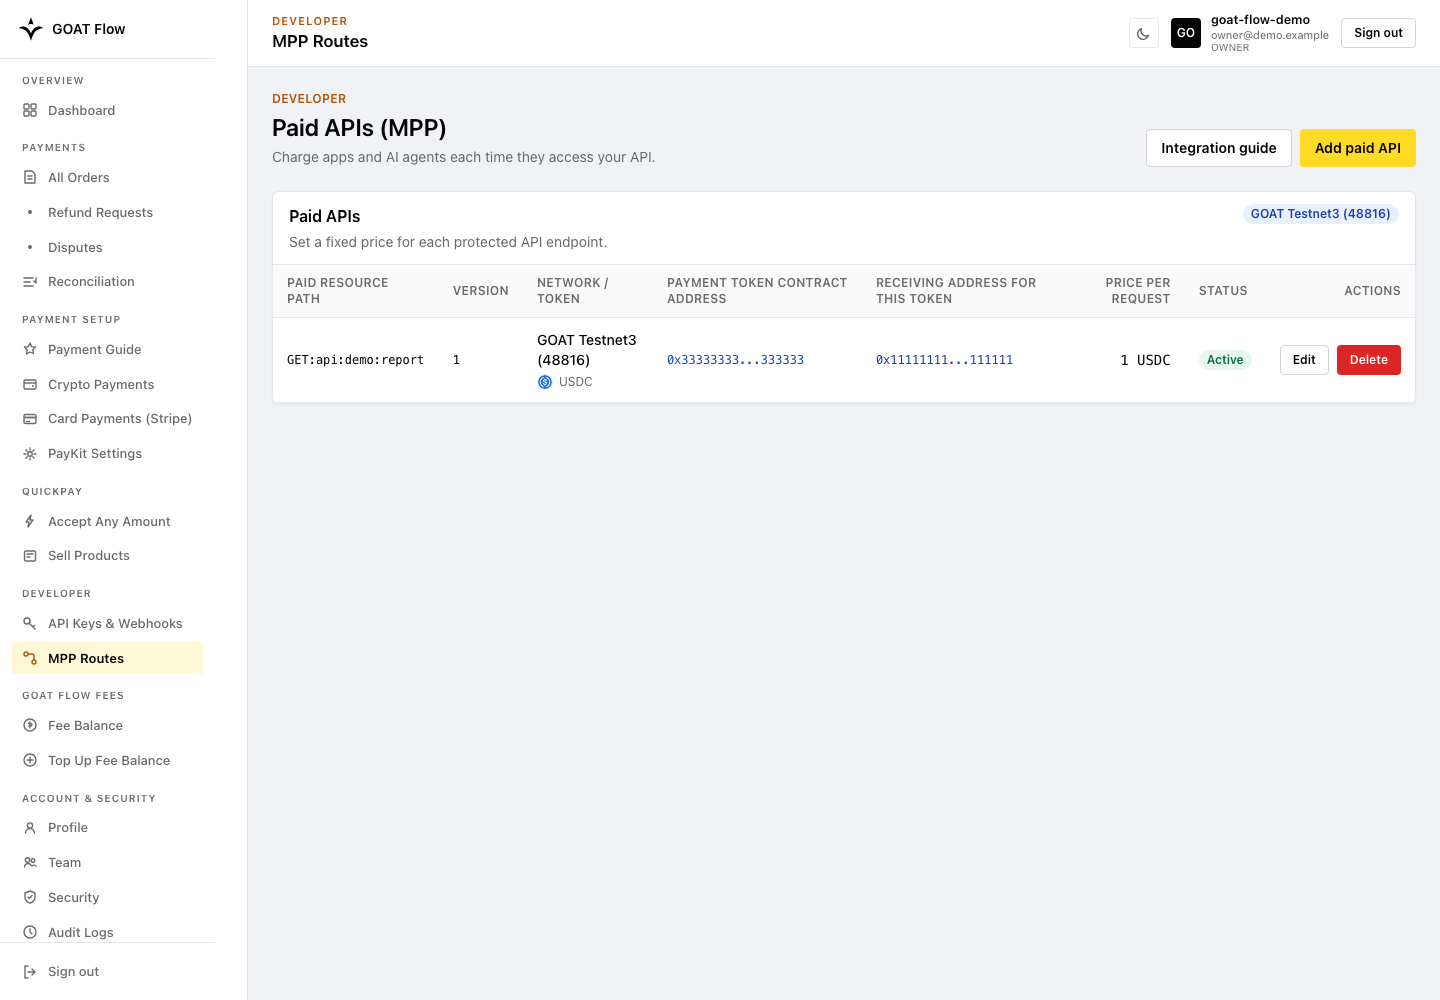
Each route row carries a paid resource path, version, network/token, payment token contract address, the receiving address for that token, amount, and status. A matching receiving address must already exist for the token before a route can be added.
Route identifiers are colon-delimited, for example
GET:api:docs:protected; slashes and spaces are not accepted by the current
portal form.
The current GOAT Flow MPP adapter:
- Treats
POST /mpp/v1/challengereturning HTTP402as a successful payment instruction. - Transfers exactly the challenged token amount to the challenged recipient.
- Calls
POST /mpp/v1/verify; HTTP200must include a validPayment-Receiptresponse header, while202and429are retried according toRetry-After. - Preserves the challenge and transaction hash in recoverable post-broadcast errors so verification can resume without paying again.
The merchant resource server must verify the signed receipt against the exact
merchant, route/request canonicalization, expiry, signature, and replay policy.
The current receipt does not carry route_pricing_version; Core binds pricing
to the challenge/order, so middleware cannot independently compare that version
without a future receipt extension. For browser use, Core must allow the DApp
origin and expose Payment-Receipt, while the protected resource must allow the
same origin and the Payment-Receipt request header. Multi-replica deployments
need a shared atomic consumption store when receipts are single-use.
For the protocol boundary and this profile's buyer/agent flow, see API Payments.
GOAT Flow Fees
Environment note: screenshots in this section use synthetic demo values. Mainnet fee amounts, supported assets, limits, and top-up behavior may differ. Confirm the live Mainnet GOAT Flow Fees pages before launch, and do not perform a Mainnet top-up without authorization.
Open GOAT Flow Fees → Fee Balance to view service-fee credits; use GOAT Flow Fees → Top Up Fee Balance to add service-fee credits.
Fee Balance
Fee Balance is a prepaid service-fee credit ledger, separate from buyer-to-merchant transfers. It is not a balance of customer funds. The Testnet3 UI states that new order or session services can stop when the credit balance is depleted. The active per-chain fee is displayed in Platform fee configuration; do not assume one global price or reuse Testnet3 fees on Mainnet.

Balance Cards
| Card | Description |
|---|---|
| Current fee balance | Current prepaid service-fee credit balance |
| Total charged | Cumulative fees charged |
| Total refunded | Cumulative refunded fees |
Fee Configuration
The Platform fee configuration table is read-only: merchants can view configured fee rows but cannot edit pricing.
Check the Mainnet table or API for active fees before launch. Testnet3 values are examples only and must not be quoted as Mainnet pricing.
Transaction History
The transaction history table exposes amount, chain ID, order, description, and date columns:
| Type | Description |
|---|---|
| Fee charged | Order or session fee deduction (e.g. order creation fee) |
| Fee refunded | A returned fee recorded by the active deployment |
| Fee funds added | Service-fee credit added to Fee Balance (e.g. a top-up) |
Do not assume that every cancellation or expiry refunds a fee, that every top-up is reversible, or that fee events are posted at a particular lifecycle state unless the active Mainnet policy documents that behavior.
Top Up Fee Balance
The Testnet3 Top Up Fee Balance page requires:
- a supported top-up destination chain
- an amount in USD
- a connected EVM wallet
- a supported USDT or USDC top-up asset
The page displays USDT and USDC as 1:1 USD for this Testnet3 top-up flow. Supported chains, top-up assets, receiving wallets, limits, confirmation policy, and crediting behavior can differ by environment.
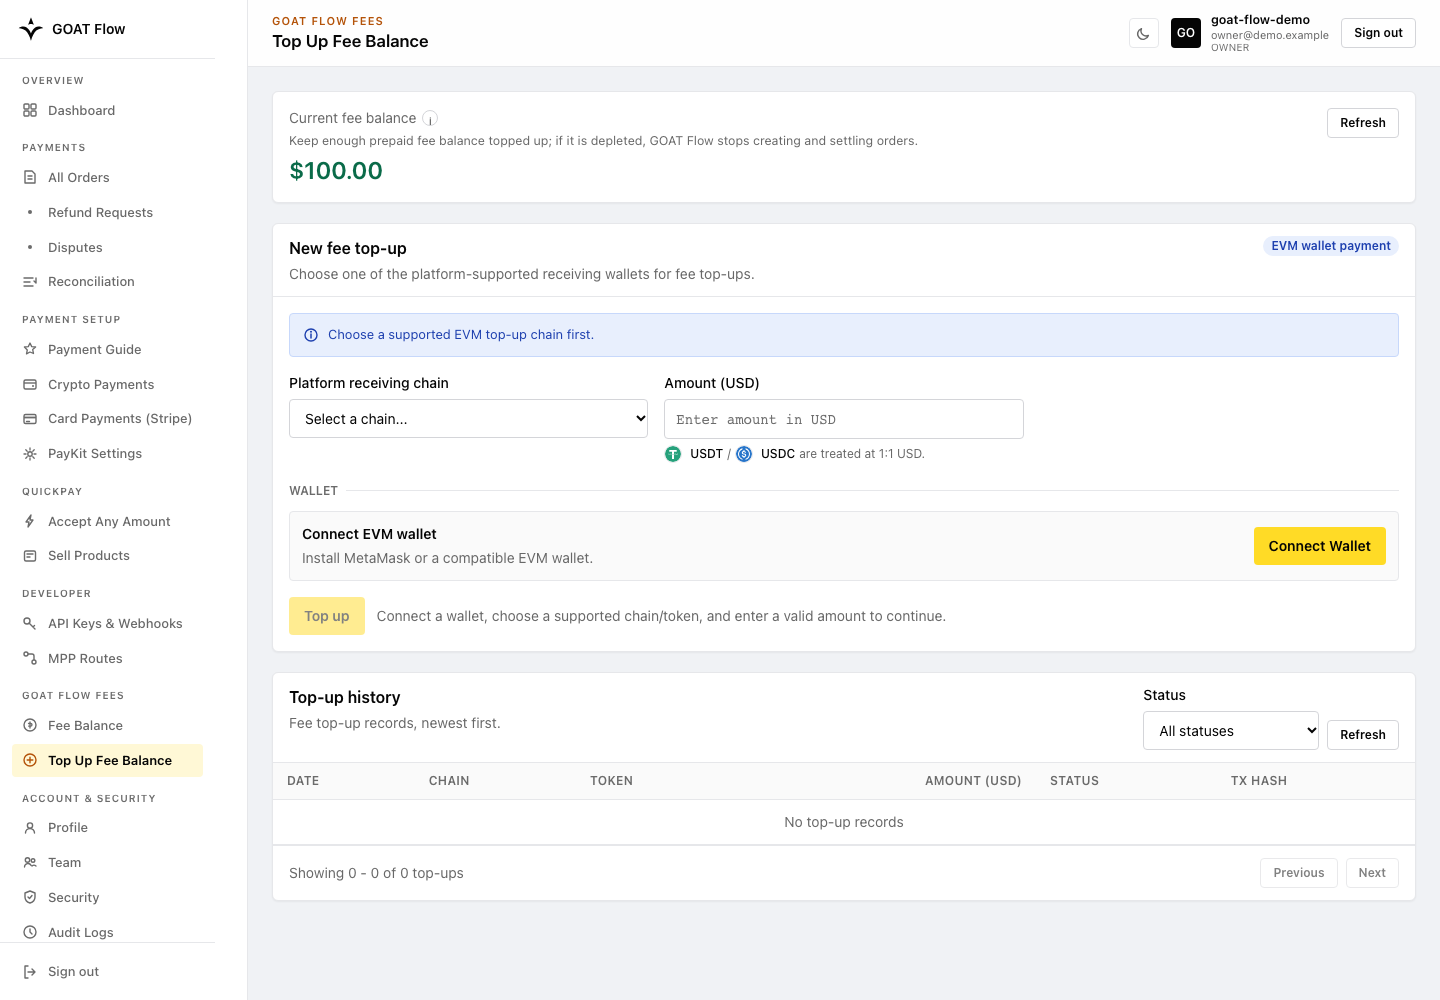
Top-up history can be filtered by PENDING, COMPLETED, EXPIRED, or FAILED.
Confirm the final status and corresponding Fee Balance credit before relying on
a top-up. Do not infer refund or retry behavior from an empty form.
Account & Security
Manage your merchant profile, team access, personal account security, and operation history.
Profile
Open Account & Security → Profile to view your merchant identity and edit business details. Receive type and merchant ID are read-only.
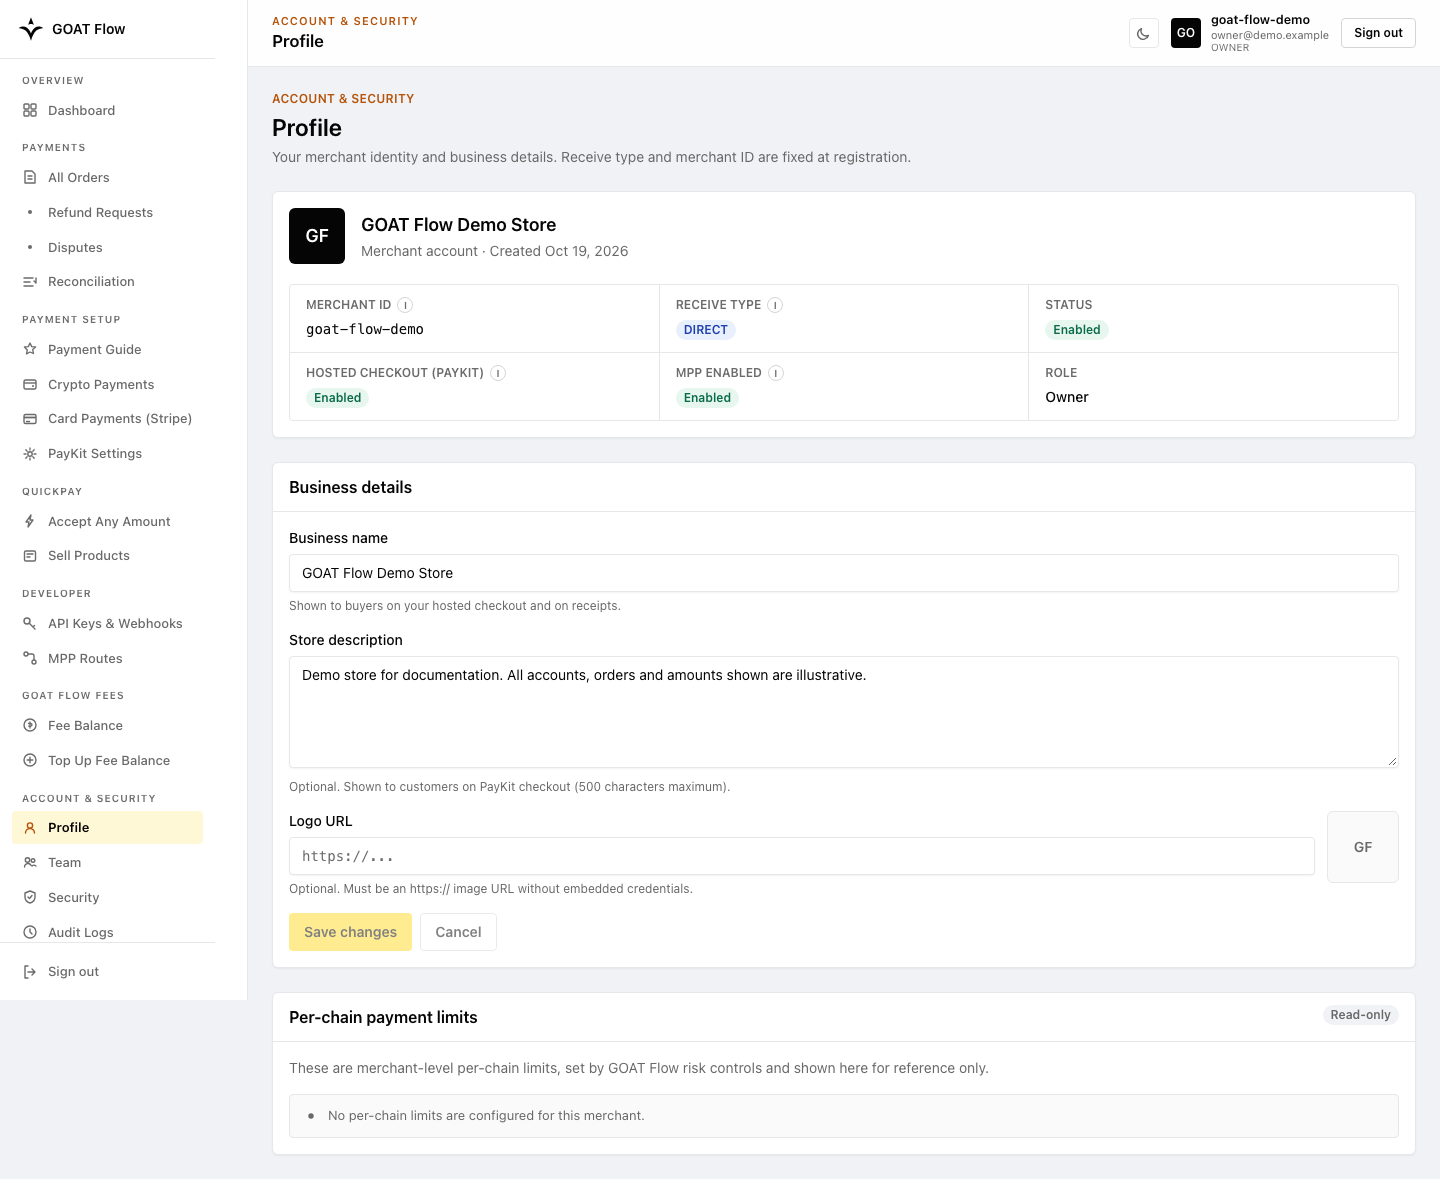
Identity and Capability Flags
The account card shows fixed identity and capability fields:
| Field | Editable | Description |
|---|---|---|
| Merchant ID | No | Set during registration |
| Receive type | No | DIRECT; fixed at registration |
| Status | No | Enabled / Disabled |
| Hosted checkout (PayKit) | No here | Current PayKit master switch; the Owner can change it in Payment Setup → PayKit Settings |
| MPP enabled | No | Whether Paid API Routes (MPP) are enabled |
| Role | No | Owner or Member |
Business Details
| Field | Editable | Description |
|---|---|---|
| Business name | Yes | Shown to buyers on your hosted checkout and on receipts |
| Store description | Yes | Optional description shown on PayKit checkout; up to 500 characters |
| Logo URL | Yes | Optional; must be an https:// image URL without embedded credentials |
Click Save changes after modifications.
Per-Chain Payment Limits
The Per-chain payment limits panel is read-only.
These are merchant-level per-chain limits set by GOAT Flow risk controls and
shown for reference (for example max_frozen_amount_usd,
max_pending_orders).
Team
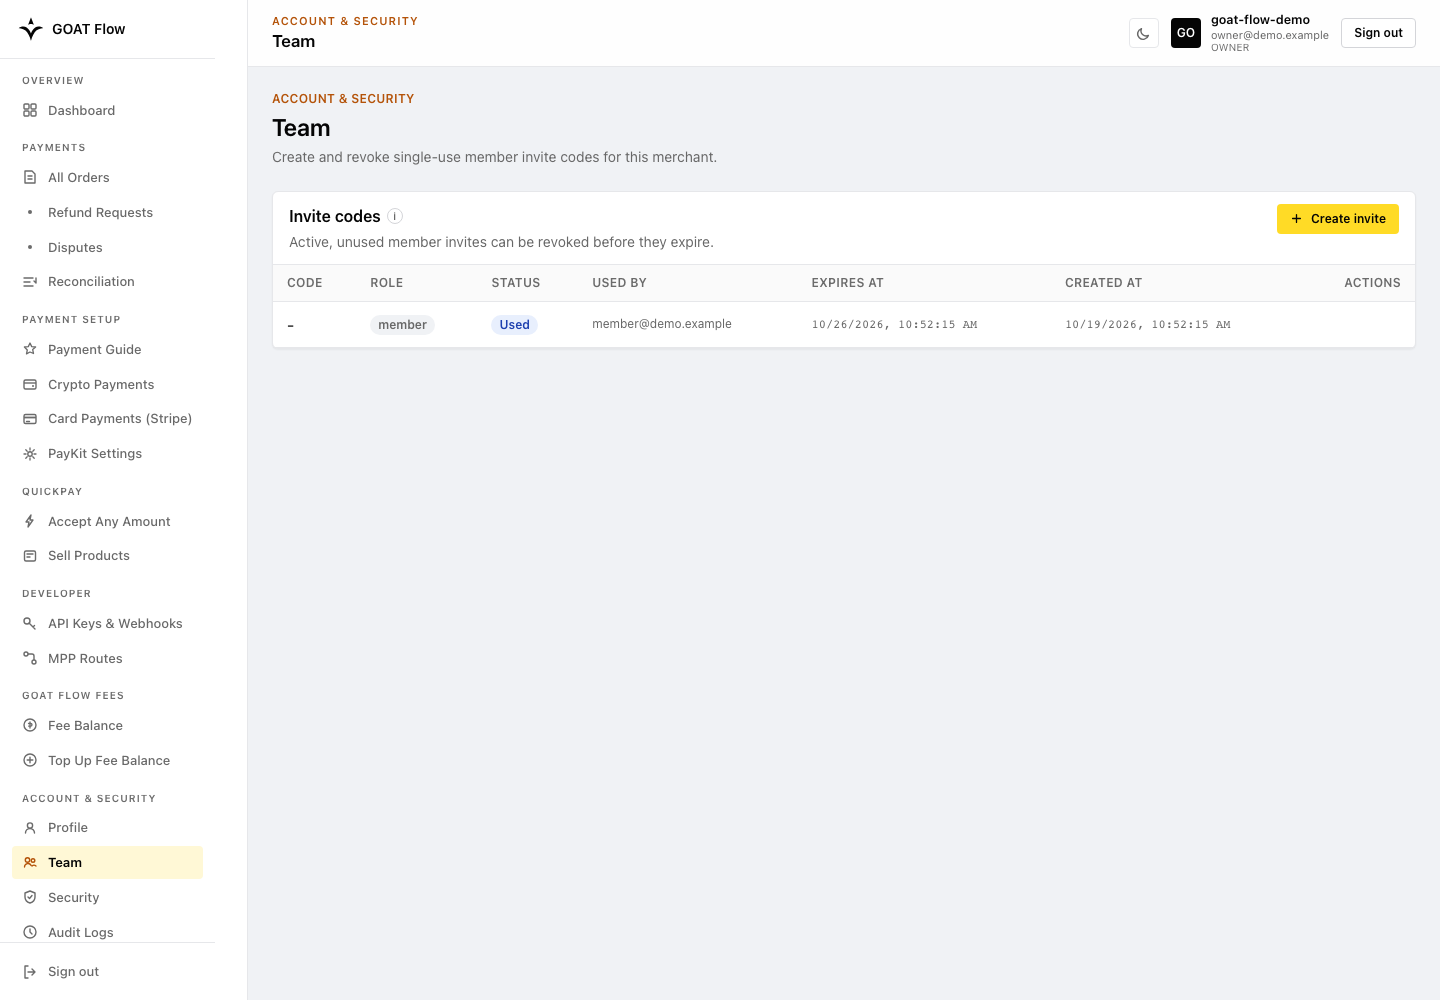
Open Account & Security → Team. Merchant owners create and revoke single-use member invite codes here. Invited members can access operational and billing views plus their own Security page, but owner-only setup pages are hidden.
The invitee accepts the code on the public portal's Use invite tab, which is labeled Join workspace — the same merchant, joined as a member.
Role permissions
The current portal exposes these role permissions. Confirm role enforcement in your target environment before relying on it for sensitive operations.
| Feature | Owner | Member |
|---|---|---|
| View Dashboard | Yes | Yes |
| View Orders | Yes | Yes |
| View Reconciliation | Yes | Yes |
| View Card payment status | Yes | Yes |
| View Refund Requests and Disputes | Yes | Yes |
| Request a refund on an eligible Card order | Yes | No |
| Connect Stripe / resume Card onboarding | Yes | No |
| Access Fee Balance / Top Up Fee Balance | Yes | Yes |
| Manage own password and 2FA | Yes | Yes |
| Modify profile and receiving settings | Yes | No |
| Manage API keys | Yes | No |
| Manage webhooks | Yes | No |
| Manage QuickPay links/products and Activate/Pause PayKit | Yes | No |
| Manage MPP routes | Yes | No |
| Manage Team / Invite Codes | Yes | No |
| View Audit Logs | Yes | No |
Dispute evidence is submitted in the connected account's Stripe Dashboard, not in the Merchant Portal. Stripe account permissions govern access there; portal Owner/Member roles do not grant Stripe Dashboard permissions.
Create an Invite Code
Go to the Team page and click Create invite.
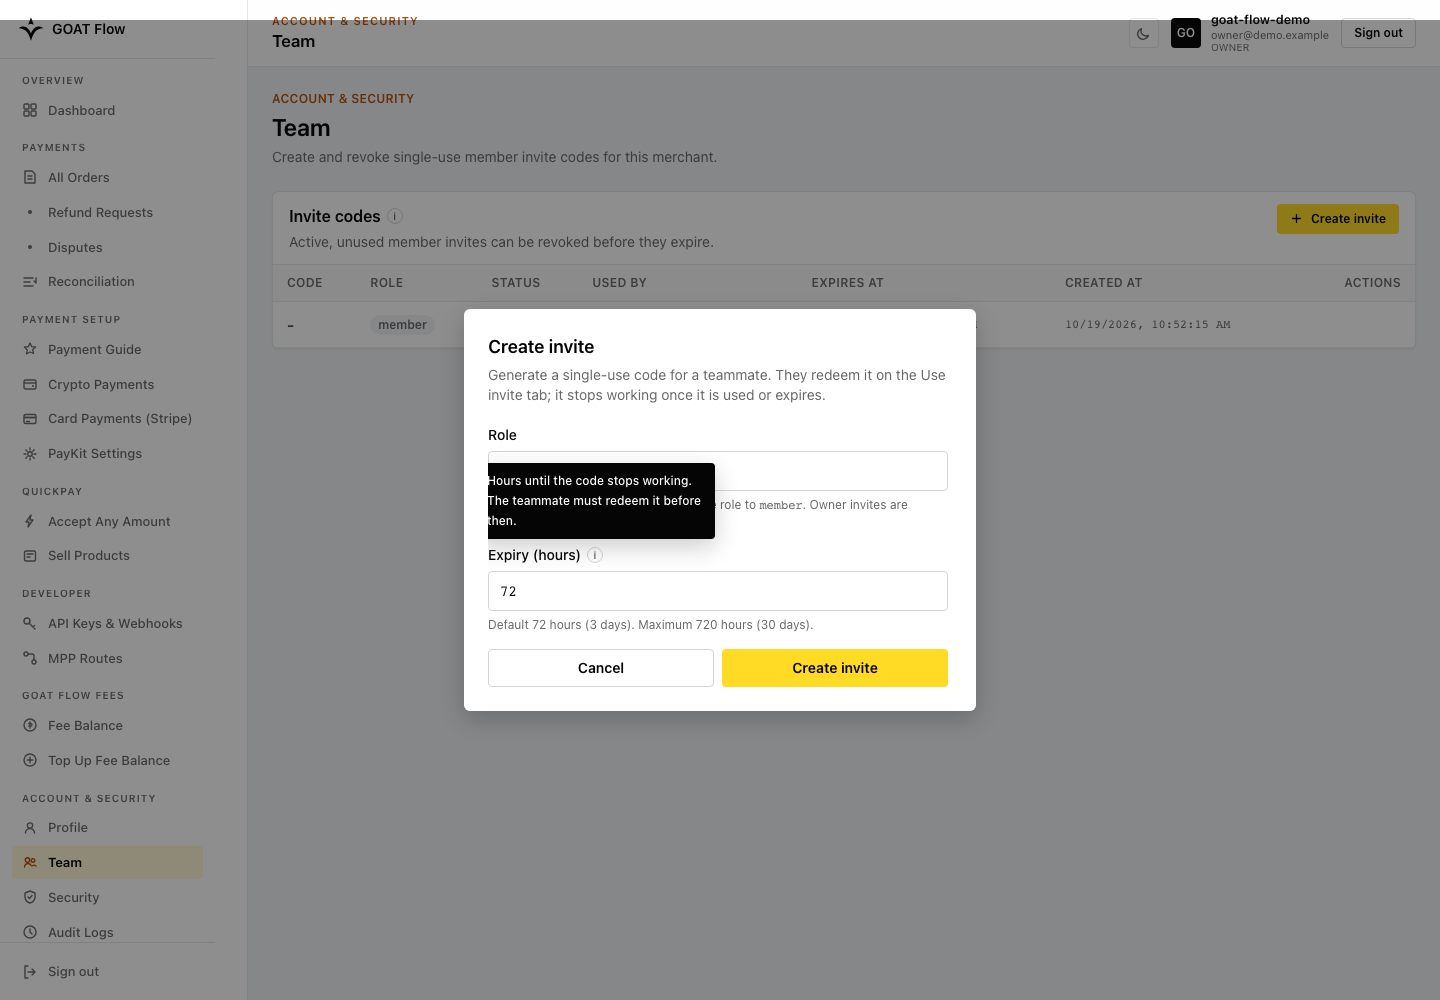
- Owner-created invite codes create
memberusers. - Expiration defaults to 72 hours.
- Expiration may be set up to 720 hours.
- Each invite code is single-use.
The full invite code is shown once. Do not publish it while it is active.
Invitee Registration
The invitee opens the Merchant Portal and uses the Use invite tab (Join workspace).
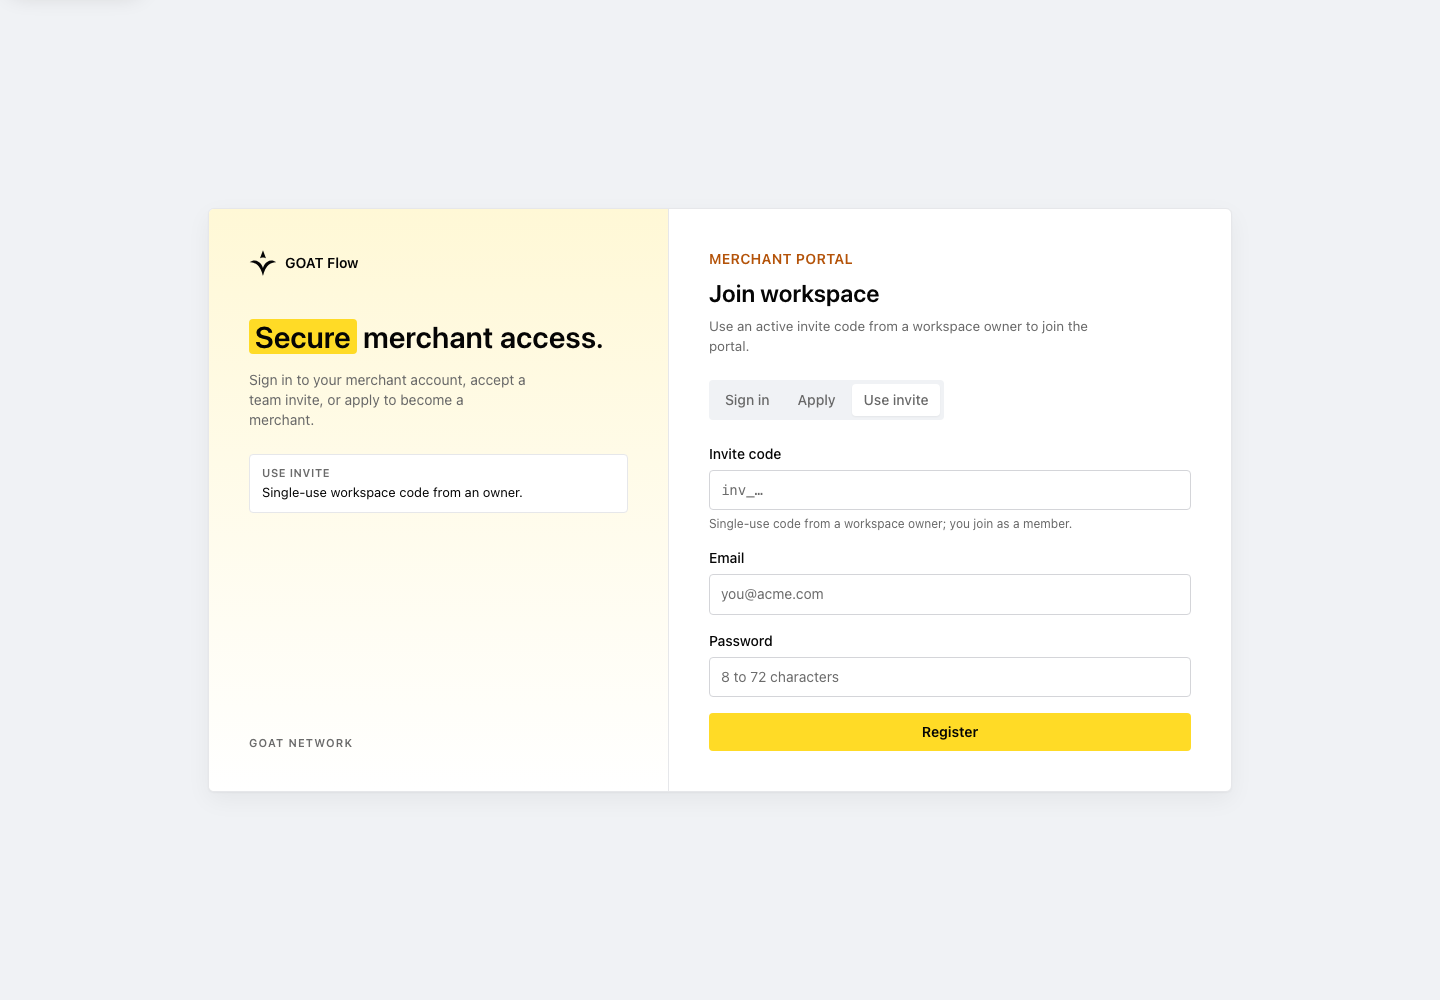
Fill in:
- Invite code - The single-use code provided by the workspace owner (starts with
inv_) - Email - The invitee's email
- Password - A password following the 8 to 72 character rule
The invitee joins as a member. Invite-code registration does not require new merchant approval because the merchant is already approved.
After registration, the member is signed in to the same merchant workspace. Direct navigation to an owner-only page redirects the member back to Security.
The Team table marks a redeemed code as Used and records the member email.
Security
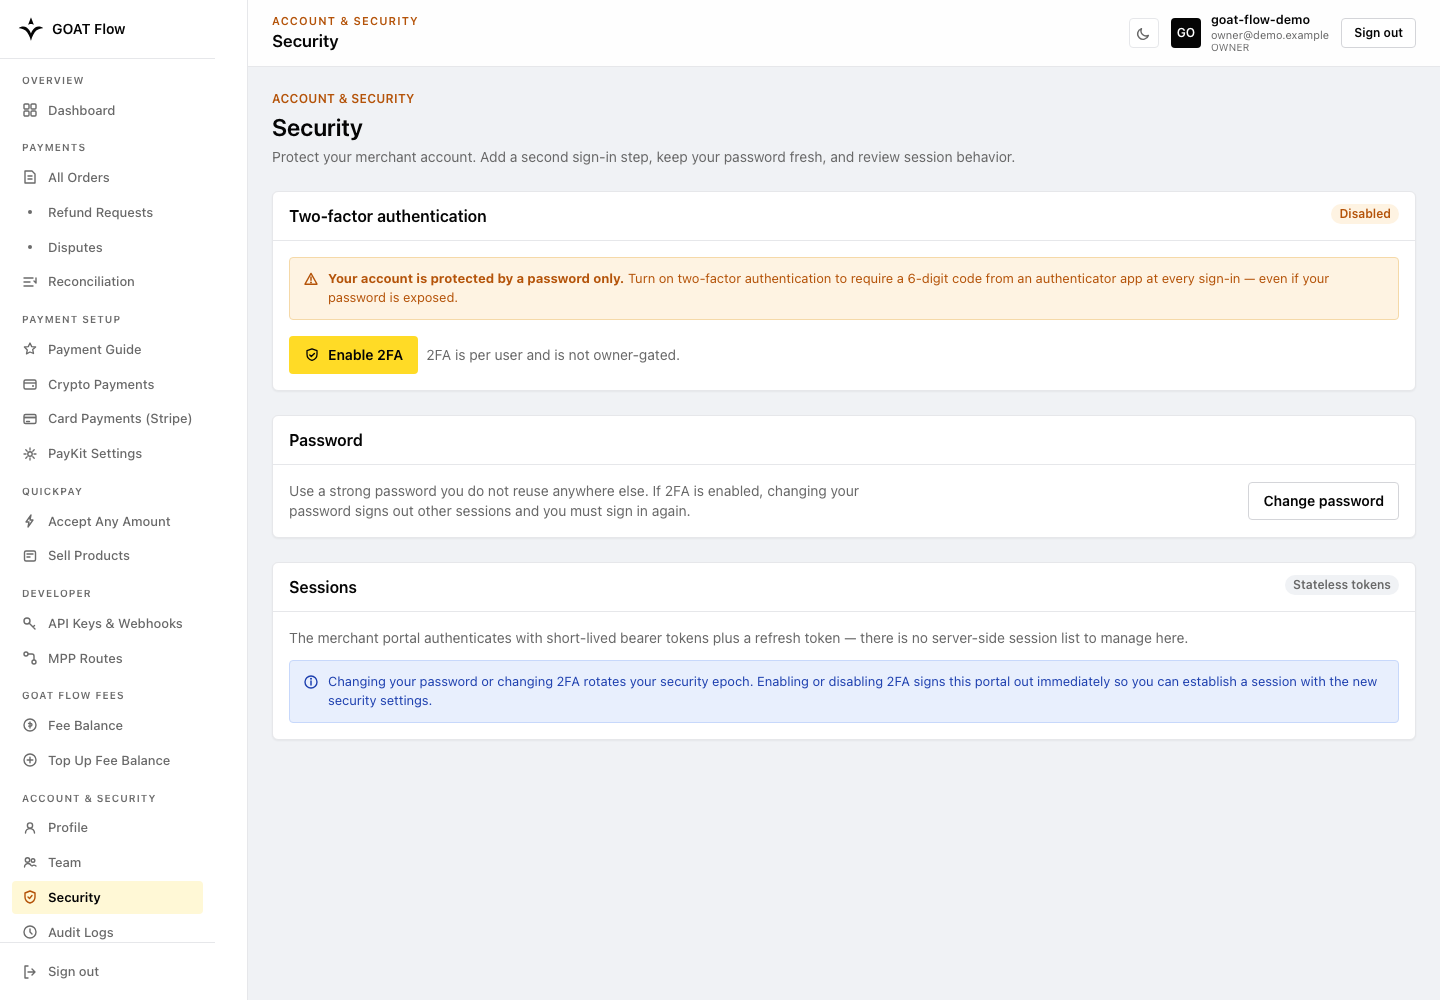
Open Account & Security → Security to manage your own password and two-factor authentication. This page is available to both Owners and Members.
Change Password
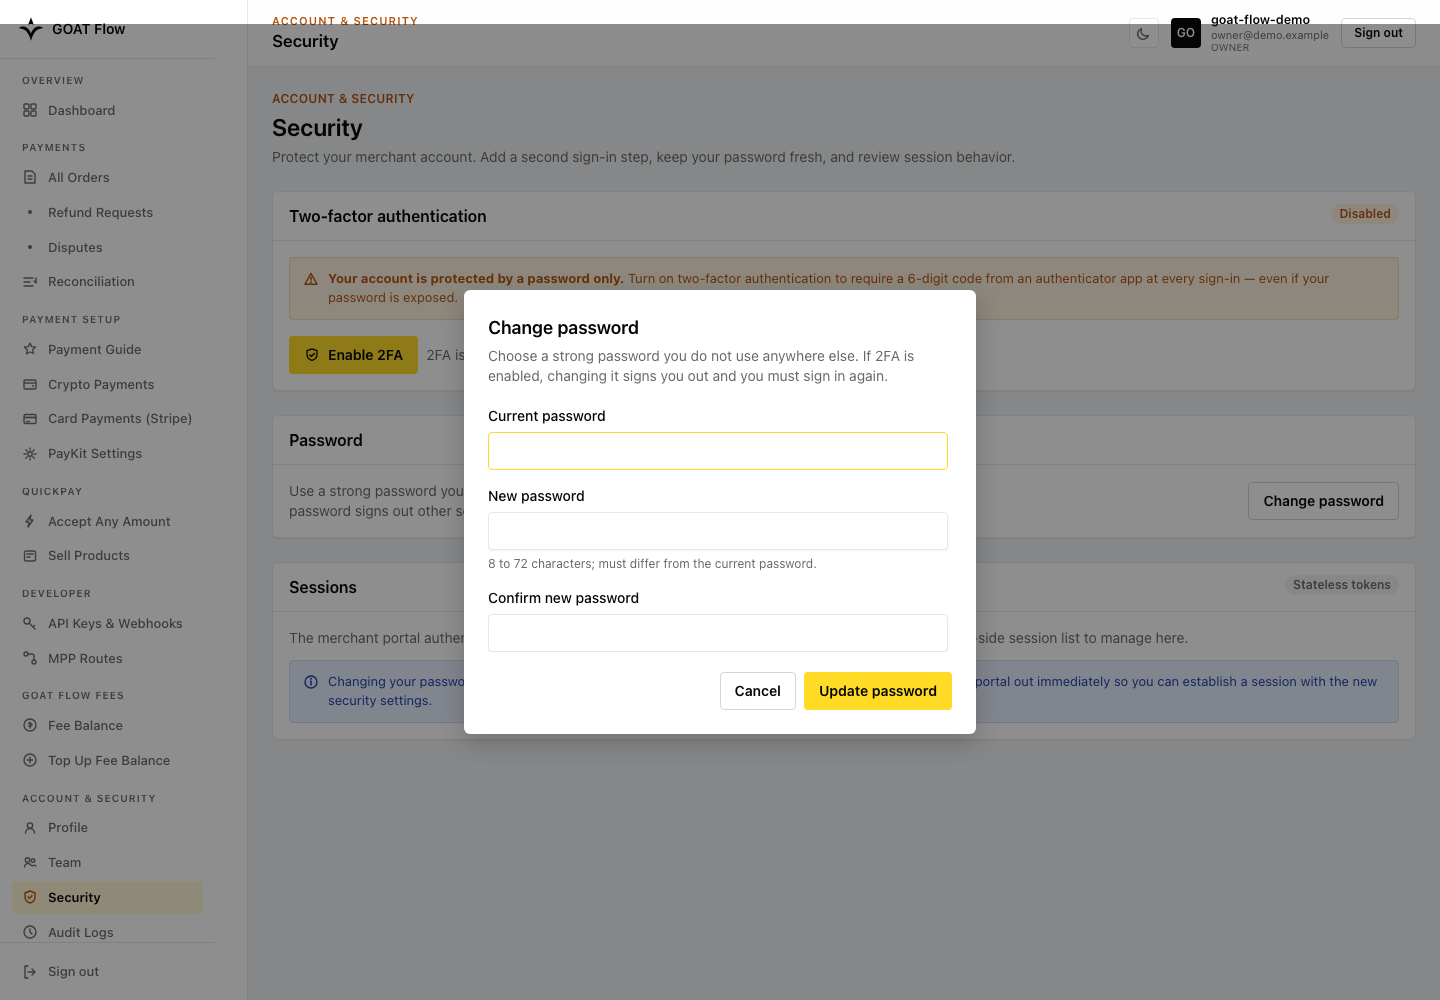
Every authenticated owner or member can open Account & Security → Security and select Change password. The form requires:
- current password
- new password
- confirmation of the new password
The new password must be 8 to 72 characters and must differ from the current password.
Lockout and account-recovery policies can vary. Contact support if self-service recovery is unavailable.
Self-Service 2FA
2FA is per user and not owner-gated. Enroll, confirm, or disable TOTP on the Account & Security → Security page. The account is password-only until 2FA is enabled; after that, every sign-in requires a 6-digit authenticator code.
Store recovery codes securely. They are meant for account recovery if the authenticator is unavailable.
Do not publish screenshots of the enrollment QR code, shared secret, or recovery codes.
Lost Password or Authenticator
If you lose your password or 2FA authenticator and cannot recover with a one-time recovery code, contact GOAT Flow support at Support@goat.network.
Sessions
Portal sessions use short-lived access tokens with refresh sessions. After a password or 2FA change, sign out other sessions where possible and sign in again. Do not rely on a fixed session-expiry or invalidation delay.
Audit Logs
Open Audit Logs to view operation records.
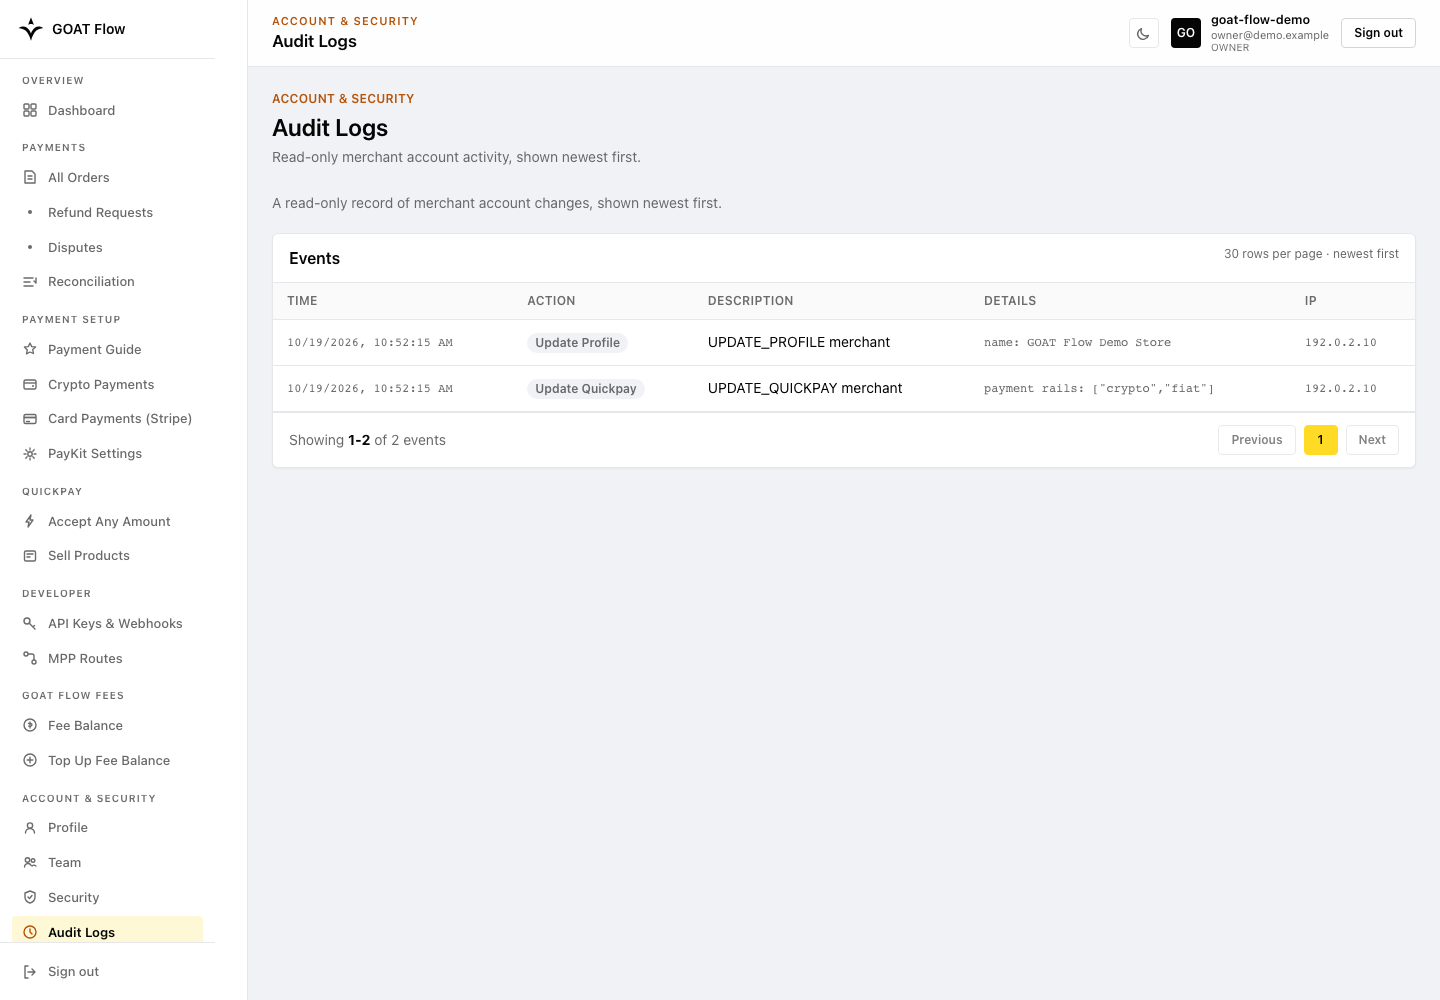
The page is read-only and shows events newest first. The current portal shows 30 rows per page; filter and export availability may vary.
Typical audit events include:
- Profile changes
- Receiving address additions and removals
- Account activation and capability changes
- API key rotation
- Webhook configuration changes
- QuickPay configuration and product changes
- MPP route changes
- Invite code creation and revocation
- Other deployment-defined account actions
Each record contains:
| Field | Description |
|---|---|
| Time | When the action occurred |
| Action | Operation type |
| Description | Human-readable summary |
| Details | Structured action details and changed values |
| IP | Source IP address |
Audit rows may contain addresses, account identifiers, and source IPs. Do not share or publish unredacted audit data.
Go-Live Checklist
Environment
- Production URLs, merchant ID, credentials, wallets, chain/token registry, webhooks, QuickPay/MPP configuration, and fee policy were verified from the live deployment.
- No Testnet3 credential, token contract, wallet, order ID, or callback URL is present in production configuration.
Merchant
- Merchant is approved and enabled.
- For Crypto, receiving addresses are correct for every accepted chain/token pair. For Card, the Stripe account is eligible and the intended LIVE/TEST mode is verified; a Card-only merchant does not need a Crypto wallet.
- Merchant users reviewed password, 2FA, recovery, and role ownership.
- Applicable service-fee requirements are checked; where fee credits are required, the balance and top-up ownership cover expected launch traffic.
Integration
- Merchant API secrets remain backend-only.
- Pricing and payment terms are server/runtime-authoritative.
- Crypto validates chain, payer, recipient, amount, token, and expiry; Card validates currency, amount, order/session association, mode, and payment result.
- API Payments integrations handle HTTP
402challenges where applicable. - Confirmed and failed/cancelled/expired states are handled.
- Authoritative order/session completion or the verified GOAT Flow MPP-profile receipt gates fulfillment; payment confirmation alone is not sufficient for a Card order held from fulfillment.
- Browser checkout callbacks do not unlock fulfillment by themselves.
- Webhook authentication and retry behavior are verified when webhooks are used.
Operational Validation
- Each enabled payment method was tested in the intended test environment.
- Crypto records match the transaction, amount, token, chain, and status. Stripe TEST records are checked in the order/payment details, not revenue or reconciliation; LIVE Card reporting is verified separately under launch controls.
- Error messaging, retry limits, abandoned-order handling, monitoring, escalation, and support ownership were exercised.
- The production configuration and launch record were reviewed by merchant, engineering, and operations owners.
Related references:
Support: Support@goat.network
Continue with SDK Reference or API Reference.